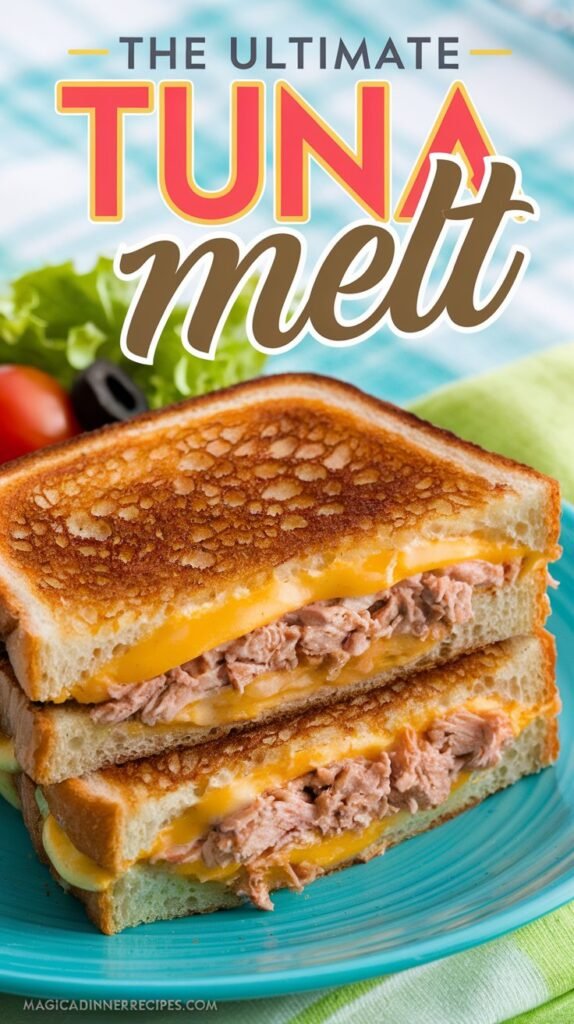
If you’re anything like me, there’s nothing quite as comforting as a warm, melty tuna sandwich on a busy day. I’ve always been a huge fan of tuna—so much so that when there’s a sale, I stock up like there’s no tomorrow. In fact, my daughter’s love for tuna means that I often have a stash of cans hidden away. And when I finally get to make a tuna melt, it’s nothing short of perfection. Today, I’m sharing my ultimate tuna melt recipe—a twist on the classic version that’s become a staple in my weekly meal rotation. Whether it’s a quick lunch for yourself or a satisfying dinner for the family, this recipe is sure to hit the spot.
Why I Love This Tuna Melt
I remember the first time I made a tuna melt that truly impressed me. The mix of perfectly drained tuna, fresh veggies, and just the right amount of mayonnaise came together in a way that was both nostalgic and innovative. It wasn’t your run-of-the-mill tuna sandwich. Instead, it was a gourmet take on a classic that brought out a depth of flavor with every bite. Now, it’s become my go-to recipe for when I need a quick meal that doesn’t compromise on taste.
Ingredients That Make the Magic
Here’s what you’ll need to create this delicious masterpiece:
- Tuna: Two 5-ounce cans, drained (I prefer using a good quality tuna—something that has a light, fresh taste).
- Onion: One medium onion, chopped into small pieces.
- Celery: Half a stalk, finely diced.
- Garlic: One clove, minced (this little addition packs a big punch!).
- Parsley: A tablespoon, chopped to bring a fresh herbaceous note.
- Mayonnaise: About 3 to 4 tablespoons. I like to balance the creaminess with a touch of extra virgin olive oil.
- Extra Virgin Olive Oil: Three tablespoons, divided (using olive oil gives it a healthier edge and helps prevent the bread from burning).
- Mozzarella Cheese: One-third cup, shredded. This is what makes the melt oh-so-gooey!
- Bread: Sliced bread is a must. A hearty panini or even a crusty sourdough works wonderfully.
- Butter: Softened, for spreading on the bread.
- Salt and Black Pepper: To season and bring everything together.
This recipe makes enough for four servings. However, if you’re feeding a crowd with big appetites, you might find it stretches a bit thinner—but trust me, every bite will be worth it.
A Step-by-Step Guide to Tuna Melt Perfection
Step 1: Prepare the Tuna Mixture
Start by opening your tuna cans and draining them well. Place the drained tuna into a medium mixing bowl. The key here is to ensure no extra liquid is left, as that can make your sandwich soggy. Next, add the chopped onion, diced celery, minced garlic, and parsley to the bowl. These fresh ingredients give the tuna a lively crunch and an aromatic flavor that elevates the whole dish.
Mix in 3 to 4 tablespoons of mayonnaise and a splash of extra virgin olive oil. I usually add a bit of olive oil not just for flavor, but to lighten up the consistency a bit. Then, sprinkle in a handful of shredded mozzarella cheese—this is the secret to that ooey-gooey texture when the cheese melts over the hot tuna. Finally, season with salt and pepper to taste, and stir everything together until well combined.
Step 2: Toasting the Bread to Golden Perfection
Now that your tuna mixture is ready, it’s time to prepare your bread. I find that using a non-stick skillet works best for this, but if you have a trusty cast iron skillet, even better! Start by heating your skillet over medium heat and add about a tablespoon of extra virgin olive oil. This helps ensure that the bread gets a nice, even toast without burning too quickly.
While the oil warms up, take your slices of bread and generously spread a thin layer of softened butter on one side of each slice. The butter not only adds flavor but also helps achieve that golden-brown finish we all love.
Place the bread in the skillet with the buttered side facing down. Keep a close eye on it—this isn’t a process to rush. You want the bread to toast slowly, allowing the butter to infuse every nook and cranny.
Step 3: Assembling Your Tuna Melt
Once the bread starts to develop a beautiful golden color, it’s time to add the star of the show—the tuna mixture. Using a spoon, scoop roughly two tablespoons of your prepared tuna salad onto the bread while it’s still in the skillet. The heat from the bread will gently warm the tuna, melding the flavors together.
After placing the tuna mixture on one slice, take another slice of bread and spread butter on its outer side. Place this slice on top of the tuna, ensuring that the buttered side is facing out. This sandwich assembly is key to achieving that perfect melt with a crispy exterior and a soft, savory center.
Step 4: Finishing Up the Melt
Now, let the magic happen. Press down gently on the sandwich with a spatula to help it form a nice, compact shape. Continue to grill the sandwich on one side until the bottom is toasted and golden. Then, carefully flip the entire sandwich over to toast the other side. The goal is a balanced, even crispiness on both sides, while the mozzarella inside becomes deliciously melty and gooey.
For those who prefer an even crispier texture, a press or a sandwich maker like a George Foreman grill can also do the trick. Either way, keep an eye on your tuna melt as it cooks, because you want to avoid over-toasting and drying it out.
Tips and Tweaks to Make It Your Own
I’ve experimented with this recipe in several ways, and here are a few ideas to customize your tuna melt:
- Bread Alternatives: If you’re out of your favorite bread, try using English muffins. They add a different texture and are perfect for a quick breakfast twist.
- Low-Carb Option: For those watching their carbs, consider swapping out the bread for thick slices of tomato. Grill them lightly to create a juicy, savory base.
- Open-Faced Style: Sometimes less is more. Create an open-faced tuna melt by using only one slice of bread, topping it with the tuna mixture, and garnishing with a couple of tomato slices or avocado for that gourmet feel.
- Add-Ins: Feel free to experiment with additional ingredients. A few pickle spears or a dash of mustard can introduce a tangy twist to the classic recipe.
A Note on Healthier Choices
While a tuna melt is inherently a comfort food, I always try to make it a bit healthier where I can. A few drops of extra virgin olive oil, reduced butter usage, or opting for whole grain bread can all contribute to a more nutritious version without sacrificing flavor. And if you’re really particular about the tuna quality, consider opting for wild-caught varieties that are sustainably sourced—they might cost a bit more, but the flavor difference is undeniable.
The Fun and Nostalgia of a Tuna Melt
There’s something undeniably nostalgic about a good tuna melt. It brings back memories of simple lunches and comfort food during busy days. For me, every time I make this sandwich, it’s a little celebration of practicality and flavor. It’s the kind of dish that makes you pause and savor each bite, whether you’re enjoying it solo or sharing it with friends.
If you’re ever in need of a quick yet satisfying meal, I hope this recipe becomes a new favorite in your rotation. Grab those cans of tuna, gather your favorite ingredients, and create a sandwich that’s both heartwarming and irresistibly delicious.
I’d love to hear how you customize your tuna melt! Do you have any special add-ins or unique twists? Share your thoughts and recipes in the comments below. Happy cooking, and here’s to making every meal a little bit more delicious!
How about a delicious cookie recipe to devour after your ultimate tuna melt? Be sure to check out Delicious Cinnamon Roll Cookies Recipe