If you’re planning a wedding or reception and want to impress your guests with some delicious finger foods, this collection of 38 elegant recipes has got you covered. Offering a variety of flavors and styles, these bite-sized treats are perfect for mingling and will elevate your celebration without the hassle of formal dining. From savory to sweet, get ready to explore some delightful options that will keep the party lively and satisfying.
Cucumber Bites with Herbed Cream Cheese
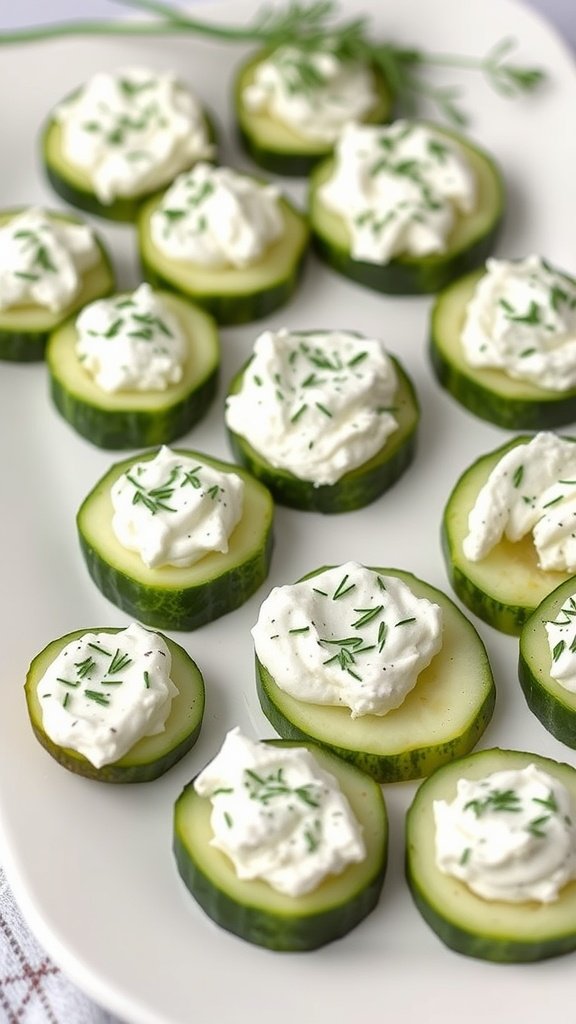
Cucumber bites topped with herbed cream cheese are a delightful addition to any wedding reception or special gathering. These little snacks are fresh, light, and packed with flavor, making them a great choice for finger foods. With their cool crunch and creamy topping, they offer a satisfying contrast that’s sure to please your guests.
Not only are these bites visually appealing, but they are also incredibly easy to prepare. Perfect for those who want to spend less time in the kitchen and more time enjoying the celebration, this recipe is a simple yet elegant choice among the 38 Elegant Finger Foods Recipes for Weddings and Receptions.


Ingredients
- 1 large cucumber
- 8 ounces cream cheese, softened
- 2 tablespoons fresh dill, chopped
- 1 tablespoon chives, chopped
- 1 tablespoon lemon juice
- Salt and pepper to taste
Instructions
- Prepare the Cucumber: Wash the cucumber and slice it into rounds about half an inch thick.
- Make the Cream Cheese Mixture: In a bowl, combine the softened cream cheese, dill, chives, lemon juice, salt, and pepper. Mix until smooth and well-combined.
- Assemble the Bites: Spoon a dollop of the herbed cream cheese onto each cucumber slice.
- Garnish: Sprinkle additional chopped herbs on top for a touch of color and flavor.
- Serve: Arrange the cucumber bites on a platter and serve immediately, or chill in the refrigerator until ready to enjoy.
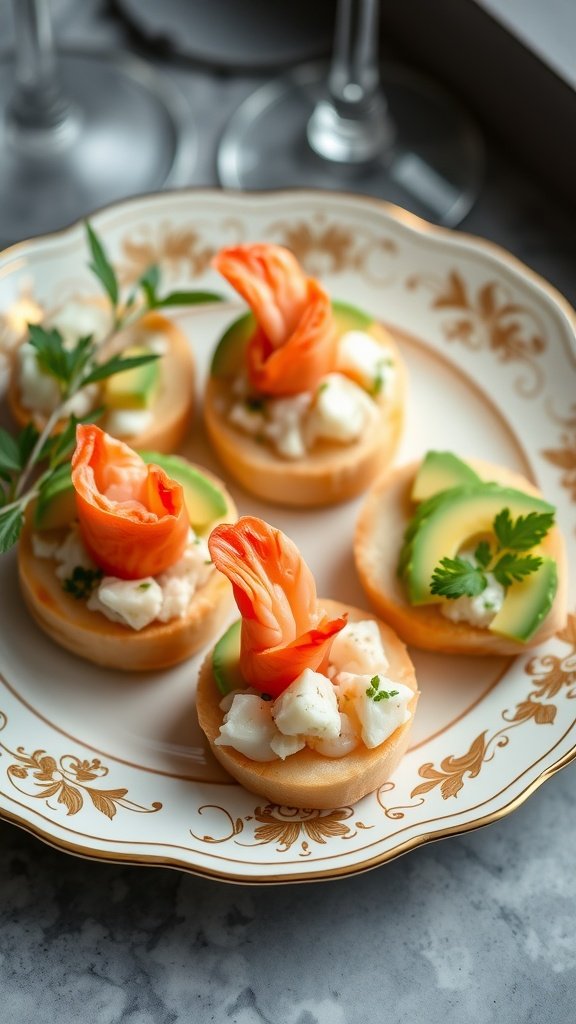
Shrimp Cocktail served in Elegant Glasses

Shrimp cocktail is a classic appetizer that never goes out of style. The combination of fresh, succulent shrimp and zesty cocktail sauce makes for a refreshing bite that’s perfect for any celebration, especially weddings and receptions. This dish is not only delicious but also incredibly easy to prepare, making it a great option for hosts who want to impress their guests without spending hours in the kitchen.
Serving shrimp cocktail in elegant glasses adds a touch of sophistication to your table setting. The vibrant colors and textures make it visually appealing, ensuring it stands out among the other finger foods. Plus, it’s easy for guests to enjoy while mingling, making it a practical choice for any gathering. Here’s how you can make this delightful dish:
Ingredients
- 1 pound large shrimp, peeled and deveined
- 1 cup cocktail sauce
- 1 lemon, cut into wedges
- Fresh parsley for garnish
- Ice for serving
Instructions
- Cook the Shrimp: Bring a large pot of salted water to a boil. Add the shrimp and cook for 2-3 minutes until they are pink and opaque. Drain and immediately transfer to an ice bath to stop the cooking process.
- Prepare the Glasses: Fill elegant glasses with a layer of ice to keep the shrimp chilled. Spoon a generous amount of cocktail sauce into each glass.
- Assemble the Dish: Arrange the cooked shrimp around the rim of each glass, with a few nestled inside. Garnish with lemon wedges and a sprig of parsley.
- Serve: Place the shrimp cocktail on a serving platter and enjoy as your guests mingle. This dish pairs wonderfully with a crisp white wine or a refreshing cocktail.
Antipasto Skewers with Salami and Olives
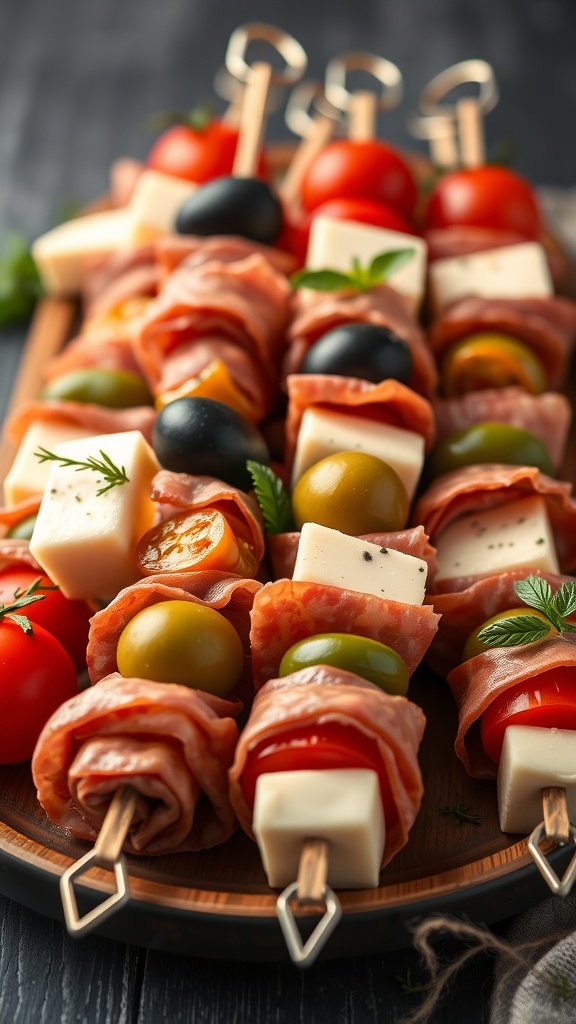
Antipasto skewers are a delightful way to bring the flavors of Italy to your celebration. With a mix of savory salami, creamy cheese, and vibrant olives, these little bites are packed with taste and easy to assemble. Perfect for weddings and receptions, they add a touch of elegance while being simple enough for anyone to prepare.
The combination of ingredients creates a satisfying burst of flavor in every bite, making them a hit at any gathering. Plus, you can customize them with your favorite antipasto items, ensuring they suit everyone’s palate.
Ingredients
- 1 cup cherry tomatoes
- 1 cup mozzarella cheese, cubed
- 1 cup salami, cut into strips
- 1/2 cup green olives
- 1/2 cup black olives
- Fresh basil leaves for garnish
- Skewers
Instructions
- Prepare the Ingredients: Gather all your ingredients and cut the salami into strips and mozzarella into cubes if not pre-cut.
- Assemble the Skewers: On each skewer, thread a cherry tomato, followed by a piece of salami, an olive, and a cube of mozzarella. Repeat until the skewer is filled, leaving a little space at each end for handling.
- Garnish and Serve: Once all skewers are assembled, place them on a serving platter and garnish with fresh basil leaves. Serve immediately or refrigerate until ready to serve.
Bruschetta with Tomato and Basil
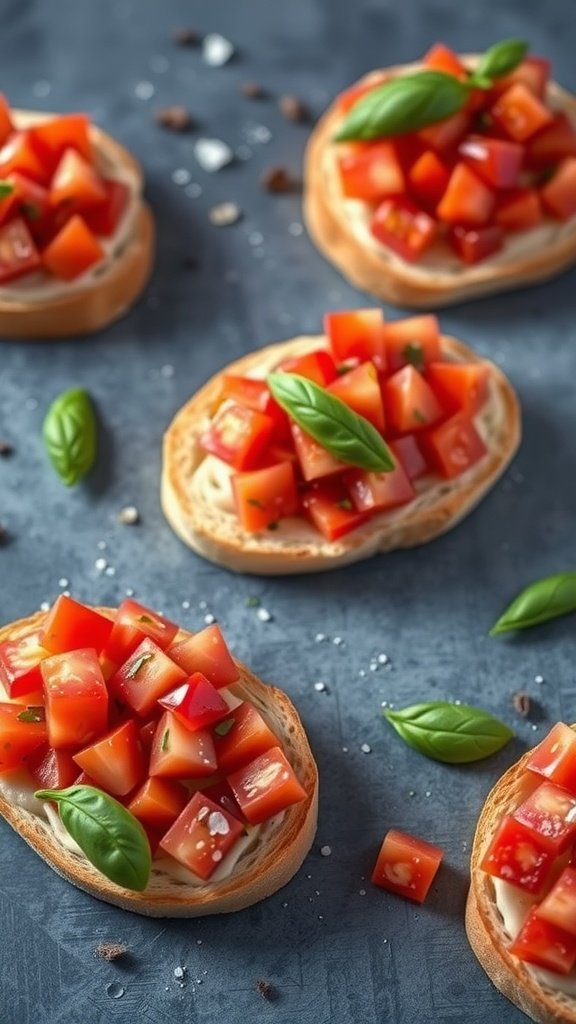
Bruschetta with tomato and basil is a delightful Italian appetizer that combines fresh ingredients for a burst of flavor in every bite. The crunchy toasted bread serves as the perfect base for juicy tomatoes, fragrant basil, and a drizzle of olive oil, making it a simple yet elegant choice for any wedding or reception.
This recipe is not only easy to prepare but also allows you to showcase seasonal produce at its best. With its vibrant colors and refreshing taste, this finger food is sure to impress your guests and add a touch of sophistication to your spread of 38 Elegant Finger Foods Recipes for Weddings and Receptions.
Ingredients
- 1 baguette, sliced into 1/2-inch pieces
- 2 cups ripe tomatoes, diced
- 1/4 cup fresh basil, chopped
- 2 cloves garlic, minced
- 1/4 teaspoon salt
- 1/4 teaspoon black pepper
- 1/4 cup extra virgin olive oil
- 1 tablespoon balsamic vinegar (optional)
Instructions
- Preheat your oven to 400°F (200°C). Arrange the baguette slices on a baking sheet and brush them lightly with olive oil. Toast in the oven for about 5-7 minutes, or until golden and crispy.
- In a mixing bowl, combine the diced tomatoes, chopped basil, minced garlic, salt, pepper, olive oil, and balsamic vinegar if using. Stir gently to mix.
- Once the bread is toasted, remove it from the oven and let it cool slightly. Top each slice with a generous spoonful of the tomato mixture.
- Serve immediately, garnished with extra basil if desired. Enjoy your fresh bruschetta at your elegant event!
Savory Tartlets with Goat Cheese and Fig
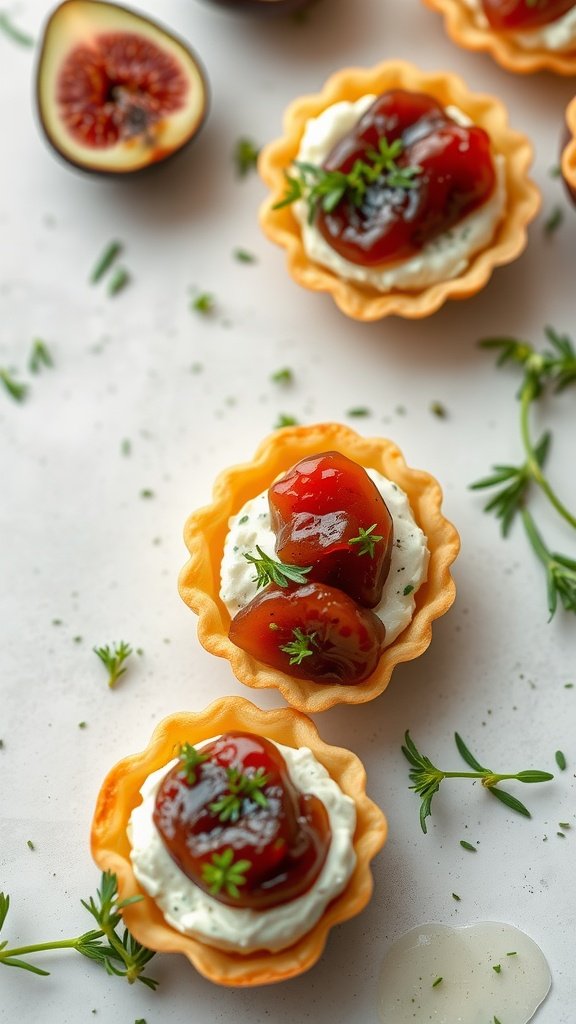
Savory tartlets with goat cheese and fig are a delightful addition to any wedding or reception menu. They perfectly balance creamy and sweet flavors, making them a hit with guests of all ages. Plus, they are surprisingly easy to prepare, allowing you to focus on enjoying the celebration.
These bite-sized treats offer a luxurious taste, thanks to the rich goat cheese paired with the sweetness of figs. The flaky pastry shell adds the perfect crunch, making each bite satisfying. They are not only visually appealing but also versatile enough to be served as an appetizer or part of a larger spread of 38 Elegant Finger Foods Recipes for Weddings and Receptions.
Ingredients
- 1 package of pre-made tartlet shells
- 8 oz goat cheese, softened
- 1/4 cup heavy cream
- 1/4 cup honey
- 1 cup fresh figs, chopped
- 1 tablespoon balsamic glaze
- Fresh thyme for garnish
Instructions
- Preheat your oven to 350°F (175°C). Place the tartlet shells on a baking sheet.
- In a mixing bowl, combine the softened goat cheese and heavy cream. Whip until smooth and creamy.
- Fill each tartlet shell with the goat cheese mixture, smoothing the top with a spatula.
- Top each tartlet with chopped figs and drizzle a small amount of honey over them.
- Bake in the oven for about 10-12 minutes, or until the edges of the tartlet shells are golden brown.
- Remove from the oven and drizzle with balsamic glaze. Garnish with fresh thyme before serving.
Stuffed Mushroom Caps with Garlic and Herbs
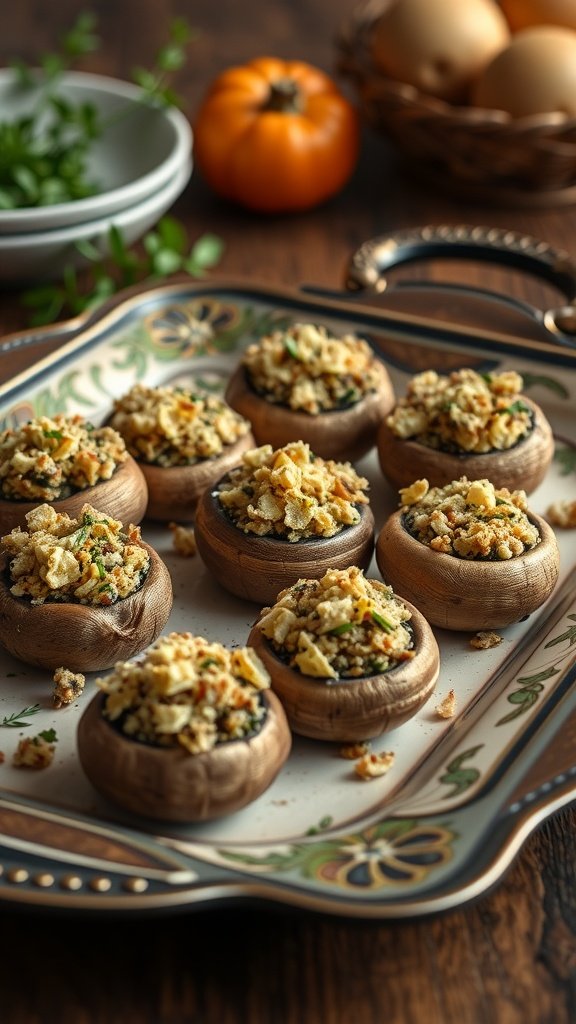
Stuffed mushroom caps make for a delightful finger food that’s perfect for weddings and receptions. They burst with flavor from garlic and fresh herbs, creating a savory bite that guests will love. Plus, they’re quite simple to whip up, making them an ideal choice for any occasion.
The earthy taste of mushrooms pairs beautifully with the aromatic filling, which often includes breadcrumbs and cheese for added texture. These bite-sized treats are not only visually appealing, but they also offer a comforting taste that is sure to impress your guests at any gathering.
Ingredients
- 12 large mushroom caps
- 1 cup breadcrumbs
- 2 cloves garlic, minced
- 1/4 cup grated Parmesan cheese
- 1/4 cup fresh parsley, chopped
- 1 tablespoon olive oil
- Salt and pepper to taste
- 1 teaspoon dried oregano
Instructions
- Preheat the oven to 375°F (190°C).
- Clean the mushroom caps and remove the stems. Finely chop the stems and set aside.
- In a skillet, heat the olive oil over medium heat. Add the chopped mushroom stems and minced garlic, sautéing until softened.
- In a mixing bowl, combine the sautéed mixture with breadcrumbs, Parmesan cheese, parsley, oregano, salt, and pepper.
- Fill each mushroom cap generously with the stuffing mixture.
- Place the stuffed mushrooms on a baking sheet and bake for about 20 minutes, or until golden brown.
- Let cool slightly before serving. Enjoy your delicious stuffed mushroom caps!
Mini Beef Wellington Bites
Mini Beef Wellington Bites are a delightful twist on the classic dish, making them perfect for elegant gatherings like weddings and receptions. These bite-sized treats combine tender beef with rich flavors, all encased in flaky pastry. They’re not just tasty; they also add a touch of sophistication to any spread.
While the idea of making Beef Wellington might sound intimidating, these mini versions are surprisingly simple to prepare. They deliver all the deliciousness of the original without the fuss. Pair them with a savory dipping sauce for an extra kick, and watch them disappear from the platter!
Ingredients
- 1 pound beef tenderloin, cut into small cubes
- 1 tablespoon olive oil
- 1 cup mushrooms, finely chopped
- 1/4 cup shallots, minced
- 2 cloves garlic, minced
- 1 tablespoon Dijon mustard
- 1 package puff pastry, thawed
- 1 egg, beaten (for egg wash)
- Salt and pepper to taste
- Your choice of dipping sauce
Instructions
- Prepare the Beef: In a large skillet, heat olive oil over medium-high heat. Add the beef cubes, season with salt and pepper, and sear until browned. Remove from the pan and set aside.
- Cook the Filling: In the same skillet, add mushrooms, shallots, and garlic. Cook until the mushrooms are browned and moisture has evaporated. Stir in the Dijon mustard, then mix in the beef.
- Assemble the Bites: Roll out puff pastry on a floured surface and cut into squares. Place a spoonful of the beef mixture in the center of each square. Fold the pastry over and seal the edges.
- Brush with Egg Wash: Place the bites on a baking sheet lined with parchment paper and brush the tops with the beaten egg for a golden finish.
- Bake: Preheat your oven to 400°F (200°C) and bake the bites for about 15-20 minutes, or until golden brown.
Mini Caprese Skewers with Balsamic Drizzle
Mini Caprese skewers are a delightful, bite-sized version of the classic Italian salad, combining fresh mozzarella, juicy cherry tomatoes, and fragrant basil. The addition of a balsamic drizzle elevates the flavors, bringing a sweet and tangy note that pairs beautifully with the creamy cheese and the freshness of the herbs. These skewers are not only tasty but also incredibly simple to make, making them an ideal choice among the 38 elegant finger foods recipes for weddings and receptions.
Perfect for any gathering, these mini skewers are as pleasing to the eye as they are to the palate. They require minimal preparation and allow your guests to enjoy a burst of flavor in every bite. Whether you’re hosting a wedding reception or a casual get-together, these Caprese skewers will surely impress!
Ingredients
- 24 cherry tomatoes
- 24 small mozzarella balls (bocconcini)
- 24 fresh basil leaves
- 1/2 cup balsamic glaze
- Salt and pepper to taste
- 24 wooden skewers or toothpicks
Instructions
- Assemble the Skewers: On each skewer, thread one cherry tomato, followed by a basil leaf, and then a mozzarella ball. Repeat this pattern until the skewer is filled, leaving a bit of space at each end.
- Season: Once all the skewers are assembled, drizzle them with balsamic glaze and season with salt and pepper to taste.
- Serve: Arrange the skewers on a serving platter and enjoy them fresh. These are best served immediately but can be made a few hours in advance and stored in the fridge.
Spanakopita with Spinach and Feta

Spanakopita is a delightful Greek pastry that combines flaky phyllo dough with a rich filling of spinach and feta cheese. This elegant finger food is not only flavorful but also simple to prepare, making it a great addition to any wedding reception or special occasion. The savory blend of ingredients creates a satisfying bite that guests will love.
With its crispy exterior and creamy filling, spanakopita is perfect for mingling and can be enjoyed warm or at room temperature. Its appealing presentation and delicious taste make it a standout choice among the 38 elegant finger foods recipes for weddings and receptions.
Ingredients
- 1 pound fresh spinach, washed and chopped
- 1 cup feta cheese, crumbled
- 1 small onion, finely chopped
- 2 cloves garlic, minced
- 2 tablespoons olive oil
- 1 teaspoon dried dill
- 1/2 teaspoon salt
- 1/4 teaspoon black pepper
- 1 package phyllo dough, thawed
- 1/2 cup melted butter
Instructions
- Preheat the oven to 375°F (190°C).
- In a skillet, heat olive oil over medium heat. Add the chopped onion and garlic, cooking until softened. Stir in the spinach and cook until wilted. Remove from heat and let cool.
- In a bowl, mix the cooled spinach mixture with feta cheese, dill, salt, and pepper.
- Lay out one sheet of phyllo dough and brush lightly with melted butter. Layer another sheet on top, brushing again. Cut the stack into strips about 3 inches wide.
- Place a tablespoon of the spinach filling at one end of each strip. Fold the corner over to create a triangle shape, then continue folding to the end of the strip, sealing in the filling. Brush the tops with more melted butter.
- Arrange the triangles on a baking sheet and bake for 25-30 minutes until golden brown. Serve hot or at room temperature.
Mini Quiches with Asparagus and Cheese
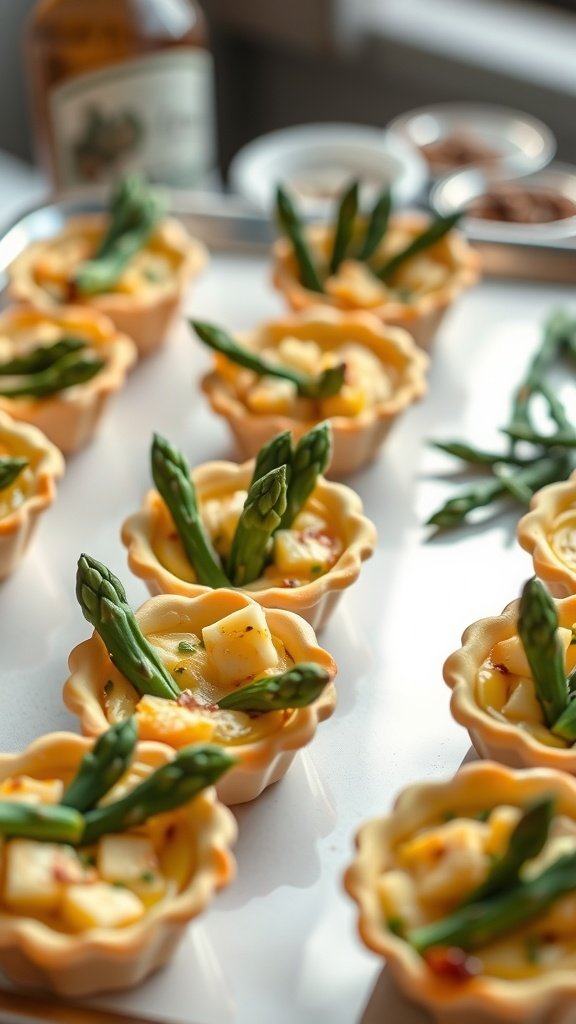
Mini quiches with asparagus and cheese are a delightful addition to any wedding or reception. These bite-sized treats combine the creamy richness of cheese with the fresh, earthy flavor of asparagus, making them both savory and satisfying. They’re simple to prepare and can be made ahead of time, allowing you to focus on other aspects of your event.
These quiches are versatile; you can easily customize them with different vegetables or cheeses to suit your taste. Whether served as an appetizer or part of a larger finger food spread, they are sure to please your guests at any celebration. Here’s how to make them:
Ingredients
- 1 pre-made pie crust or puff pastry
- 1 cup asparagus, chopped
- 1 cup shredded cheese (cheddar, feta, or your choice)
- 4 large eggs
- 1 cup milk or cream
- Salt and pepper to taste
- 1 tablespoon olive oil
- Optional: chopped herbs (like chives or parsley)
Instructions
- Preheat your oven to 375°F (190°C).
- Roll out the pie crust or puff pastry and cut it into small circles to fit into a muffin tin. Press the circles into the tin.
- In a skillet, heat olive oil over medium heat and sauté the chopped asparagus until tender, about 3-4 minutes. Remove from heat.
- In a mixing bowl, whisk together the eggs and milk. Season with salt, pepper, and any optional herbs.
- Evenly distribute the cooked asparagus and shredded cheese among the pastry cups. Pour the egg mixture over the top until just full.
- Bake for 20-25 minutes or until the quiches are set and lightly golden on top. Let them cool slightly before serving.
Sweet Potato Rounds with Avocado

Sweet Potato Rounds with Avocado are a delightful combination of flavors and textures, making them an ideal finger food for weddings and receptions. The creamy avocado pairs beautifully with the naturally sweet and earthy notes of roasted sweet potatoes. Plus, they are simple to prepare, allowing you to impress your guests without spending hours in the kitchen.
This elegant appetizer is not only visually appealing but also packed with nutrients. The sweetness of the potato complements the rich creaminess of the avocado, while a sprinkle of seeds adds a pleasant crunch. It’s a delicious and healthy option that everyone will love!
Ingredients
- 2 large sweet potatoes
- 2 ripe avocados
- 1 tablespoon olive oil
- Salt and pepper to taste
- 1 tablespoon sesame seeds
- 1 tablespoon pumpkin seeds
Instructions
- Preheat the oven to 400°F (200°C). Cut the sweet potatoes into 1/2-inch thick rounds and place them on a baking sheet.
- Drizzle with olive oil and season with salt and pepper. Bake for 25-30 minutes, flipping halfway through, until they are tender and lightly browned.
- While the sweet potatoes are baking, mash the avocados in a bowl and season with salt and pepper.
- Once the sweet potatoes are done, let them cool slightly. Top each round with a generous scoop of the mashed avocado.
- Sprinkle with sesame and pumpkin seeds before serving. Enjoy this delightful finger food at your next gathering!
Buffalo Cauliflower Bites with Blue Cheese Dip
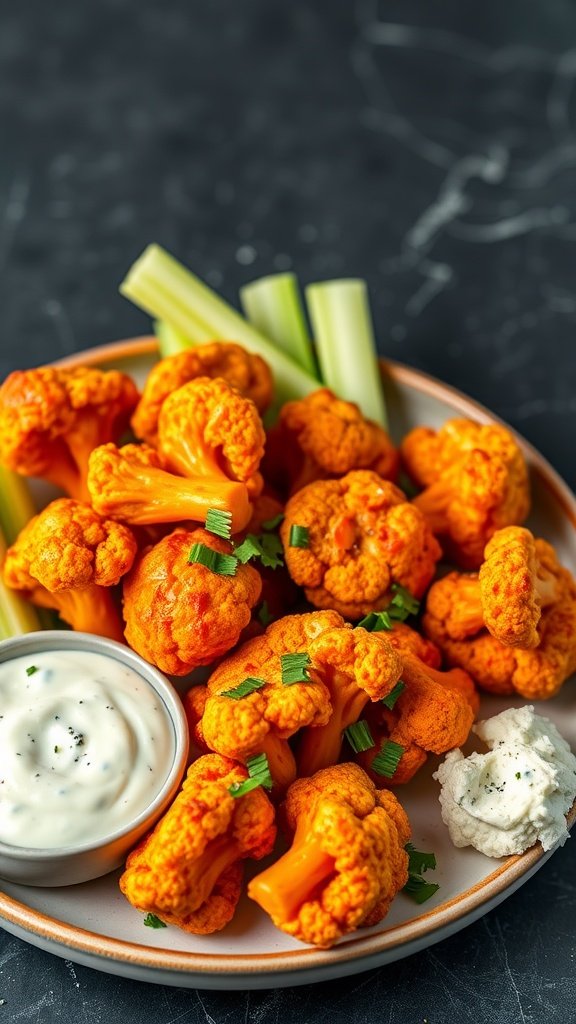
Buffalo cauliflower bites are the ultimate finger food for any celebration, especially when it comes to weddings and receptions. These spicy, crispy bites pack a punch of flavor while being a delightful vegetarian option. The combination of the smoky buffalo sauce and creamy blue cheese dip creates a balance that everyone, even non-vegetarians, will love.
Making buffalo cauliflower bites is straightforward and requires only a few ingredients. Roast the cauliflower until it’s golden and crispy, toss it in buffalo sauce, and serve with a side of blue cheese dip. It’s a simple yet impressive dish that’s perfect for mingling guests at your event.
Ingredients
- 1 large head of cauliflower, cut into bite-sized florets
- 1 cup all-purpose flour
- 1 cup water
- 1 teaspoon garlic powder
- 1 teaspoon onion powder
- 1 teaspoon salt
- 1 cup buffalo sauce
- 2 tablespoons olive oil
- 1/2 cup blue cheese, crumbled
- 1/2 cup sour cream
- 1 tablespoon lemon juice
- 1 tablespoon fresh chives, chopped (for garnish)
Instructions
- Preheat your oven to 450°F (230°C) and line a baking sheet with parchment paper.
- In a large bowl, whisk together flour, water, garlic powder, onion powder, and salt until smooth.
- Dip each cauliflower floret into the batter and place on the prepared baking sheet.
- Bake for 20-25 minutes or until golden and crispy, flipping halfway through.
- In a separate bowl, combine the baked cauliflower with buffalo sauce and olive oil, tossing to coat well.
- Return the sauced cauliflower to the oven for an additional 10 minutes to set the sauce.
- For the blue cheese dip, mix together crumbled blue cheese, sour cream, and lemon juice in a small bowl.
- Serve the buffalo cauliflower bites warm, garnished with chopped chives, alongside the blue cheese dip.
Prosciutto-Wrapped Asparagus
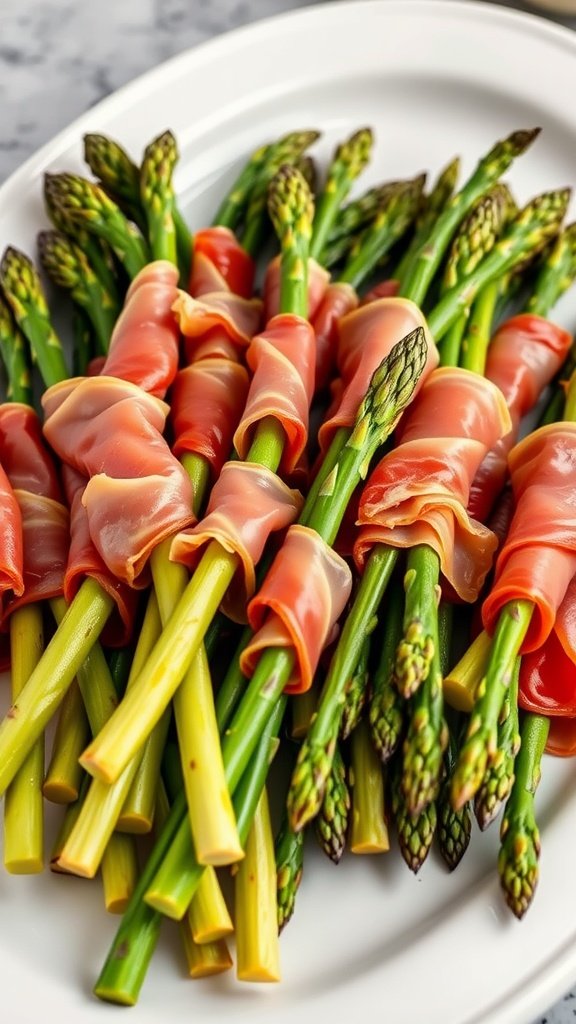
Prosciutto-wrapped asparagus is a delightful combination of savory and fresh flavors, making it an excellent finger food for weddings and receptions. The saltiness of the prosciutto pairs beautifully with the crisp, tender asparagus, creating a snack that’s both elegant and satisfying. This dish is not only delicious but also easy to prepare, making it perfect for those looking to impress without spending hours in the kitchen.
Whether served warm or at room temperature, these bites are sure to be a hit with guests. Plus, with just a few ingredients, you can whip up a platter that adds a touch of sophistication to your event. Here’s how to make this simple yet elegant dish:
Ingredients
- 1 pound fresh asparagus spears
- 8 ounces prosciutto, thinly sliced
- 2 tablespoons olive oil
- Freshly cracked black pepper, to taste
- Grated Parmesan cheese (optional)
Instructions
- Preheat the oven to 400°F (200°C).
- Trim the woody ends off the asparagus spears and place them in a bowl.
- Drizzle the olive oil over the asparagus and toss to coat evenly. Season with black pepper.
- Wrap each asparagus spear with a slice of prosciutto, starting at the bottom and spiraling up the spear until it is covered.
- Place the wrapped asparagus on a baking sheet and bake for about 10-15 minutes, or until the prosciutto is crispy.
- If desired, sprinkle grated Parmesan cheese on top before serving. Enjoy your elegant finger food!
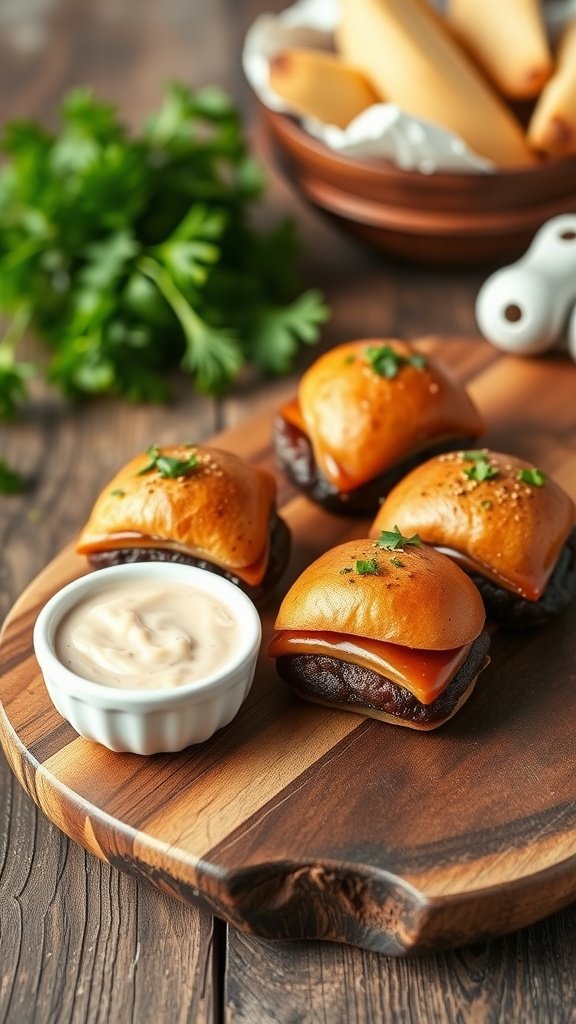
Pork Tenderloin Sliders with Slaw
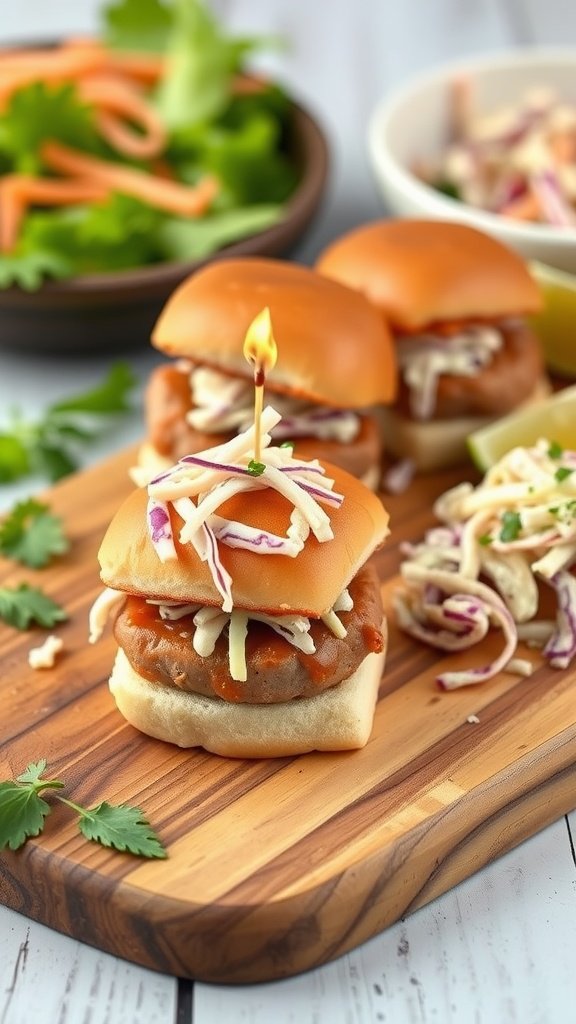
These Pork Tenderloin Sliders are a delightful twist on traditional sandwiches, making them a perfect choice for elegant finger foods at weddings and receptions. The tender, juicy pork pairs beautifully with a crunchy slaw, providing a balance of flavors and textures that everyone will love. Plus, they’re easy to prepare, ensuring you can enjoy the party just as much as your guests!
With a hint of sweetness from the pork and a zesty crunch from the slaw, each bite is satisfying and fun. These sliders hold well, making them ideal for serving in a buffet style. Your guests will appreciate the thoughtful combination of flavors and the convenience of a bite-sized meal. Here’s how to make them:
Ingredients
- 1 lb pork tenderloin
- 1 tablespoon olive oil
- 1 teaspoon garlic powder
- 1 teaspoon paprika
- Salt and pepper to taste
- 12 slider buns
- 1 cup coleslaw mix
- 1/4 cup mayonnaise
- 1 tablespoon apple cider vinegar
- 1 tablespoon honey
- 1/2 teaspoon celery seed
Instructions
- Season the Pork: Preheat your oven to 375°F (190°C). Rub the pork tenderloin with olive oil, garlic powder, paprika, salt, and pepper. Place it on a baking sheet.
- Cook the Pork: Roast the pork in the preheated oven for 25-30 minutes, or until the internal temperature reaches 145°F (63°C). Remove from the oven and let it rest for 10 minutes before slicing.
- Prepare the Slaw: In a mixing bowl, combine the coleslaw mix, mayonnaise, apple cider vinegar, honey, and celery seed. Toss until well combined.
- Assemble the Sliders: Slice the pork tenderloin into thin pieces. Place a piece of pork on each slider bun, top with a generous spoonful of slaw, and close the bun.
- Serve: Arrange the sliders on a serving platter and enjoy!
Mediterranean Hummus with Pita Chips
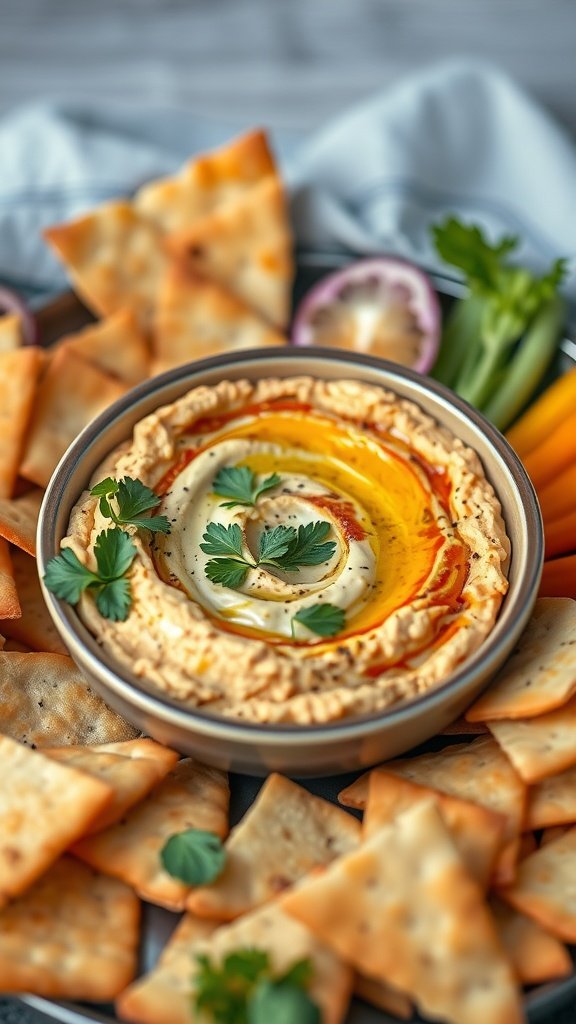
Mediterranean Hummus is a delightful blend of creamy textures and vibrant flavors, making it a perfect addition to any gathering, especially weddings and receptions. With its rich taste from tahini and garlic, this hummus pairs wonderfully with crunchy, freshly baked pita chips. It’s simple to make, requiring just a few ingredients, and is sure to be a hit with guests who appreciate a lighter, healthier snack option.
This recipe not only elevates your appetizer spread but also adds a touch of elegance to your menu. The contrast of creamy hummus and crispy pita chips creates a satisfying experience for your guests. Plus, it can be whipped up in no time, allowing you to focus on other preparations for your special day!
Ingredients
- 1 can (15 oz) chickpeas, drained and rinsed
- 1/4 cup tahini
- 2 tablespoons olive oil
- 2 tablespoons lemon juice
- 1 clove garlic, minced
- 1/2 teaspoon ground cumin
- Salt and pepper to taste
- Water, as needed for consistency
- Pita bread, cut into triangles for chips
- Optional: paprika and fresh parsley for garnish
Instructions
- Blend the Ingredients: In a food processor, combine the chickpeas, tahini, olive oil, lemon juice, garlic, cumin, salt, and pepper. Blend until smooth, adding water as needed to reach your desired consistency.
- Prepare the Pita Chips: Preheat your oven to 400°F (200°C). Arrange the pita triangles on a baking sheet, brush lightly with olive oil, and sprinkle with salt. Bake for about 10-12 minutes until golden and crispy.
- Serve: Transfer the hummus to a serving bowl, drizzle with a bit of olive oil, and sprinkle paprika and fresh parsley on top for a pop of color. Serve with warm pita chips and enjoy!
Feta and Spinach Stuffed Peppers
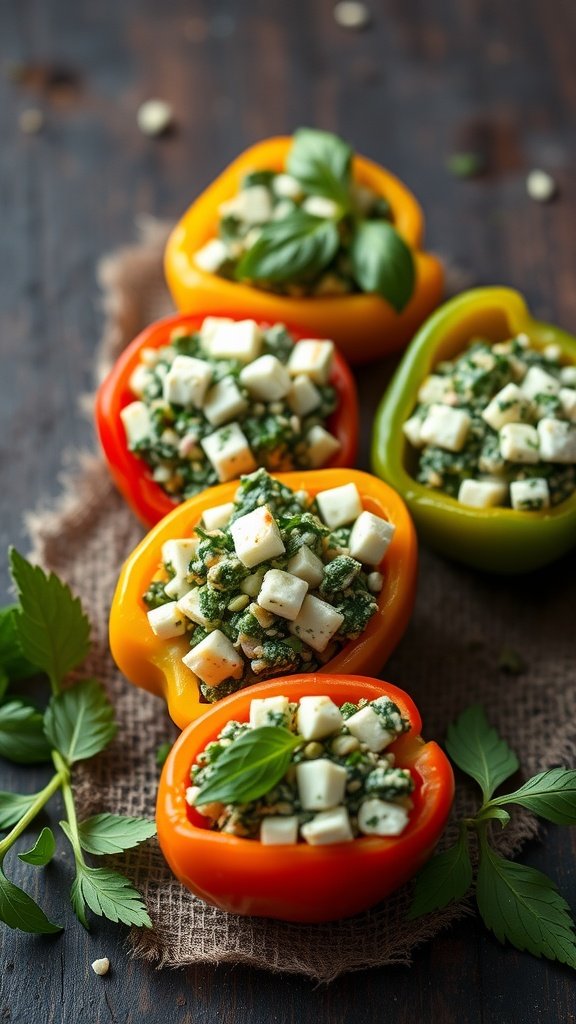
Feta and spinach stuffed peppers are a delightful blend of flavors that are sure to stand out at any wedding or reception. These bite-sized treats combine the tangy taste of feta cheese with the earthy goodness of spinach, all nestled in sweet bell peppers. They’re simple to make, making them a perfect choice for both novice and experienced cooks alike.
Not only do these stuffed peppers deliver on taste, but they also bring a vibrant pop of color to your table, enhancing the overall presentation of your finger food spread. Ideal for mingling, they can be enjoyed warm or at room temperature, making them an elegant addition to the 38 Elegant Finger Foods Recipes for Weddings and Receptions.
Ingredients
- 4 large bell peppers (red, yellow, or green)
- 1 cup fresh spinach, chopped
- 1 cup feta cheese, crumbled
- 1/2 cup cooked quinoa or rice
- 1/4 cup pine nuts (optional)
- 1 tablespoon olive oil
- 1 teaspoon garlic powder
- Salt and pepper to taste
- Fresh basil for garnish
Instructions
- Preheat your oven to 375°F (190°C).
- Slice the tops off the bell peppers and remove the seeds. Set aside.
- In a mixing bowl, combine the chopped spinach, feta cheese, cooked quinoa (or rice), pine nuts, olive oil, garlic powder, salt, and pepper. Mix well until all ingredients are evenly combined.
- Stuff each bell pepper with the spinach and feta mixture until they are full.
- Place the stuffed peppers upright in a baking dish. If desired, add a splash of water to the bottom of the dish to create steam.
- Bake in the preheated oven for 25-30 minutes, or until the peppers are tender.
- Remove from the oven and let cool slightly. Garnish with fresh basil before serving.
Mini Tacos with Spiced Chicken
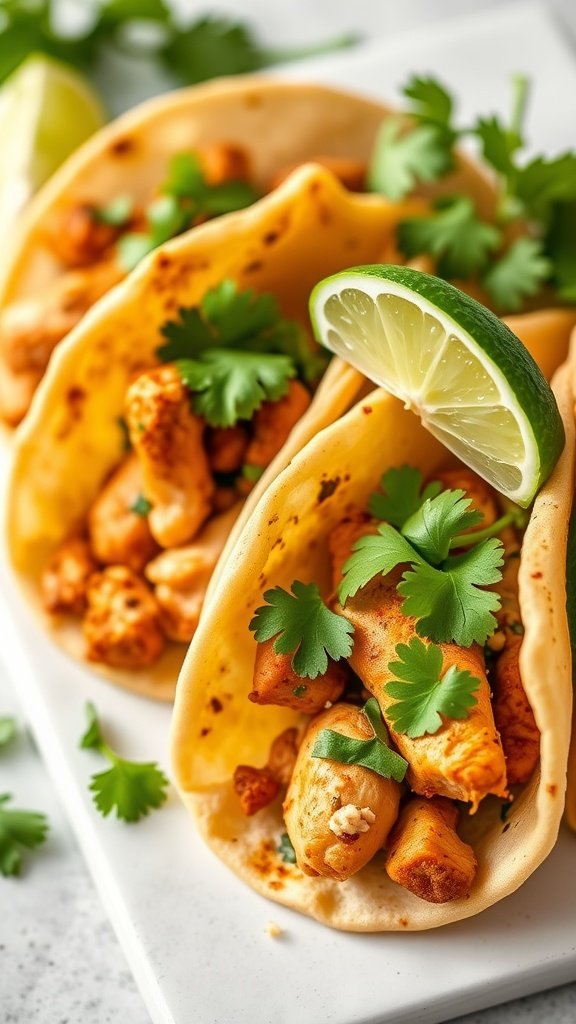
Mini tacos packed with spiced chicken are a delightful addition to any wedding or reception. These bite-sized treats are bursting with flavor and are sure to impress your guests. With a blend of spices that enhances the savory chicken, each taco provides a satisfying crunch and a zesty kick that everyone will enjoy.
Not only are these mini tacos simple to make, but they also offer a fun, interactive element for your guests. They can customize their tacos with toppings like fresh cilantro, diced onions, or a squeeze of lime. This recipe is perfect for your gathering, fitting right into the theme of the 38 Elegant Finger Foods Recipes for Weddings and Receptions.
Ingredients
- 1 pound boneless, skinless chicken thighs
- 2 tablespoons olive oil
- 1 teaspoon chili powder
- 1 teaspoon cumin
- 1 teaspoon garlic powder
- 1/2 teaspoon paprika
- Salt and pepper to taste
- 12 small corn tortillas
- Fresh cilantro, for garnish
- Lime wedges, for serving
Instructions
- Prepare the Chicken: In a bowl, combine olive oil, chili powder, cumin, garlic powder, paprika, salt, and pepper. Add the chicken thighs and coat them well with the spice mixture.
- Cook the Chicken: Heat a skillet over medium-high heat. Add the seasoned chicken and cook for about 5-7 minutes per side until the chicken is cooked through and has a nice sear. Remove from heat and let it rest before slicing.
- Warm the Tortillas: In the same skillet, warm the corn tortillas for about 30 seconds on each side until pliable.
- Assemble the Tacos: Slice the chicken into bite-sized pieces. Place a few pieces of chicken in the center of each tortilla. Top with fresh cilantro and a squeeze of lime for added flavor.
- Serve: Arrange the mini tacos on a platter with lime wedges on the side. These are ready to be enjoyed!
Caramelized Onion and Brie Crostini

Caramelized onion and brie crostini is a delightful appetizer that brings together sweet and savory flavors in every bite. The rich, creamy brie pairs beautifully with the sweet, caramelized onions, all layered on a crispy toasted baguette slice. This recipe is simple enough for anyone to make, yet elegant enough to impress your guests at any wedding or reception.
Perfect for your next gathering, these crostini are not only easy to prepare but also offer a mouthwatering combination of textures and tastes. Each bite is a little piece of heaven, making them a fantastic choice among the 38 elegant finger foods recipes for weddings and receptions. Let’s dive into making this delicious treat!
Ingredients
- 1 French baguette, sliced into ½-inch rounds
- 2 cups onions, thinly sliced
- 2 tablespoons olive oil
- 1 tablespoon balsamic vinegar
- 1 teaspoon fresh thyme leaves
- 8 ounces brie cheese, sliced
- Salt and pepper to taste
Instructions
- Preheat the Oven: Preheat your oven to 400°F (200°C).
- Prepare the Baguette: Arrange the baguette slices on a baking sheet and drizzle them with olive oil. Toast in the oven for about 5-7 minutes until lightly golden.
- Carmelize the Onions: In a skillet over medium heat, add olive oil and sliced onions. Cook slowly, stirring occasionally, for about 15-20 minutes until they are soft and caramelized. Add balsamic vinegar, thyme, salt, and pepper, mixing well.
- Assemble the Crostini: Once the baguette slices are toasted, top each with a spoonful of the caramelized onions and a slice of brie cheese.
- Bake Again: Return the assembled crostini to the oven for an additional 5-7 minutes until the cheese is melted and bubbly.
- Serve: Remove from the oven, let cool slightly, and serve warm.
Crispy Coconut Shrimp with Dipping Sauce
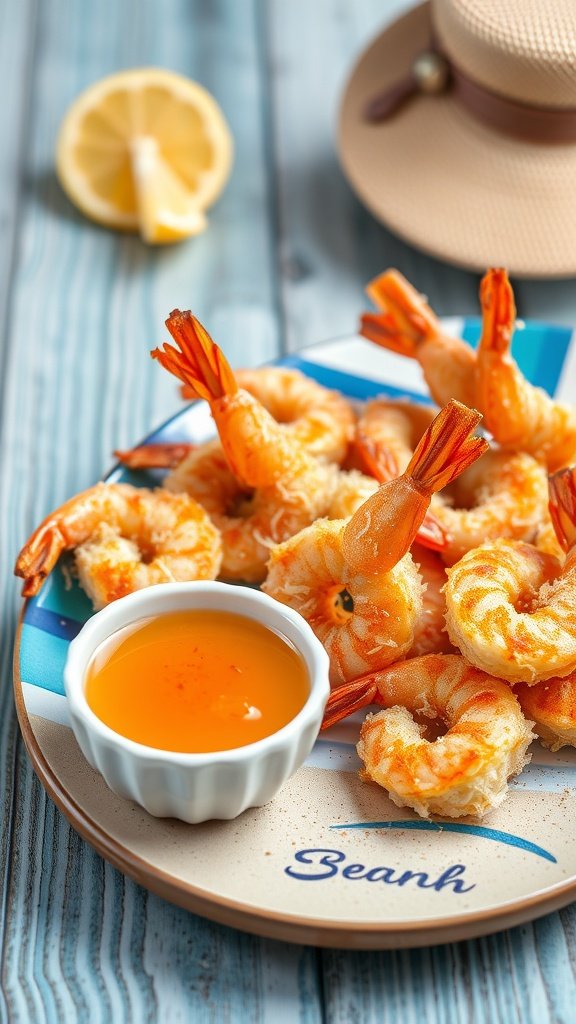
Crispy coconut shrimp are a delightful addition to any wedding or reception. These little bites are coated in a crunchy layer of coconut and panko breadcrumbs, bringing a satisfying texture that pairs beautifully with the tender shrimp inside. The sweetness of the coconut combined with the savory shrimp creates a flavor that’s hard to resist. Plus, they’re easy to prepare, making them a great choice for both experienced cooks and novices alike.
Served with a tangy dipping sauce, crispy coconut shrimp make for an elegant finger food that guests will love. This recipe fits well into the theme of 38 Elegant Finger Foods Recipes for Weddings and Receptions, providing a touch of sophistication while keeping it casual and fun.
Ingredients
- 1 pound large shrimp, peeled and deveined
- 1 cup shredded coconut
- 1 cup panko breadcrumbs
- 2 large eggs
- 1/2 cup all-purpose flour
- 1 teaspoon garlic powder
- 1 teaspoon paprika
- Salt and pepper to taste
- Vegetable oil for frying
Instructions
- Prepare the Shrimp: In a bowl, season the shrimp with garlic powder, paprika, salt, and pepper.
- Set Up Breading Station: In three separate shallow dishes, place the flour, beaten eggs, and a mixture of shredded coconut and panko breadcrumbs.
- Bread the Shrimp: Dredge each shrimp in flour, dip into the eggs, then coat with the coconut-panko mixture, pressing gently to adhere.
- Fry the Shrimp: Heat vegetable oil in a large skillet over medium heat. Fry the shrimp in batches until golden brown, about 2-3 minutes per side. Drain on paper towels.
- Serve: Pair with a dipping sauce of your choice, such as sweet chili sauce or a tangy mango salsa, and enjoy your crispy coconut shrimp!
Savory Cheese and Herb Scones

Savory cheese and herb scones are a delightful addition to any wedding or reception, perfect for guests to nibble on while mingling. These scones are flaky and buttery, with a rich flavor from the cheese and a fresh touch from the herbs. They are simple to make, requiring just a few basic ingredients and a quick bake in the oven.
These scones bring a savory twist that pairs well with various dips or can even be enjoyed on their own. Their light texture and comforting taste make them an ideal choice for elegant finger foods. Whether served at a casual gathering or a sophisticated event, these cheese and herb scones will surely be a hit with everyone.
Ingredients
- 2 cups all-purpose flour
- 1 tablespoon baking powder
- 1/2 teaspoon salt
- 1/4 cup cold unsalted butter, cubed
- 1 cup shredded cheese (cheddar or your choice)
- 1/4 cup chopped fresh herbs (like chives or parsley)
- 3/4 cup milk
Instructions
- Preheat the oven to 400°F (200°C) and line a baking sheet with parchment paper.
- In a large bowl, whisk together the flour, baking powder, and salt. Cut in the cold butter until the mixture resembles coarse crumbs.
- Stir in the shredded cheese and chopped herbs until evenly distributed.
- Add the milk gradually, mixing just until the dough comes together. Do not overmix.
- Turn the dough onto a floured surface and gently knead a few times until smooth. Pat it into a circle about 1 inch thick.
- Cut into wedges and place them on the prepared baking sheet. Bake for 15-20 minutes, or until golden brown.
- Let cool slightly before serving. Enjoy your savory cheese and herb scones!
Honey Glazed Chicken Skewers

Honey Glazed Chicken Skewers are a delightful addition to any wedding or reception. These tender, juicy pieces of chicken are marinated in a sweet and savory honey sauce, creating a flavor that’s both rich and aromatic. Perfect for mingling guests, these skewers are not only tasty but also simple to prepare, making them an ideal choice for your next event.
The sweet glaze caramelizes beautifully during cooking, giving each skewer a lovely shine and a slightly crispy texture on the outside, while keeping the chicken moist and flavorful inside. They can be made ahead of time and grilled just before serving, allowing you to focus on enjoying the celebration!
Ingredients
- 1 pound boneless, skinless chicken thighs, cut into bite-sized pieces
- 1/4 cup honey
- 2 tablespoons soy sauce
- 1 tablespoon sesame oil
- 2 cloves garlic, minced
- 1 teaspoon fresh ginger, grated
- 1 tablespoon rice vinegar
- Salt and pepper to taste
- Sesame seeds for garnish
- Chopped green onions for garnish
- Wooden skewers (soaked in water for 30 minutes)
Instructions
- In a bowl, combine honey, soy sauce, sesame oil, garlic, ginger, rice vinegar, salt, and pepper to make the marinade.
- Add the chicken pieces to the marinade and let it sit for at least 30 minutes (or up to 2 hours in the fridge for more flavor).
- Preheat your grill or grill pan over medium-high heat.
- Thread the marinated chicken onto the soaked skewers.
- Grill each skewer for about 6-8 minutes, turning occasionally, until the chicken is cooked through and has nice grill marks.
- Remove from the grill and sprinkle with sesame seeds and chopped green onions before serving.
Lobster and Avocado Canapés
Lobster and avocado canapés are a delightful and sophisticated addition to any wedding reception. The combination of tender lobster meat and creamy avocado creates a rich, satisfying flavor that is both refreshing and indulgent. These canapés are not only delicious but surprisingly simple to prepare, making them a perfect choice for elegant finger foods.
Each bite offers a burst of coastal flavors, enhanced by a touch of citrus or herbs for an extra zing. With a visually appealing presentation, these canapés will impress your guests and elevate your event. Here’s how to make them:
Ingredients
- 1 cup cooked lobster meat, chopped
- 1 ripe avocado, diced
- 1 tablespoon fresh lemon juice
- 1 tablespoon mayonnaise
- Salt and pepper to taste
- 1 package of mini toast or crackers
- Fresh herbs (such as cilantro or chives) for garnish
Instructions
- In a mixing bowl, combine the chopped lobster meat, diced avocado, lemon juice, and mayonnaise. Season with salt and pepper to taste.
- Spread a generous spoonful of the lobster and avocado mixture onto each mini toast or cracker.
- Garnish with fresh herbs for a pop of color and flavor.
- Arrange the canapés on a platter and serve immediately for the best taste and presentation.
Cherry Tomato and Basil Pesto Cups
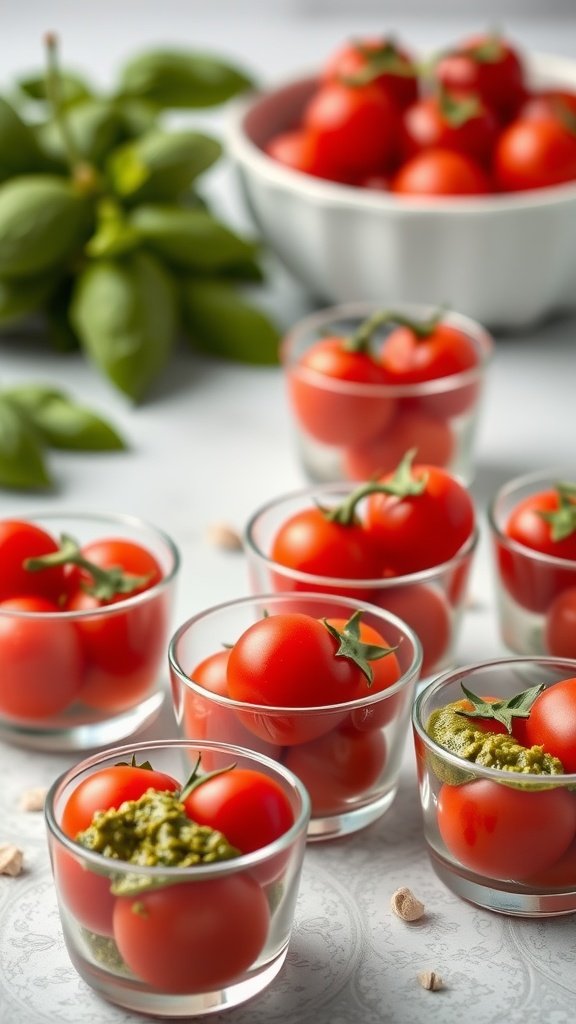
Cherry Tomato and Basil Pesto Cups are a delightful addition to any wedding or reception. These bite-sized treats combine the juicy freshness of cherry tomatoes with a rich, flavorful basil pesto, offering a burst of taste in every bite. They’re not just delicious but also incredibly easy to prepare, making them a stress-free choice for your elegant finger foods spread.
The vibrant colors and simple presentation make these cups visually appealing, perfect for impressing your guests. Plus, they are versatile enough to be served as a starter or an appetizer at your next gathering. With just a few ingredients, you’ll have a sophisticated dish that everyone will love!
Ingredients
- 2 cups cherry tomatoes
- 1/2 cup fresh basil leaves
- 1/4 cup pine nuts
- 1/4 cup Parmesan cheese, grated
- 1/4 teaspoon salt
- 1/4 cup olive oil
- 1 clove garlic, minced
Instructions
- Make the Pesto: In a food processor, combine basil, pine nuts, Parmesan cheese, salt, and garlic. Pulse until finely chopped. With the processor running, gradually add olive oil until the mixture is smooth.
- Prepare the Tomatoes: Carefully slice the tops off the cherry tomatoes and scoop out a bit of the insides to create a small cavity.
- Fill the Cups: Spoon the basil pesto into each cherry tomato, filling generously.
- Serve: Arrange the filled tomatoes on a platter and enjoy immediately or chill them until serving time.
Vegetable Spring Rolls with Peanut Sauce

Vegetable spring rolls are a light and refreshing choice for any wedding reception. These delightful bites are filled with crisp vegetables and wrapped in translucent rice paper, making them both visually appealing and easy to eat. Paired with a creamy peanut sauce, they offer a perfect balance of flavors that guests will enjoy.
Not only are these spring rolls simple to prepare, but they also allow for plenty of creativity with the fillings. You can mix and match your favorite vegetables to create a colorful presentation. This recipe for vegetable spring rolls is a great addition to our collection of 38 Elegant Finger Foods Recipes for Weddings and Receptions, ensuring everyone can find something they love!
Ingredients
- 8 rice paper wrappers
- 1 cup shredded carrots
- 1 cup cucumber, julienned
- 1 cup bell pepper, sliced
- 1 cup lettuce, shredded
- 1/2 cup fresh cilantro leaves
- 1/2 cup fresh mint leaves
- 1/2 cup peanuts, chopped (for garnish)
Instructions
- Prepare the Filling: In a large bowl, combine the shredded carrots, cucumber, bell pepper, lettuce, cilantro, and mint. Mix well.
- Soften the Rice Paper: Fill a shallow dish with warm water. Dip one rice paper wrapper into the water for about 10-15 seconds until softened. Lay it flat on a clean surface.
- Fill the Wrapper: Place a small amount of the vegetable mixture at the bottom third of the wrapper. Fold the sides in and then roll it up tightly from the bottom. Repeat with the remaining wrappers and filling.
- Make the Peanut Sauce: In a bowl, whisk together 1/4 cup peanut butter, 2 tablespoons soy sauce, 1 tablespoon lime juice, 1 tablespoon honey, and water to thin as needed.
- Serve: Arrange the spring rolls on a platter and sprinkle with chopped peanuts. Serve with the peanut sauce on the side for dipping.
Mini Savory Pancakes with Smoked Salmon

Mini savory pancakes topped with smoked salmon are a delightful addition to any wedding or reception menu. These little bites combine the fluffy texture of the pancakes with the rich, smoky flavor of the salmon, creating a perfect balance that guests will love. They are not only elegant but also simple to prepare, making them ideal for hosts who want to impress without spending hours in the kitchen.
The pancakes are versatile and can be made ahead of time, allowing you to focus on other details of your event. Each pancake is finished with a dollop of creamy sauce and a sprinkle of fresh herbs, bringing freshness and vibrancy to the dish. It’s a taste sensation that feels indulgent yet remains light and satisfying.
Ingredients
- 1 cup all-purpose flour
- 1 teaspoon baking powder
- 1/2 teaspoon salt
- 1 cup milk
- 1 large egg
- 2 tablespoons melted butter
- 4 ounces smoked salmon, sliced
- 1/2 cup sour cream
- 1 tablespoon fresh dill, chopped
Instructions
- In a bowl, combine flour, baking powder, and salt. In another bowl, whisk together milk, egg, and melted butter. Pour the wet ingredients into the dry ingredients and mix until just combined.
- Heat a non-stick skillet over medium heat and lightly grease it. Pour small rounds of batter onto the skillet and cook until bubbles form on the surface, about 2 minutes. Flip and cook for an additional minute until golden brown.
- Transfer the pancakes to a serving plate. Top each pancake with a slice of smoked salmon and a dollop of sour cream. Garnish with fresh dill before serving.
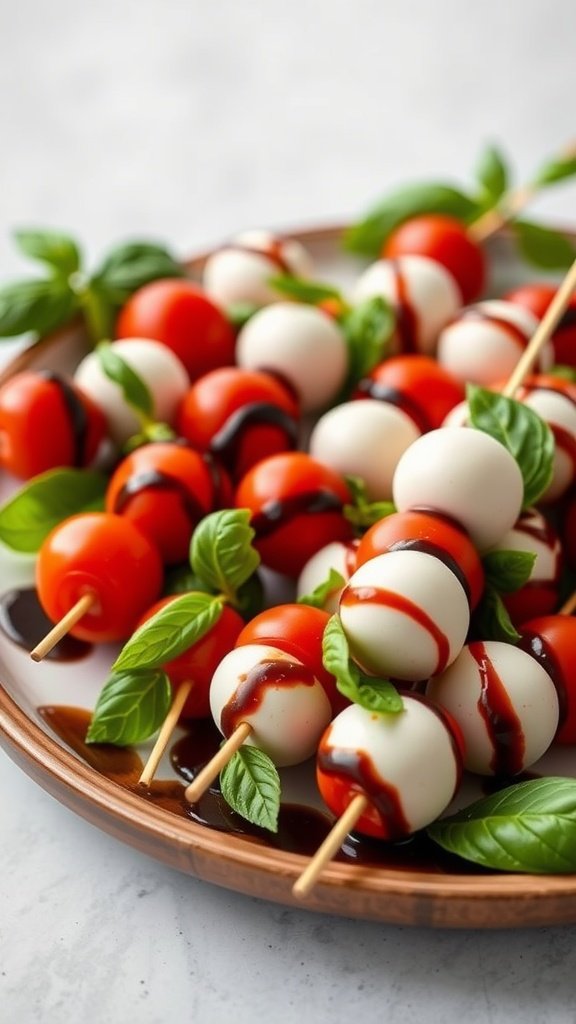
Caprese Salad on a Stick
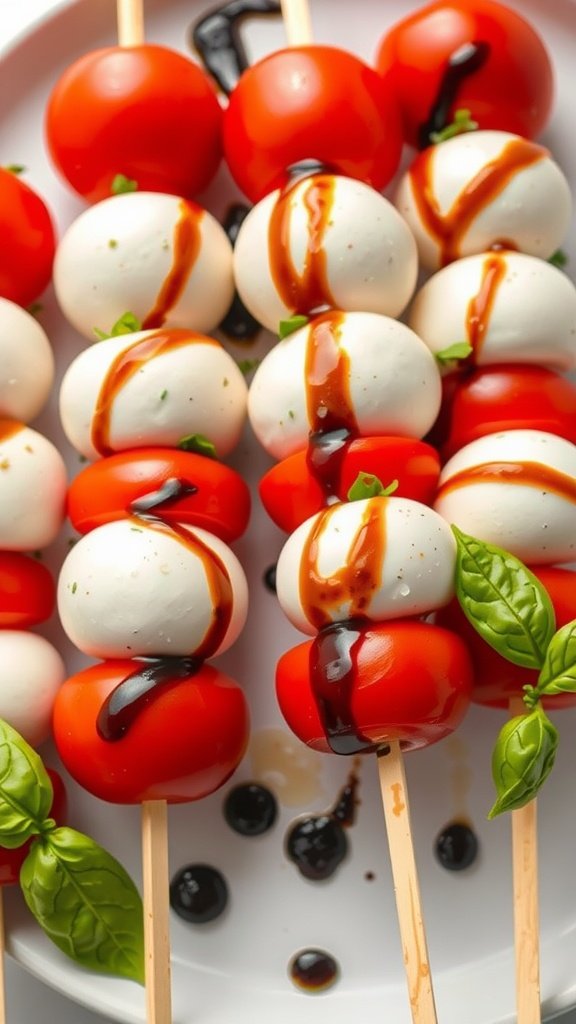
Caprese Salad on a Stick is a delightful and easy-to-make appetizer that adds a fresh twist to the classic Caprese salad. Featuring juicy cherry tomatoes, creamy mozzarella balls, and aromatic basil, this finger food combines flavors that are bright and refreshing. It’s perfect for weddings and receptions, offering a simple yet elegant touch to your appetizer spread.
Assembling these skewers is a breeze, making them an ideal choice for hosts looking for a quick and impressive dish. Just layer the ingredients on a skewer, drizzle with balsamic glaze, and you’re good to go!
Ingredients
- 1 pint cherry tomatoes
- 8 ounces fresh mozzarella balls
- 1 bunch fresh basil leaves
- Balsamic glaze
- Salt and pepper to taste
- Wooden skewers
Instructions
- Prepare the Skewers: Thread a cherry tomato onto a skewer, followed by a basil leaf, and then a mozzarella ball. Repeat this pattern until the skewer is filled, leaving some space at the end for handling.
- Season: Once all ingredients are on the skewers, drizzle balsamic glaze over them and sprinkle with salt and pepper to taste.
- Serve: Arrange the skewers on a platter and enjoy this refreshing appetizer with your guests!
Zucchini Fritters with Tzatziki Sauce

Zucchini fritters are a delightful addition to any wedding or reception, bringing a burst of flavor and a crispy texture that guests will love. These little bites are simple to prepare and are perfect for mingling, making them an ideal choice among the 38 Elegant Finger Foods Recipes for Weddings and Receptions.
The combination of tender zucchini, fresh herbs, and a light crunch makes these fritters incredibly satisfying. Served with a cool tzatziki sauce, they offer a refreshing contrast that enhances the overall taste. Whether you’re hosting or attending, these fritters are sure to be a hit!
Ingredients
- 2 medium zucchinis, grated
- 1 teaspoon salt
- 1/2 cup all-purpose flour
- 1/4 cup grated Parmesan cheese
- 1 large egg
- 2 green onions, chopped
- 1 teaspoon garlic powder
- 1/4 teaspoon black pepper
- Vegetable oil for frying
Instructions
- Prepare the Zucchini: Place the grated zucchini in a colander, sprinkle with salt, and let it sit for about 15 minutes. This helps to remove excess moisture. Afterward, squeeze out any remaining liquid.
- Mix the Batter: In a bowl, combine the zucchini, flour, Parmesan cheese, egg, green onions, garlic powder, and black pepper. Stir until well blended.
- Heat the Oil: In a skillet, heat about 1/4 inch of vegetable oil over medium heat.
- Fry the Fritters: Drop spoonfuls of the zucchini mixture into the hot oil. Cook for about 3-4 minutes on each side, or until golden brown. Transfer to a paper towel-lined plate to drain excess oil.
- Serve with Tzatziki: For the tzatziki sauce, mix 1 cup of plain yogurt, 1/2 cucumber (grated), 1 clove garlic (minced), 1 tablespoon olive oil, 1 tablespoon lemon juice, and salt to taste. Serve the warm fritters alongside this refreshing sauce.
Black Bean and Corn Salsa in Tortilla Cups
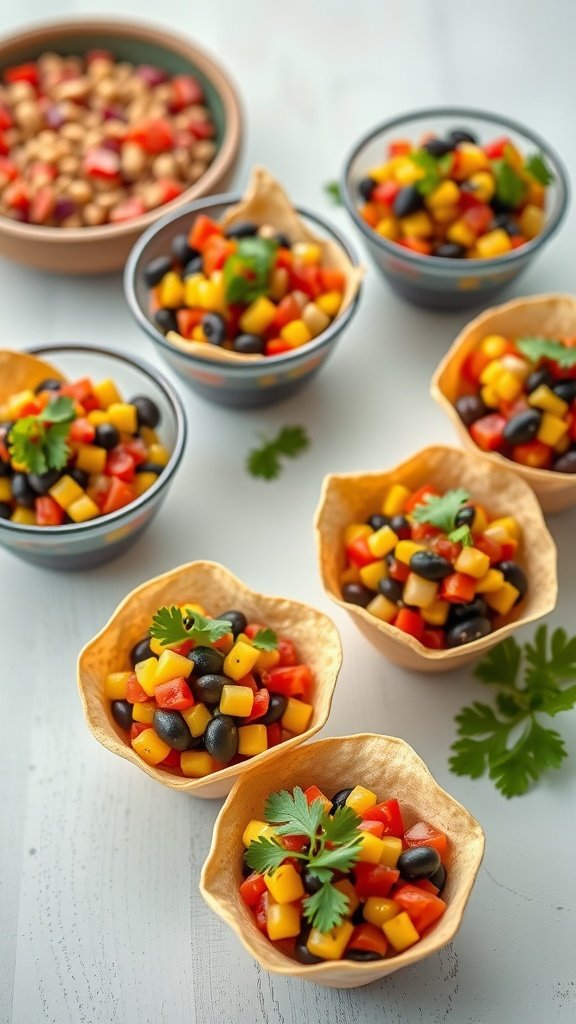
Black Bean and Corn Salsa in Tortilla Cups is a delightful combination that brings a burst of flavors to your gathering. This recipe is easy to prepare and makes for a colorful and tasty finger food option that your guests will love. The crunchy tortilla cups hold a vibrant mix of black beans, sweet corn, and fresh vegetables, creating a refreshing bite-sized treat.
The salsa is not only delicious but also packed with nutrients, making it a guilt-free indulgence. Perfect for weddings and receptions, these tortilla cups add a festive touch to any table. Plus, they can be made ahead of time, allowing you to enjoy the celebration without spending too much time in the kitchen!
Ingredients
- 1 cup canned black beans, rinsed and drained
- 1 cup corn (fresh, canned, or frozen)
- 1/2 cup red bell pepper, diced
- 1/2 cup yellow bell pepper, diced
- 1/4 cup red onion, finely chopped
- 1/4 cup fresh cilantro, chopped
- Juice of 1 lime
- Salt and pepper to taste
- 12 small tortilla cups (store-bought or homemade)
Instructions
- Prepare the Salsa: In a large bowl, combine the black beans, corn, red and yellow bell peppers, red onion, and cilantro. Mix well.
- Season: Drizzle lime juice over the mixture. Add salt and pepper to taste. Stir to combine and let it sit for about 10 minutes to allow the flavors to meld.
- Assemble: Spoon the salsa into the tortilla cups just before serving to keep them crunchy.
- Serve: Arrange the filled tortilla cups on a platter and enjoy this delightful snack!
Pumpkin and Sage Ravioli Bites

Pumpkin and sage ravioli bites are a delightful treat that perfectly blend the earthy richness of pumpkin with the aromatic notes of sage. These elegant finger foods are a hit at weddings and receptions, offering guests a unique flavor experience that showcases seasonal ingredients. Plus, they are quite simple to make, making them an ideal addition to your menu without the stress of complicated preparations.
The combination of the tender ravioli, savory sage, and a touch of cheese creates a harmonious bite that is both comforting and sophisticated. These bites are not just about taste; they also bring a vibrant splash of color to your table, making them visually appealing as well. Whether served as a starter or alongside other hors d’oeuvres, they are sure to impress your guests!
Ingredients
- 1 package of fresh or frozen ravioli (pumpkin-filled)
- 2 tablespoons olive oil
- 1 tablespoon fresh sage, chopped
- 1/4 cup grated Parmesan cheese
- Salt and pepper, to taste
- Optional: additional sage leaves for garnish
Instructions
- Cook the Ravioli: In a large pot of salted boiling water, cook the ravioli according to package instructions until they float to the top. Drain and set aside.
- Prepare the Sage Oil: In a skillet, heat the olive oil over medium heat. Add the chopped sage and sauté for about 2 minutes until fragrant.
- Combine: Add the cooked ravioli to the skillet and gently toss in the sage oil. Season with salt and pepper to taste.
- Serve: Plate the ravioli bites, sprinkle with grated Parmesan cheese, and garnish with additional sage leaves if desired. Enjoy warm!
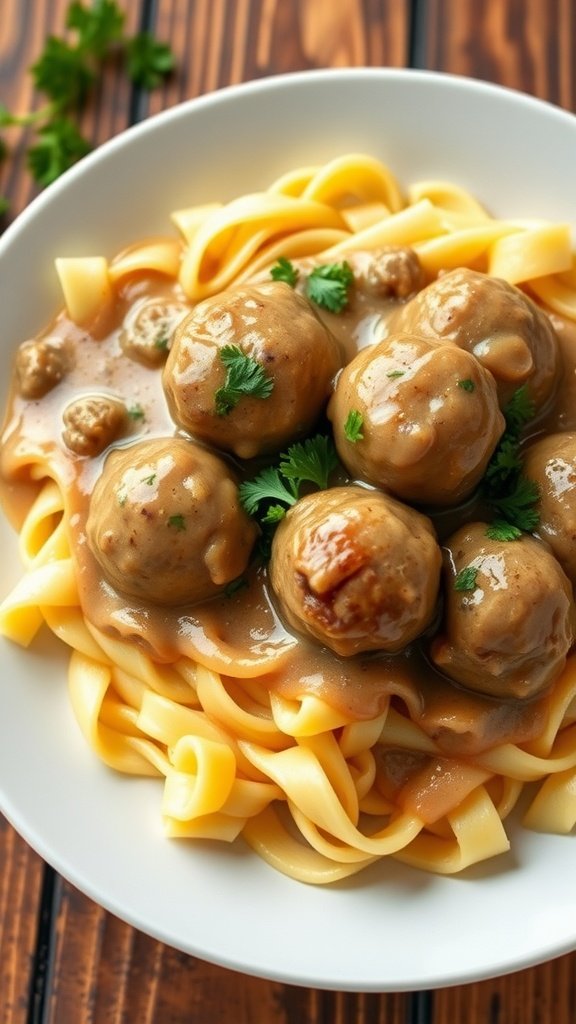
Moroccan Spiced Meatballs with Mint Yogurt

These Moroccan spiced meatballs are a delightful addition to any wedding or reception, offering a burst of flavor in every bite. Tender and aromatic, they are seasoned with warm spices like cumin and coriander, giving them a unique taste profile that’s both comforting and exotic. Paired with a cool and refreshing mint yogurt sauce, these meatballs are simple to prepare and will surely impress your guests.
Perfect as a finger food option, these meatballs can be served warm or at room temperature, making them a versatile choice for any elegant gathering. The combination of spices and the cooling yogurt dip creates a balanced flavor that keeps everyone coming back for more. Whether you’re planning a small gathering or a large wedding, this recipe fits seamlessly into the theme of 38 Elegant Finger Foods Recipes for Weddings and Receptions.
Ingredients
- 1 pound ground beef or lamb
- 1/4 cup finely chopped onion
- 2 cloves garlic, minced
- 1 teaspoon ground cumin
- 1 teaspoon ground coriander
- 1 teaspoon paprika
- 1/2 teaspoon cinnamon
- 1/4 teaspoon cayenne pepper
- 1/4 cup fresh parsley, chopped
- 1 egg
- 1/2 cup breadcrumbs
- Salt and pepper, to taste
- 1 cup plain yogurt
- 1/4 cup fresh mint, chopped
- 1 tablespoon lemon juice
Instructions
- Mix the Meatballs: In a large bowl, combine ground meat, onion, garlic, cumin, coriander, paprika, cinnamon, cayenne, parsley, egg, breadcrumbs, salt, and pepper. Mix well until all ingredients are evenly combined.
- Shape the Meatballs: Form the mixture into small meatballs, about 1 inch in diameter. Place them on a baking sheet lined with parchment paper.
- Bake the Meatballs: Preheat your oven to 400°F (200°C). Bake the meatballs for 20-25 minutes, or until cooked through and browned.
- Make the Mint Yogurt: In a separate bowl, mix together yogurt, chopped mint, and lemon juice. Add salt to taste.
- Serve: Arrange the meatballs on a serving platter with the mint yogurt on the side for dipping. Enjoy!
Chocolate-Dipped Fruit Skewers

Chocolate-dipped fruit skewers are a delightful treat that combines the sweetness of fresh fruit with the richness of chocolate. These skewers are not only visually appealing but also incredibly easy to prepare, making them a fantastic option for any wedding or reception. The contrast between the juicy fruit and the smooth chocolate creates a delightful flavor experience that guests will love.
Whether you choose strawberries, bananas, or pineapple, these skewers are versatile and can be tailored to fit your event theme. Plus, they are a healthier finger food option that satisfy your sweet tooth. Perfect for mingling, these treats can be enjoyed without any mess.
Ingredients
- 1 cup strawberries, hulled
- 1 cup banana slices
- 1 cup pineapple chunks
- 1 cup chocolate chips (dark or milk)
- 1 tablespoon coconut oil (optional)
- Wooden skewers
Instructions
- Prepare the Fruits: Wash and cut your fruits into bite-sized pieces. Thread them onto the wooden skewers in a colorful arrangement.
- Melt the Chocolate: In a microwave-safe bowl, combine chocolate chips and coconut oil. Heat in 30-second intervals, stirring in between, until smooth and melted.
- Dip the Skewers: Hold each skewer by the end and dip the fruit section into the melted chocolate. Allow any excess chocolate to drip off.
- Set to Cool: Place the dipped skewers on a parchment-lined tray and let them cool in the refrigerator for about 15-20 minutes, or until the chocolate hardens.
- Serve: Arrange the chocolate-dipped fruit skewers on a platter for your guests to enjoy!
Spicy Tuna Tartare on Wontons

Spicy Tuna Tartare on Wontons is a delightful finger food that brings a refreshing twist to any wedding or reception. The combination of fresh tuna, zesty seasonings, and crispy wonton shells creates a burst of flavor with every bite. Not only is it packed with taste, but it’s also quite simple to prepare, making it perfect for both seasoned chefs and kitchen novices alike.
This dish offers a wonderful balance of textures, with the crunchy wontons complementing the soft, spicy tuna mixture. It’s an elegant addition to our collection of 38 Elegant Finger Foods Recipes for Weddings and Receptions, ensuring your guests will be impressed by both the presentation and flavor.
Ingredients
- 8 oz sushi-grade tuna, diced
- 1 tablespoon soy sauce
- 1 tablespoon sesame oil
- 1 teaspoon sriracha (or to taste)
- 1 green onion, finely chopped
- 1 avocado, diced
- 12 wonton wrappers
- Vegetable oil for frying
- Sesame seeds for garnish
Instructions
- Prepare the Wontons: Heat vegetable oil in a deep pan over medium heat. Cut the wonton wrappers into triangles and fry them until golden and crispy. Drain on paper towels.
- Make the Tuna Mixture: In a bowl, combine diced tuna, soy sauce, sesame oil, sriracha, and green onion. Gently fold in the diced avocado.
- Assemble: Place a spoonful of the tuna mixture into each wonton shell. Garnish with sesame seeds and extra green onion if desired.
- Serve: Enjoy immediately while the wontons are still crispy!
Baked Brie with Cranberry Sauce
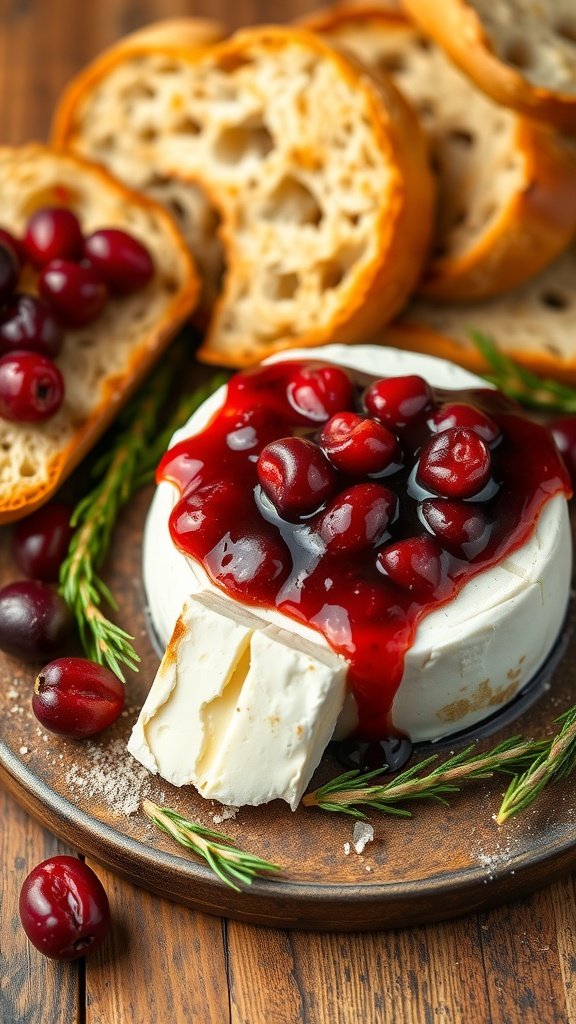
Baked Brie with Cranberry Sauce is a delightful addition to your wedding or reception menu. This dish combines rich, creamy Brie cheese with the tartness of cranberry sauce, creating a delicious balance of flavors. It’s simple to make and can be prepared in no time, making it an ideal finger food for your elegant gathering.

The warm, gooey Brie pairs perfectly with crispy bread or crackers, allowing guests to enjoy a sophisticated bite with ease. Whether you’re planning a small wedding or a larger reception, this dish fits right in among the 38 Elegant Finger Foods Recipes for Weddings and Receptions.
Ingredients
- 1 wheel of Brie cheese (8 oz)
- 1 cup cranberry sauce (store-bought or homemade)
- 1 tablespoon brown sugar (optional)
- 1 teaspoon fresh rosemary, chopped (or other herbs of choice)
- 1 package of crostini or crackers
- Optional: nuts for garnish
Instructions
- Preheat your oven to 350°F (175°C).
- Place the Brie cheese on a baking sheet lined with parchment paper. If desired, sprinkle brown sugar on top for added sweetness.
- Bake the Brie in the preheated oven for about 10-15 minutes, or until it becomes soft and melty.
- While the cheese is baking, warm the cranberry sauce in a small saucepan over low heat to make it easier to pour.
- Once the Brie is ready, remove it from the oven and pour the warmed cranberry sauce over the top. Sprinkle with chopped rosemary and nuts if using.
- Serve immediately with crostini or crackers for dipping.
Mini Vegetable Quiches with Cheese

Mini vegetable quiches with cheese are a delightful finger food that perfectly marries flavor and convenience. These bite-sized treats feature a flaky crust filled with a savory mixture of eggs, cheese, and fresh vegetables. They are ideal for weddings and receptions, offering guests a taste of comfort food that is both satisfying and elegant.
Simple to make, these quiches can be prepared in advance, allowing you to focus on enjoying the celebration. The combination of colorful vegetables, creamy cheese, and a hint of seasoning makes each bite a pleasant experience. Serve them warm or at room temperature, and watch them disappear from the platter!
Ingredients
- 1 pre-made pie crust
- 4 large eggs
- 1 cup milk
- 1 cup shredded cheese (e.g., cheddar or mozzarella)
- 1/2 cup diced bell peppers
- 1/2 cup chopped spinach
- 1/4 cup sliced olives
- Salt and pepper to taste
Instructions
- Preheat the oven to 375°F (190°C) and grease a muffin tin.
- Roll out the pie crust and cut it into circles to fit the muffin tin. Press the circles into the cups.
- In a bowl, whisk together the eggs and milk. Add salt and pepper.
- Stir in the cheese, bell peppers, spinach, and olives until well combined.
- Pour the egg mixture into the crusts until each is about three-quarters full.
- Bake for 20-25 minutes, or until the quiches are set and the tops are golden.
- Allow to cool slightly before removing from the muffin tin. Serve warm or at room temperature.
Fruit and Cheese Board with Nuts
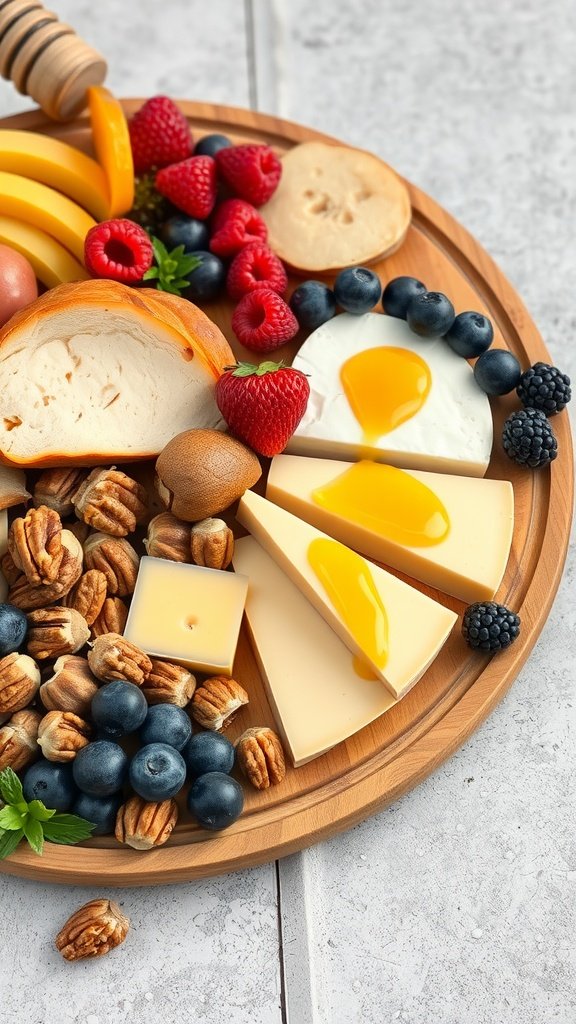
A fruit and cheese board is a delightful and simple way to impress your guests at any wedding or reception. This elegant finger food combines a variety of flavors and textures, from the creaminess of cheese to the sweet burst of fresh fruits and the crunch of nuts. It’s not only visually appealing but also offers something for everyone, making it an ideal choice for mingling guests.
Creating a fruit and cheese board is straightforward and allows for plenty of customization based on seasonal fruits and personal preferences. Whether you choose sharp cheddar, creamy brie, or tangy goat cheese, each bite can be paired with different fruits like grapes, berries, and apples. Add a mix of nuts for extra crunch, and you have a versatile spread that complements the festive atmosphere of your celebration.
Ingredients
- 1 cup assorted cheeses (cheddar, brie, goat cheese)
- 1 cup fresh berries (strawberries, blueberries, raspberries)
- 1 cup sliced fruits (bananas, apples, pears)
- 1 cup mixed nuts (almonds, pecans, walnuts)
- 1 tablespoon honey (optional)
- Fresh mint leaves for garnish (optional)
Instructions
- Prepare the Ingredients: Slice the cheeses into bite-sized pieces and arrange them on a large wooden board or platter.
- Add the Fruits: Wash and slice the fresh fruits. Group them around the cheeses for a colorful presentation.
- Incorporate the Nuts: Scatter the mixed nuts throughout the board for added texture and flavor.
- Drizzle with Honey: If desired, drizzle honey over the cheese or fruit for a touch of sweetness.
- Garnish: Finish with fresh mint leaves for an aromatic touch. Serve immediately and enjoy your elegant finger food!
Mushroom and Truffle Oil Flatbreads

Mushroom and truffle oil flatbreads offer a delightful combination of earthy flavors and crispy textures, making them a fantastic choice for any wedding or reception. The rich umami from the mushrooms pairs beautifully with the aromatic truffle oil, creating a bite-sized treat that is sure to impress your guests.
This recipe is simple to prepare, making it ideal for both novice cooks and seasoned chefs. With just a few ingredients and minimal prep time, you can whip up these elegant finger foods that not only taste great but also look stunning on your buffet table.
Ingredients
- 1 cup all-purpose flour
- 1/2 teaspoon salt
- 1/2 teaspoon baking powder
- 1/4 cup water
- 1 tablespoon olive oil
- 8 oz mushrooms, sliced
- 2 tablespoons truffle oil
- 1/4 cup grated Parmesan cheese
- Fresh herbs (such as thyme or parsley) for garnish
Instructions
- Make the Dough: In a bowl, mix flour, salt, and baking powder. Gradually add water and olive oil, stirring until a dough forms. Knead briefly until smooth.
- Prepare the Flatbreads: Divide the dough into small balls and roll each one out into a flat shape. Cook on a hot skillet for about 2-3 minutes on each side until golden and slightly puffed.
- Cook the Mushrooms: In a separate pan, heat a little truffle oil. Add the sliced mushrooms and sauté until tender and golden brown, about 5-7 minutes.
- Assemble: Top each flatbread with sautéed mushrooms, sprinkle with Parmesan cheese, and drizzle with more truffle oil.
- Garnish and Serve: Add fresh herbs on top before serving. Enjoy your elegant finger foods at the wedding or reception!
Chickpea Salad in Cucumber Cups
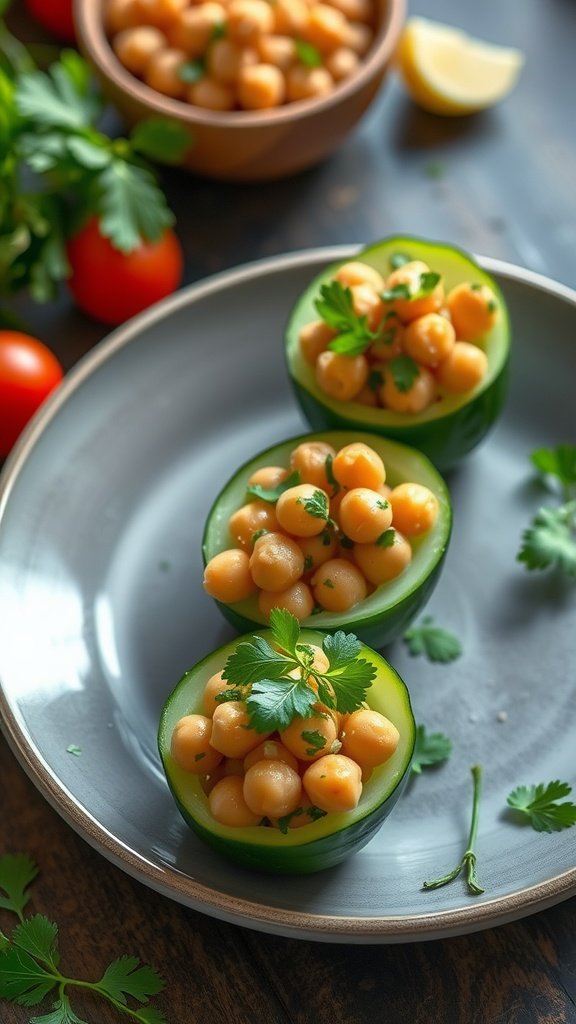
Chickpea salad in cucumber cups brings a refreshing touch to any gathering. The crunch of the cucumber paired with the creamy chickpeas creates a delightful contrast that is both satisfying and light. This finger food is not only easy to make, but it also packs a nutritious punch, making it a perfect choice for weddings and receptions.
The flavors meld beautifully, enhanced by fresh herbs and a hint of lemon. Plus, they’re visually appealing, making them a standout appetizer at any event. Serve these at your next gathering, and they’re sure to impress your guests!
Ingredients
- 1 can chickpeas, drained and rinsed
- 1/4 cup diced red onion
- 1/4 cup diced bell pepper
- 1/4 cup chopped fresh parsley
- 2 tablespoons olive oil
- 1 tablespoon lemon juice
- Salt and pepper to taste
- 1 large cucumber
Instructions
- In a bowl, combine chickpeas, red onion, bell pepper, and parsley.
- Drizzle with olive oil and lemon juice, then season with salt and pepper. Mix well to combine.
- Cut the cucumber into 2-inch segments and hollow out the center using a small spoon.
- Fill each cucumber cup with the chickpea mixture.
- Serve chilled and enjoy!
Mini Caprese Skewers with Balsamic Glaze
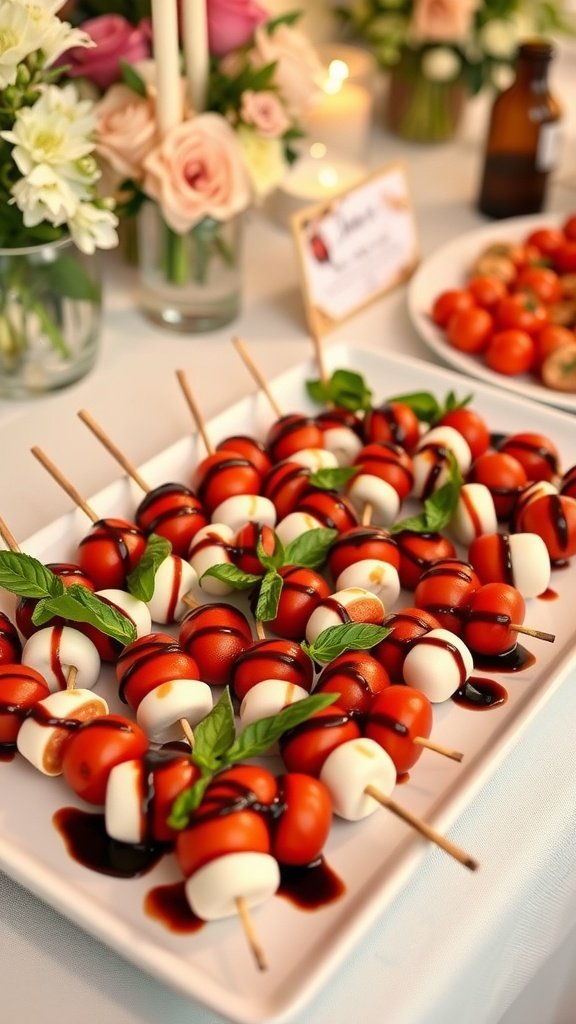
Mini Caprese Skewers are a delightful addition to any wedding reception or elegant gathering. These bite-sized treats combine the freshness of ripe cherry tomatoes, creamy mozzarella balls, and fragrant basil leaves, all drizzled with a rich balsamic glaze. The combination of flavors is bright and satisfying, making them a hit among guests.
Not only are these skewers easy to assemble, but they also bring a touch of sophistication to your appetizer spread. They are perfect for mingling, allowing guests to enjoy a delicious bite without needing a fork or plate. Plus, they can be prepped ahead of time, making your event planning a breeze!
Ingredients
- 20 cherry tomatoes
- 20 mozzarella balls (bocconcini)
- 20 fresh basil leaves
- 1/2 cup balsamic glaze
- Salt and pepper, to taste
- Wooden skewers (about 6 inches long)
Instructions
- Prepare the Skewers: On each wooden skewer, thread a cherry tomato, followed by a basil leaf, and then a mozzarella ball. Repeat this pattern until each skewer is filled, leaving some space at the ends for easy handling.
- Season: Once all skewers are assembled, drizzle them with balsamic glaze. Sprinkle a little salt and pepper over the top for added flavor.
- Chill and Serve: Place the assembled skewers on a serving platter and refrigerate for at least 30 minutes before serving. This helps the flavors meld beautifully.