Looking for fun and tasty snacks that your kids can easily dip and munch? This collection of 26 dippable finger foods is packed with flavors and textures that little ones will adore. From cheesy bites to veggie delights, these recipes are sure to keep snack time exciting and hassle-free!
Cheesy Spinach and Artichoke Dip with Veggie Sticks

This Cheesy Spinach and Artichoke Dip is a creamy delight that kids will happily dip into. It combines the rich flavors of cheese with the earthy taste of spinach and the slight tang of artichokes, making it both kid-friendly and nutritious. Plus, it’s super easy to whip up, so you’ll have a delicious snack ready in no time!
Pairing this dip with colorful veggie sticks not only adds a fun crunch but also makes it a healthier option for snack time. It’s a great way to encourage kids to eat their veggies while enjoying a tasty treat!
Ingredients
- 1 cup frozen spinach, thawed and drained
- 1 cup canned artichoke hearts, drained and chopped
- 1 cup cream cheese, softened
- 1/2 cup sour cream
- 1 cup shredded cheddar cheese
- 1/2 cup grated Parmesan cheese
- 1 teaspoon garlic powder
- Salt and pepper to taste
- Veggie sticks (carrots, celery, bell peppers, etc.) for dipping
Instructions
- Preheat your oven to 350°F (175°C).
- In a mixing bowl, combine the softened cream cheese, sour cream, cheddar cheese, Parmesan cheese, garlic powder, salt, and pepper. Mix until well blended.
- Fold in the chopped spinach and artichoke hearts until evenly distributed.
- Transfer the mixture to a baking dish and smooth the top.
- Bake for 20-25 minutes or until bubbly and golden on top.
- Serve warm with assorted veggie sticks for dipping. Enjoy!
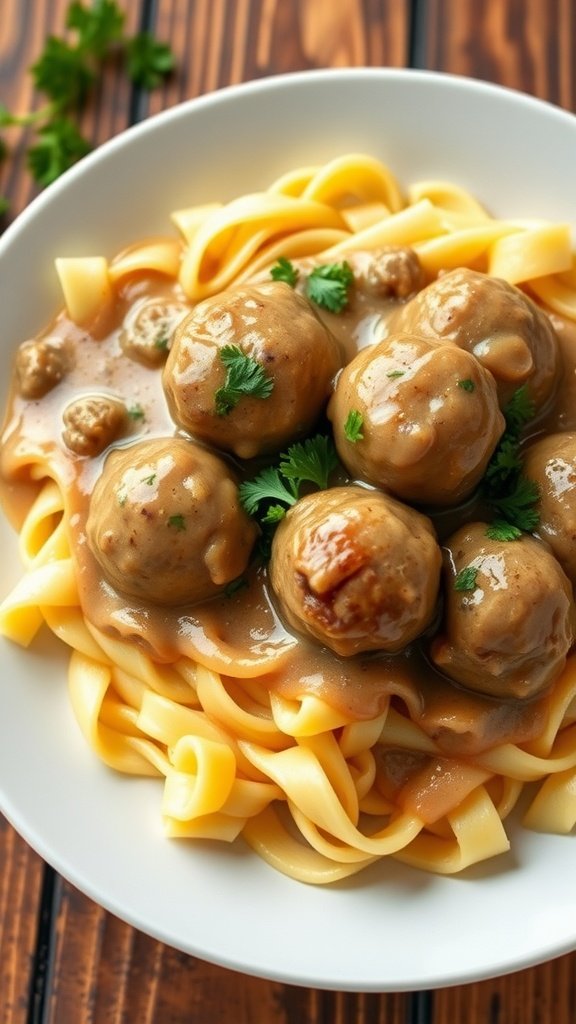
Mini Meatballs with Marinara Sauce

Mini meatballs are a delightful finger food that kids just can’t resist. They’re flavorful, tender, and perfect for dipping into tangy marinara sauce. Plus, they are super easy to whip up, making them a go-to option for busy parents looking to please picky eaters.
The combination of juicy meat and rich sauce creates a satisfying bite that kids love. Whether served as a snack, an appetizer, or part of a meal, these mini meatballs are sure to be a hit!
Ingredients
- 1 pound ground beef or turkey
- 1/2 cup breadcrumbs
- 1/4 cup grated Parmesan cheese
- 1/4 cup chopped parsley
- 1 egg
- 2 cloves garlic, minced
- 1 teaspoon salt
- 1/2 teaspoon black pepper
- 1 teaspoon Italian seasoning
- 2 cups marinara sauce
Instructions
- Preheat Oven: Start by preheating your oven to 400°F (200°C).
- Mix Ingredients: In a large bowl, combine ground meat, breadcrumbs, Parmesan cheese, parsley, egg, garlic, salt, pepper, and Italian seasoning. Mix until well combined.
- Shape Meatballs: Roll the mixture into small balls, about 1 inch in diameter, and place them on a baking sheet lined with parchment paper.
- Bake: Bake the meatballs in the preheated oven for 15-20 minutes, or until they are cooked through and browned.
- Heat Marinara: While the meatballs are baking, heat the marinara sauce in a saucepan over medium heat.
- Serve: Once the meatballs are done, serve them warm with the marinara sauce for dipping.
Fruit Kabobs with Yogurt Dip

Fruit kabobs with yogurt dip are a fun and healthy snack that kids just love! Bright, colorful pieces of fruit are skewered on sticks, making them easy to grab and enjoy. Pair these fruity bites with a creamy yogurt dip, and you have a delightful combination that’s sure to please their taste buds.
This recipe is super simple to prepare, making it a perfect activity for kids to help with. They can choose their favorite fruits and assemble their own kabobs, promoting creativity and encouraging healthy eating!
Ingredients
- 1 cup strawberries, hulled and halved
- 1 cup green grapes
- 1 cup blueberries
- 1 cup pineapple, cut into chunks
- 1 cup bell pepper, cut into squares
- 1 cup melon, cut into cubes
- Wooden skewers
- 1 cup plain yogurt
- 1 tablespoon honey (optional)
- 1 teaspoon vanilla extract (optional)
Instructions
- Prepare the Fruit: Wash and cut all the fruits into bite-sized pieces. You can use any combination of fruits that you like.
- Assemble the Kabobs: Take a wooden skewer and alternate threading the fruits onto it. You can create fun patterns or let the kids choose their own combinations.
- Make the Yogurt Dip: In a small bowl, mix the yogurt with honey and vanilla extract if desired. This adds a touch of sweetness to the dip.
- Serve: Arrange the kabobs on a platter and place the yogurt dip in the center. It’s ready to enjoy!
Mini Pigs in a Blanket with Mustard Dip
Mini pigs in a blanket are a fun and tasty treat that kids will love! These bite-sized snacks feature savory little sausages wrapped in flaky crescent dough, making them perfect for little hands. They’re not only easy to make but also super fun to dip in a zesty mustard sauce. With a few simple ingredients, you can whip up a batch in no time, making them an ideal addition to any gathering or snack time.
The combination of the soft, buttery dough and the juicy sausage creates a flavor that’s hard to resist. Pairing them with a tangy mustard dip adds a delightful kick that balances the richness of the pastry. Plus, kids can get creative with their dipping sauces, whether it’s mustard, ketchup, or even ranch. Here’s how to make this simple and delightful recipe!
Ingredients
- 1 can of crescent roll dough
- 8 mini sausages or hot dogs
- 1/4 cup mustard (yellow or Dijon)
- 1 tablespoon honey (optional)
- 1 egg (for egg wash)
Instructions
- Preheat the oven to 375°F (190°C).
- Unroll the crescent roll dough and separate it into triangles.
- Place a mini sausage at the wide end of each triangle and roll it up towards the point.
- Place the rolled pigs on a baking sheet lined with parchment paper.
- Beat the egg in a small bowl and brush it over the tops of the dough for a golden finish.
- Bake for 12-15 minutes or until golden and puffed up.
- In a small bowl, mix the mustard and honey (if using) for the dip.
- Serve the mini pigs in a blanket warm with the mustard dip on the side.
Buffalo Cauliflower Bites with Ranch Dressing

Buffalo Cauliflower Bites are a fun, tasty twist on classic buffalo wings that kids will adore. They deliver a spicy kick while still being light and healthy. This dish is not only simple to whip up but also a great way to sneak in some veggies.
These bites are crispy on the outside and tender on the inside, making them a hit with both kids and adults. Pair them with ranch dressing for dipping, and you’ve got a snack that’s sure to please. Plus, they’re perfect for parties or after-school munching!
Ingredients
- 1 medium head of cauliflower, cut into bite-sized florets
- 1 cup all-purpose flour
- 1 teaspoon garlic powder
- 1 teaspoon onion powder
- 1 teaspoon paprika
- 1/2 teaspoon salt
- 1 cup water
- 1 cup buffalo sauce
- 2 tablespoons olive oil
- Ranch dressing for serving
Instructions
- Preheat your oven to 450°F (232°C) and line a baking sheet with parchment paper.
- In a large bowl, whisk together flour, garlic powder, onion powder, paprika, and salt. Gradually add water until the mixture is smooth.
- Dip each cauliflower floret into the batter until well coated, and place them on the prepared baking sheet.
- Bake for 20-25 minutes, or until the florets are golden and crispy.
- In a separate bowl, toss the baked cauliflower with buffalo sauce and olive oil until evenly coated.
- Return to the oven for an additional 10 minutes to crisp up the sauce.
- Serve with ranch dressing for dipping. Enjoy!
Creamy Hummus with Pita Chips
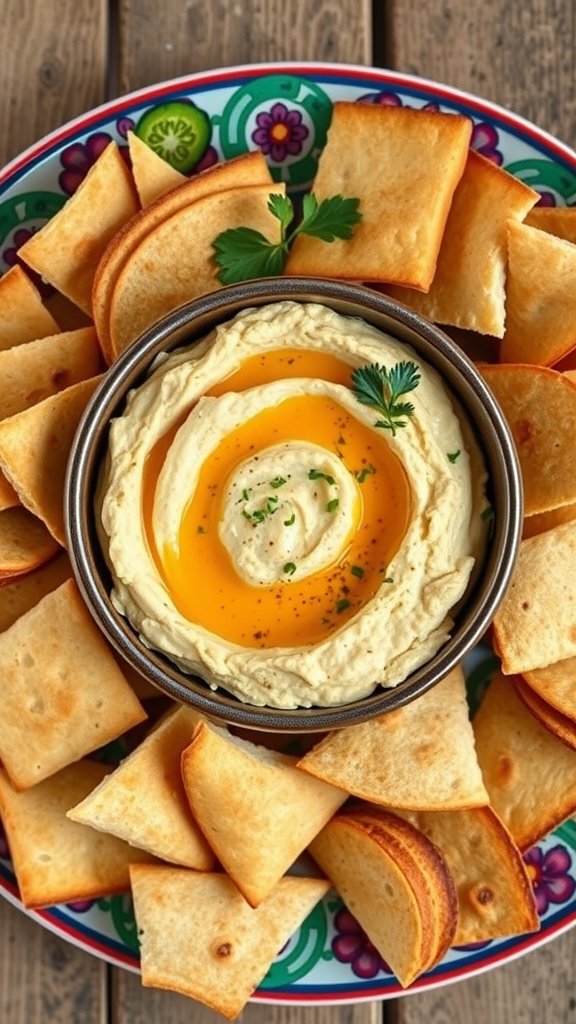
Creamy hummus paired with crispy pita chips is a delightful snack that kids will love. The smooth, rich texture of hummus, made from blended chickpeas and tahini, is not only tasty but also packed with nutrients. This recipe is super simple to whip up and offers a fun, interactive way for kids to enjoy their snacks.
The flavor profile is deliciously savory, with hints of garlic and lemon that brighten each bite. Pair it with warm, toasty pita chips for the perfect dippable treat. Making this at home allows for customization, so you can adjust the flavors to suit your family’s taste!
Ingredients
- 1 can (15 oz) chickpeas, drained and rinsed
- 1/4 cup tahini
- 2 tablespoons olive oil
- 2 tablespoons lemon juice
- 1 clove garlic, minced
- 1/2 teaspoon ground cumin
- Salt to taste
- 1/4 cup water (more if needed)
- Fresh parsley for garnish
- Pita bread, cut into triangles
- Olive oil for brushing
Instructions
- Make the Hummus: In a food processor, combine chickpeas, tahini, olive oil, lemon juice, garlic, cumin, and salt. Blend until smooth. If the mix is too thick, gradually add water until you reach your desired consistency.
- Garnish: Transfer the hummus to a serving bowl and drizzle with olive oil. Sprinkle with fresh parsley for a pop of color.
- Prepare Pita Chips: Preheat the oven to 350°F (175°C). Arrange pita triangles on a baking sheet, brush lightly with olive oil, and sprinkle with salt. Bake for about 10-12 minutes until crispy and golden.
- Serve: Enjoy the creamy hummus with warm pita chips for a delicious snack!
Sweet Potato Fries with Honey Mustard Sauce
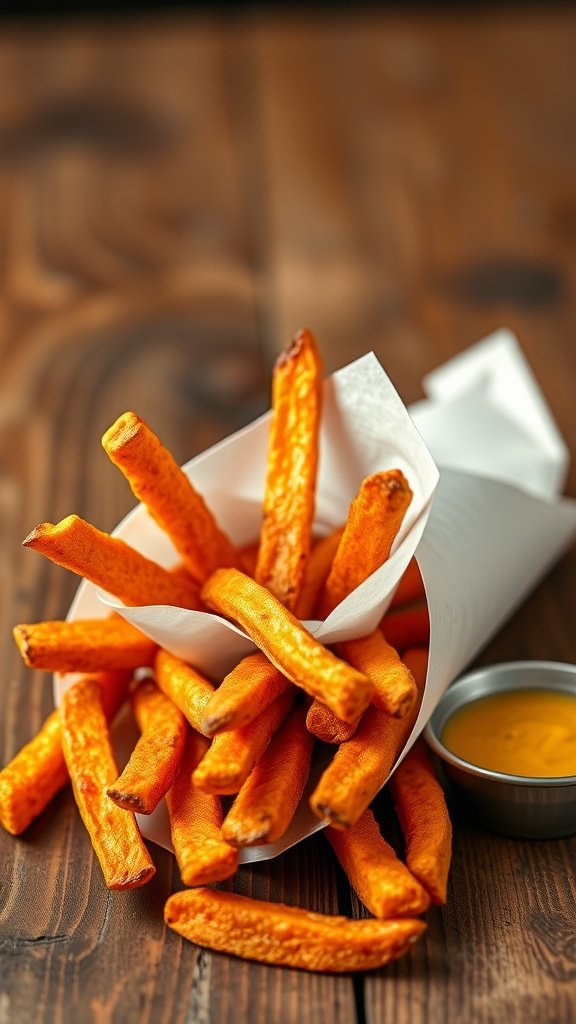
Sweet potato fries are a tasty and healthier twist on traditional fries, making them a hit with kids. They’re crispy on the outside and soft on the inside, with a hint of sweetness that pairs perfectly with a tangy honey mustard sauce. Plus, they’re super easy to make, so you can whip them up for a quick snack or a side dish.
This recipe not only satisfies cravings but also sneaks in some nutritious benefits from the sweet potatoes. The honey mustard sauce adds a delightful flavor that kids will love, making these fries a go-to option for any gathering or meal. Ready to get started? Let’s dive into the recipe!
Ingredients
- 2 large sweet potatoes
- 2 tablespoons olive oil
- 1 teaspoon salt
- 1/2 teaspoon paprika
- 1/2 teaspoon garlic powder
- 1/4 teaspoon black pepper
- 1/4 cup honey
- 1/4 cup Dijon mustard
Instructions
- Preheat the Oven: Start by preheating your oven to 425°F (220°C).
- Prepare Sweet Potatoes: Peel the sweet potatoes and cut them into thin fries. Try to keep them uniform in size for even cooking.
- Toss with Oil and Spices: In a large bowl, combine the sweet potato fries, olive oil, salt, paprika, garlic powder, and black pepper. Toss until the fries are well coated.
- Arrange on Baking Sheet: Spread the seasoned fries in a single layer on a baking sheet lined with parchment paper.
- Bake: Bake in the preheated oven for about 25-30 minutes, flipping halfway through, until they are crispy and golden brown.
- Make the Honey Mustard Sauce: While the fries are baking, mix honey and Dijon mustard in a small bowl until smooth.
- Serve: Once the fries are done, serve them hot with the honey mustard sauce on the side for dipping.
Zucchini Fritters with Tzatziki Sauce

Zucchini fritters are a delightful snack that kids will love. They have a crispy outside and a soft, flavorful inside, making them a fun food to dip. Served with a refreshing tzatziki sauce, these fritters offer a perfect blend of textures and tastes.
This recipe is straightforward, requiring just a few ingredients and minimal prep time. It’s a great way to sneak in some veggies while keeping it light and tasty!
Ingredients
- 2 medium zucchinis, grated
- 1 teaspoon salt
- 1/2 cup all-purpose flour
- 1/4 cup grated Parmesan cheese
- 1 large egg
- 1/4 teaspoon black pepper
- 1/4 teaspoon garlic powder
- 2 tablespoons chopped fresh parsley
- Oil for frying
Instructions
- Prepare the Zucchini: Grate the zucchinis and place them in a bowl. Sprinkle with salt and let them sit for about 10 minutes. This will help draw out excess moisture.
- Mix the Batter: After 10 minutes, squeeze the grated zucchini to remove excess liquid. In a separate bowl, combine the zucchini with flour, Parmesan cheese, egg, black pepper, garlic powder, and parsley. Mix until well combined.
- Fry the Fritters: Heat oil in a pan over medium heat. Scoop tablespoon-sized portions of the zucchini mixture into the pan, flattening them slightly. Cook for about 3-4 minutes on each side or until golden brown.
- Serve with Tzatziki: While the fritters cook, prepare the tzatziki sauce by mixing Greek yogurt, chopped cucumber, garlic, lemon juice, and a pinch of salt in a small bowl. Serve the warm fritters with tzatziki on the side for dipping.
Crispy Potato Wedges with Ketchup
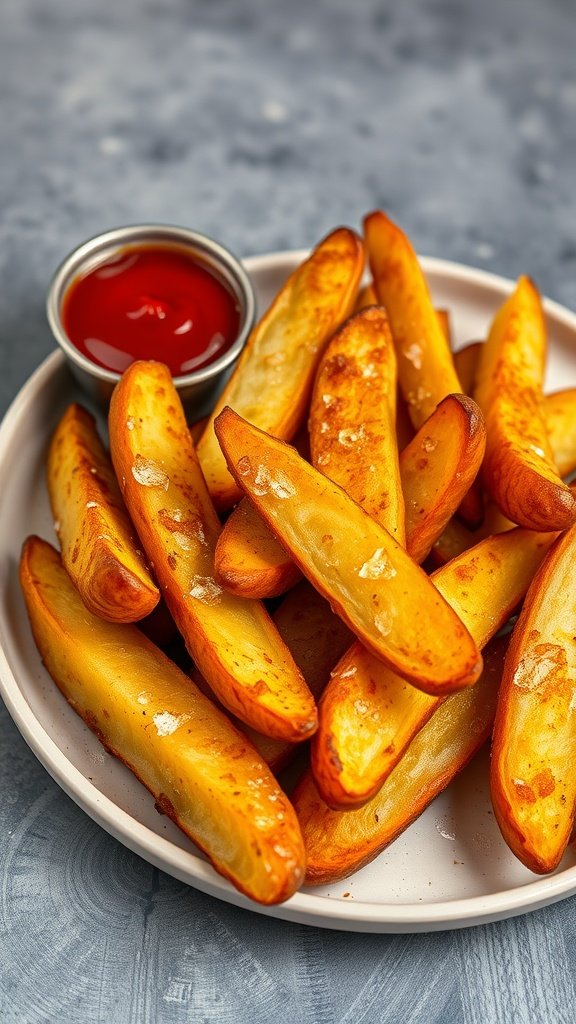
Crispy potato wedges are a fun and tasty finger food that kids absolutely adore! These golden-brown wedges are seasoned to perfection, giving them a delightful crunch on the outside while remaining soft and fluffy on the inside. Paired with a side of ketchup for dipping, these wedges make for a simple yet satisfying snack or side dish.
The best part? Making these potato wedges is a breeze! You can easily whip them up with just a few ingredients, making them perfect for busy days or spontaneous gatherings. Everyone will love enjoying these crispy bites!
Ingredients
- 4 large russet potatoes
- 3 tablespoons olive oil
- 1 teaspoon garlic powder
- 1 teaspoon paprika
- 1 teaspoon salt
- 1/2 teaspoon black pepper
- Ketchup for dipping
Instructions
- Preheat the oven to 425°F (220°C) and line a baking sheet with parchment paper.
- Wash and scrub the potatoes, then cut them into wedges.
- In a large bowl, toss the potato wedges with olive oil, garlic powder, paprika, salt, and pepper until evenly coated.
- Spread the wedges in a single layer on the prepared baking sheet.
- Bake for 30-35 minutes, turning halfway through, until the wedges are golden and crispy.
- Serve warm with ketchup for dipping.
Caprese Salad Skewers with Balsamic Glaze
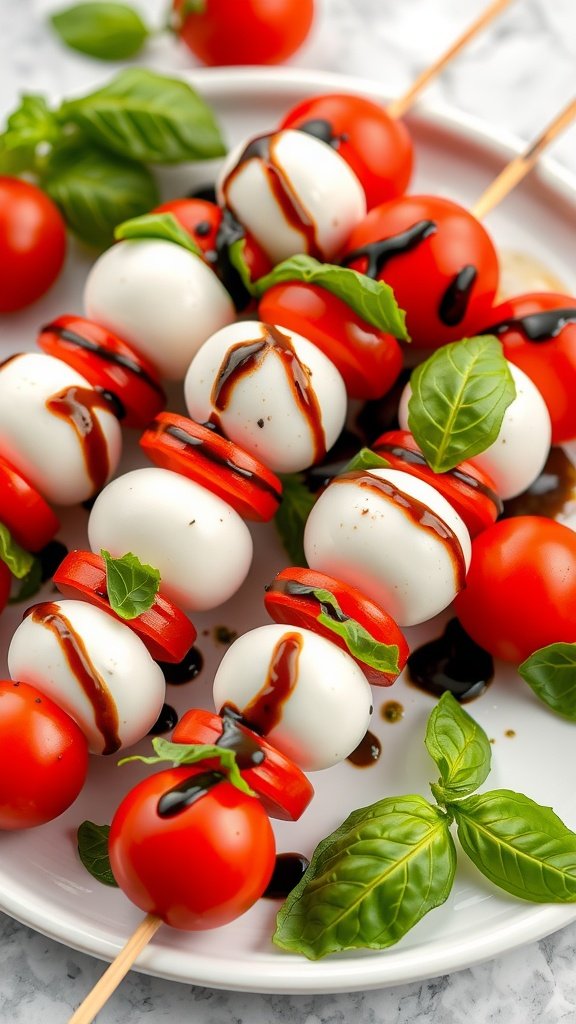
Caprese Salad Skewers are a fun and colorful twist on the classic Italian dish. They combine fresh mozzarella, juicy cherry tomatoes, and fragrant basil leaves, all drizzled with a rich balsamic glaze. This dish is not only visually appealing but also bursting with flavor, making it a hit for kids and adults alike.
Making these skewers is super easy and perfect for a quick appetizer or a snack. Just assemble the ingredients on skewers, and you’re ready to serve. They are great for parties or family gatherings, and kids will love helping to put them together!
Ingredients
- 1 pint cherry tomatoes
- 8 ounces fresh mozzarella balls
- 1 bunch fresh basil leaves
- 1/4 cup balsamic glaze
- Salt and pepper to taste
- Skewers (6-inch or 8-inch)
Instructions
- Prepare the Skewers: Take a skewer and thread a cherry tomato onto it, followed by a mozzarella ball, a basil leaf, and then another cherry tomato. Repeat this until the skewer is filled, leaving some space at the ends.
- Season: Once all skewers are assembled, drizzle them with balsamic glaze. Add a pinch of salt and pepper if desired.
- Serve: Arrange the skewers on a platter and enjoy as a fresh, dippable finger food!
Veggie Spring Rolls with Peanut Sauce

Veggie spring rolls are a fun and healthy snack that kids will love. These delightful rolls are packed with colorful, crunchy veggies and are easy to make, making them a great choice for little hands to dip and enjoy. The addition of a creamy peanut sauce brings a deliciously nutty flavor that complements the fresh ingredients perfectly.
Not only are these spring rolls visually appealing, but they also provide a burst of freshness with every bite. You can customize the veggies based on your kids’ preferences, ensuring a tasty and nutritious treat. Plus, they’re simple enough to whip up for a quick snack or as part of a meal!
Ingredients
- 8 rice paper wrappers
- 1 cup shredded carrots
- 1 cup cucumber, thinly sliced
- 1 cup bell peppers, thinly sliced
- 1 cup lettuce leaves, torn
- 1/2 cup fresh cilantro leaves
- 1/2 cup cooked vermicelli noodles (optional)
Instructions
- Prepare the Vegetables: Wash and cut all the vegetables into thin strips. Set aside.
- Soak the Rice Paper: Fill a large bowl with warm water. Dip one rice paper wrapper into the water for about 10-15 seconds until it becomes soft and pliable. Lay it flat on a clean surface.
- Fill the Wrapper: Place a small handful of shredded carrots, cucumber, bell peppers, lettuce, and cilantro in the center of the wrapper. If using, add a few vermicelli noodles.
- Roll It Up: Fold the sides of the rice paper over the filling, then roll it up tightly from the bottom to the top. Repeat with the remaining wrappers and filling.
- Make the Peanut Sauce: In a small bowl, whisk together 1/2 cup peanut butter, 2 tablespoons soy sauce, 1 tablespoon honey, and 1 tablespoon lime juice until smooth. Add a little water to reach your desired consistency.
- Serve: Arrange the spring rolls on a platter and serve with the peanut sauce for dipping.
Cheesy Garlic Breadsticks with Marinara

Cheesy garlic breadsticks are a fun and tasty treat that both kids and adults can enjoy. They’re soft, cheesy, and have a delightful garlic flavor that makes them irresistible. Dipped in marinara sauce, they become a perfect finger food for any gathering or snack time.
This recipe is straightforward, making it an easy option for busy parents who want to whip up something delicious without spending hours in the kitchen. Plus, kids love to help with the preparation, making it a fun family activity!
Ingredients
- 1 can of refrigerated pizza dough
- 2 tablespoons unsalted butter, melted
- 2 cloves garlic, minced
- 1 teaspoon dried oregano
- 1 cup shredded mozzarella cheese
- 1/4 cup grated Parmesan cheese
- Marinara sauce for dipping
Instructions
- Preheat the oven to 400°F (200°C) and line a baking sheet with parchment paper.
- Unroll the pizza dough on a floured surface and cut it into strips, about 1 inch wide.
- In a small bowl, mix melted butter, minced garlic, and dried oregano. Brush the mixture over each strip of dough.
- Sprinkle shredded mozzarella and grated Parmesan cheese on top of the buttered strips.
- Place the strips on the prepared baking sheet and bake for 12-15 minutes, or until golden brown.
- Remove from the oven and let cool for a few minutes before serving with marinara sauce!
Nachos with Melted Cheese and Salsa
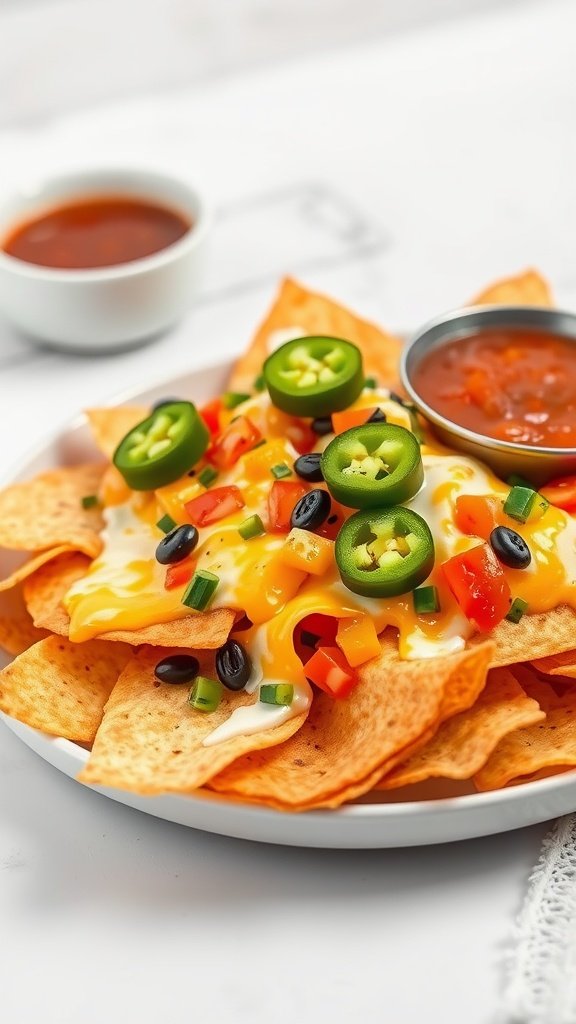
Nachos with melted cheese and salsa are a fun and tasty snack that kids absolutely adore. The crunchy tortilla chips topped with gooey cheese create a delightful contrast that’s hard to resist. Add in colorful toppings like diced tomatoes, jalapeños, and olives, and you have a dish that is not only delicious but also visually appealing.
This recipe is simple to make and can be prepared in just a few minutes, making it a perfect choice for parties or a quick after-school treat. Pair it with your favorite salsa for dipping, and you’ll have a crowd-pleaser on your hands.
Ingredients
- 1 bag of tortilla chips
- 2 cups shredded cheese (cheddar or a blend)
- 1/2 cup diced tomatoes
- 1/4 cup sliced jalapeños
- 1/4 cup sliced black olives
- 1/4 cup chopped green onions
- Salsa for dipping
Instructions
- Preheat your oven to 350°F (175°C).
- Spread the tortilla chips evenly on a baking sheet.
- Sprinkle shredded cheese generously over the chips.
- Add diced tomatoes, jalapeños, and black olives on top of the cheese.
- Bake in the oven for about 10 minutes, or until the cheese is fully melted.
- Remove from the oven and top with chopped green onions.
- Serve hot with salsa on the side for dipping.
Popcorn Chicken with BBQ Sauce

Popcorn chicken is a fun and bite-sized treat that kids adore! These crispy, tender morsels are perfect for dipping in your favorite sauces, especially a tangy BBQ. They’re easy to whip up, making them a fantastic option for a quick snack or a party platter.
With a delightful crunch and a juicy inside, popcorn chicken is sure to please even the pickiest eaters. Plus, you can customize the spices and sauces to suit your family’s taste. Let’s get cooking!
Ingredients
- 1 pound boneless chicken breast, cut into bite-sized pieces
- 1 cup buttermilk
- 1 cup all-purpose flour
- 1 teaspoon garlic powder
- 1 teaspoon paprika
- 1/2 teaspoon salt
- 1/2 teaspoon pepper
- Vegetable oil, for frying
- BBQ sauce, for dipping
Instructions
- Marinate the Chicken: In a bowl, combine chicken pieces and buttermilk. Mix well and let it marinate in the fridge for at least 30 minutes.
- Prepare the Coating: In another bowl, mix flour, garlic powder, paprika, salt, and pepper.
- Coat the Chicken: Remove the chicken from the buttermilk and let the excess drip off. Dredge each piece in the flour mixture until fully coated.
- Heat the Oil: In a deep skillet, heat vegetable oil over medium-high heat. You want enough oil to cover the chicken pieces while frying.
- Fry the Chicken: Working in batches, carefully add the coated chicken to the hot oil. Fry until golden brown, about 3-4 minutes per side. Remove and let drain on a paper towel.
- Serve: Place the popcorn chicken on a plate and serve with BBQ sauce for dipping.
Avocado Toast Bites with Cherry Tomatoes
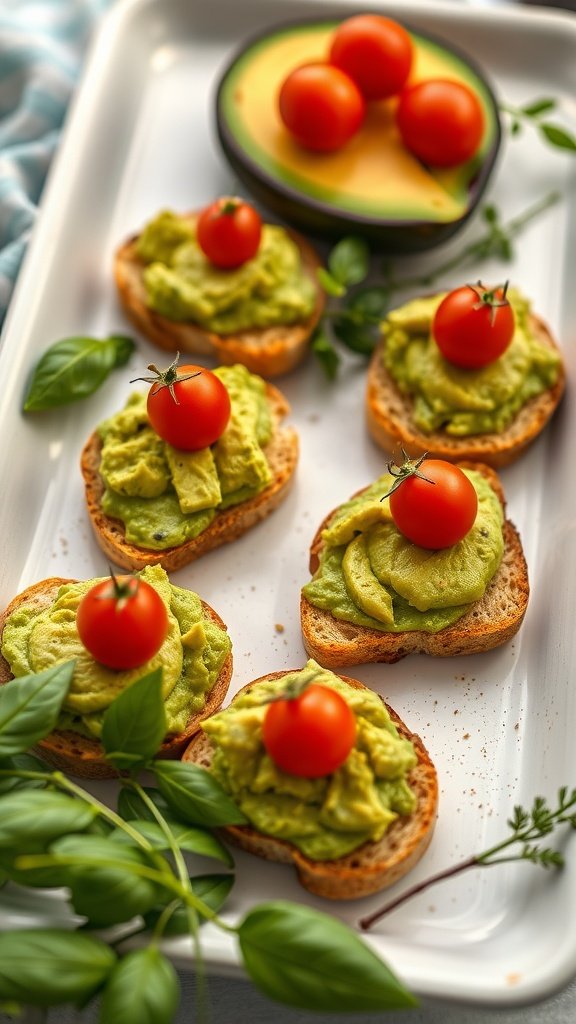
Avocado toast bites are a fun and tasty snack that kids will enjoy. These little bites are creamy, flavorful, and packed with nutrients. The freshness of ripe avocados combined with the sweetness of cherry tomatoes creates a delightful contrast that is sure to please even the pickiest eaters.
What’s great about this recipe is how simple it is to prepare. Just mash up some avocados, spread them on toasted bread, and top with cherry tomatoes. It’s a quick and healthy option for lunch or an afternoon snack that kids can help make!
Ingredients
- 2 ripe avocados
- 1 tablespoon lemon juice
- Salt and pepper to taste
- 6 slices of whole-grain bread
- 1 cup cherry tomatoes, halved
- Fresh basil leaves for garnish
Instructions
- Prepare the Avocado: In a bowl, mash the ripe avocados with lemon juice, adding salt and pepper to taste.
- Toast the Bread: Lightly toast the slices of whole-grain bread until golden brown.
- Assemble the Bites: Spread a generous layer of the avocado mixture on each slice of toast.
- Add the Toppings: Place halved cherry tomatoes on top of the avocado spread.
- Garnish: Add fresh basil leaves for an extra pop of flavor.
Taco Cups with Sour Cream

Taco Cups are a fun twist on traditional tacos, offering bite-sized portions that are perfect for little hands. They combine the savory flavor of seasoned meat, fresh veggies, and a dollop of creamy sour cream, making them a hit with kids. Plus, they’re super easy to make, so you can whip them up for a snack or a party in no time!
The crispy taco shells hold all the delicious ingredients together, providing a satisfying crunch with each bite. These cups can be customized with your favorite toppings, making them an enjoyable meal for everyone. It’s a great way to get kids involved in cooking, as they can help assemble their own taco cups!
Ingredients
- 1 lb ground beef or turkey
- 1 packet taco seasoning
- 24 small taco shells
- 1 cup shredded lettuce
- 1 cup diced tomatoes
- 1/2 cup shredded cheese (cheddar or Mexican blend)
- 1/2 cup sour cream
- 1/4 cup chopped green onions
Instructions
- Cook the Meat: In a skillet over medium heat, brown the ground beef or turkey until fully cooked. Drain excess fat and stir in the taco seasoning. Follow the package instructions for adding water and simmer until thickened.
- Prepare the Shells: Preheat your oven to 350°F (175°C). Place the taco shells in a baking dish, standing upright.
- Fill the Shells: Spoon the seasoned meat into each taco shell, filling them generously.
- Bake: Place the filled taco cups in the oven for about 5-7 minutes, just enough to warm them through.
- Top and Serve: Remove from the oven and let cool slightly. Add shredded lettuce, diced tomatoes, shredded cheese, and a dollop of sour cream on top. Sprinkle with chopped green onions before serving.
Peanut Butter and Banana Roll-Ups
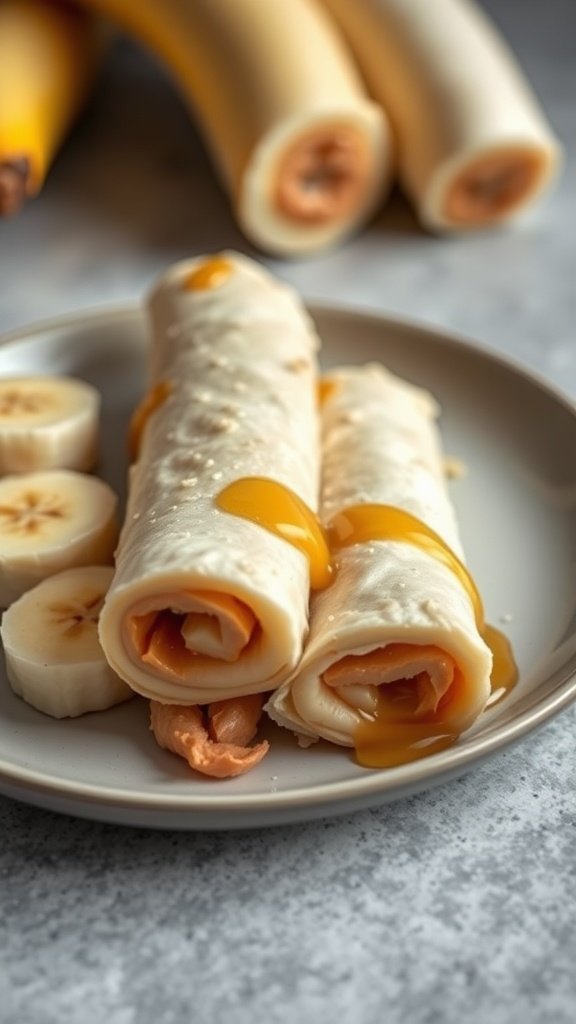
Peanut Butter and Banana Roll-Ups are a tasty and fun snack that’s perfect for kids. They combine the creamy texture of peanut butter with the sweetness of banana, all wrapped up in a soft tortilla. This simple recipe is not only easy to make but also provides a great balance of protein and natural sugars, making it a delightful treat for little ones.
The roll-ups are versatile and can be enjoyed as an after-school snack, a lunchbox addition, or even a healthy dessert. Kids will love the hands-on experience of making these, and the result is a delicious, dippable finger food that’s sure to satisfy their cravings.
Ingredients
- 2 large flour tortillas
- 1/2 cup peanut butter
- 2 bananas
- 1 tablespoon honey (optional)
- 1/4 cup granola (optional)
Instructions
- Spread peanut butter evenly over each tortilla.
- Peel and slice bananas, placing them down the center of each tortilla.
- If desired, drizzle honey over the bananas and sprinkle granola on top.
- Carefully roll up the tortillas tightly, enclosing the filling.
- Slice each roll-up into bite-sized pieces and serve immediately or store in an airtight container for later.
Cucumber Sandwiches with Cream Cheese
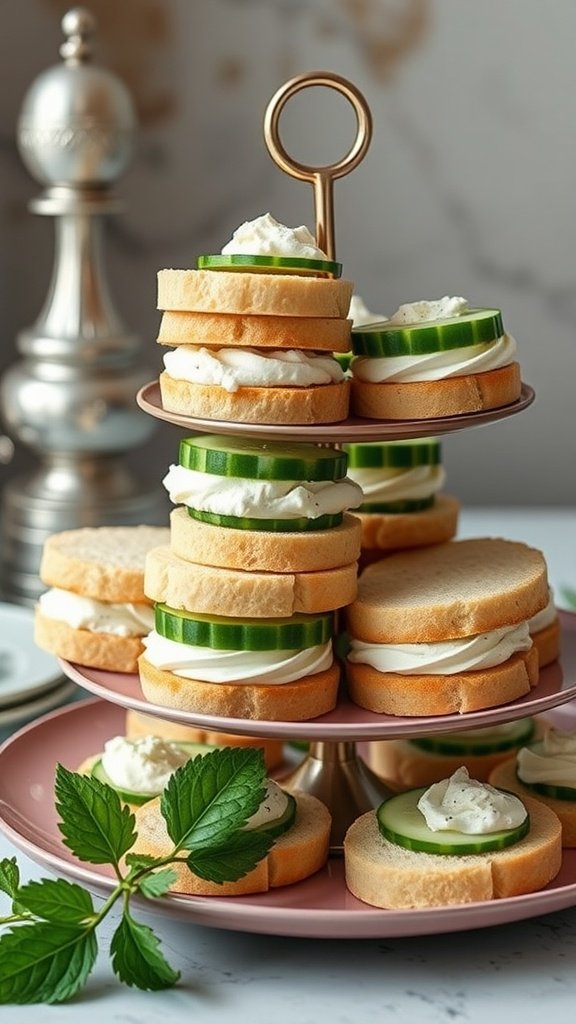
Cucumber sandwiches with cream cheese are a delightful, light treat that kids often enjoy. The refreshing crunch of the cucumber paired with the smoothness of cream cheese creates a tasty combination. Plus, they’re simple to make and can be prepared in no time!
This finger food is perfect for parties, picnics, or just a fun snack at home. With their bright colors and fun shapes, these sandwiches are sure to capture the attention of little ones. Let’s dive into how you can whip these up in your own kitchen!
Ingredients
- 1 loaf of soft white bread
- 8 oz cream cheese, softened
- 1 tablespoon fresh dill, chopped (optional)
- 1 medium cucumber, thinly sliced
- Salt and pepper to taste
Instructions
- Prepare the Filling: In a bowl, mix the softened cream cheese with fresh dill (if using), salt, and pepper until well combined.
- Cut the Bread: Use a cookie cutter or knife to cut the bread into desired shapes, such as circles or squares.
- Assemble the Sandwiches: Spread a generous amount of the cream cheese mixture on one slice of bread. Top with a slice of cucumber and another piece of bread. Press gently to secure.
- Serve: Arrange the sandwiches on a platter. You can cut them into smaller pieces for easy handling or leave them whole.
Chocolate Dipped Pretzel Rods

Chocolate dipped pretzel rods are a delightful treat that combines sweet and salty flavors in every bite. They’re crunchy, chocolaty, and can be customized with sprinkles or nuts, making them a fun project for kids to get involved with. Not only are they tasty, but they’re also easy to prepare, requiring minimal ingredients and just a little bit of time.
These pretzel rods are perfect for parties, snack time, or as a special treat in lunchboxes. Kids will love the hands-on experience of decorating them, and you’ll enjoy how simple it is to whip up a batch. You can even get creative with different types of chocolate or toppings!
Ingredients
- 1 bag of pretzel rods
- 2 cups chocolate chips (milk, dark, or white)
- 1 tablespoon coconut oil (optional, for smoothness)
- Sprinkles, crushed nuts, or candy for decoration
Instructions
- Melt the Chocolate: In a microwave-safe bowl, combine chocolate chips and coconut oil. Heat in the microwave in 30-second intervals, stirring in between, until smooth.
- Dip the Pretzels: Hold a pretzel rod by one end and dip it into the melted chocolate, covering about two-thirds of the rod. Let any excess chocolate drip off.
- Add Toppings: Immediately sprinkle your choice of toppings over the chocolate before it sets.
- Let Them Set: Place the dipped pretzel rods on a baking sheet lined with parchment paper. Allow the chocolate to cool and harden completely, which may take about 30 minutes.
- Serve and Enjoy: Once the chocolate has set, display your chocolate dipped pretzel rods in a jar or serve them on a platter for everyone to enjoy!
Rice Cake Snacks with Nutella and Bananas
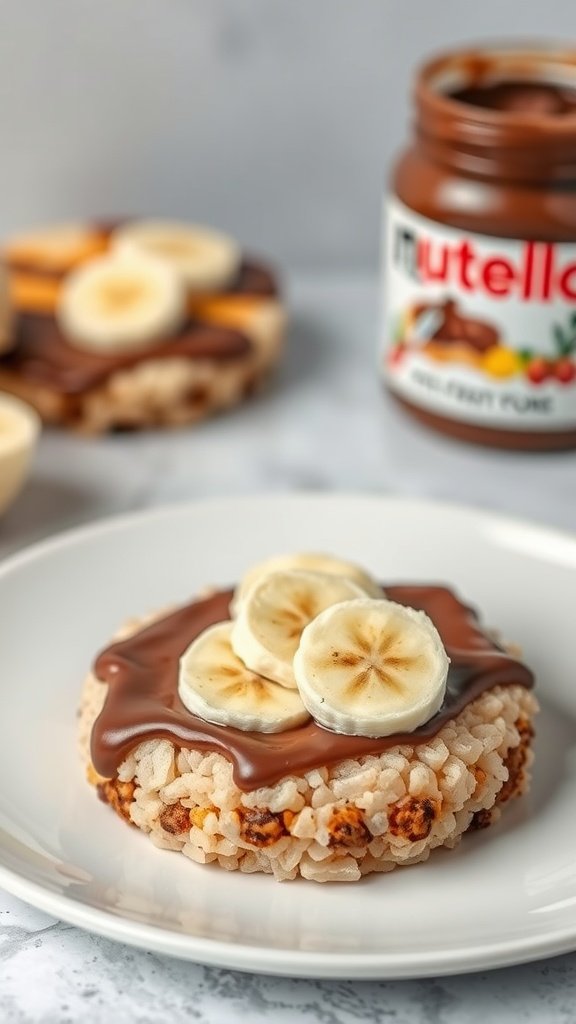
Rice cake snacks topped with Nutella and bananas are a delightful treat that kids simply adore. The sweet and creamy Nutella perfectly complements the light, crispy rice cake, while banana slices add a fresh, fruity touch. This recipe is not only delicious but also incredibly easy to make, making it a wonderful option for a quick snack or dessert.
Kids can help assemble these snacks, making it a fun activity for the whole family. Plus, they are customizable! Feel free to add sprinkles or nuts for extra crunch. Here’s how you can whip up these tasty treats:
Ingredients
- 4 rice cakes
- 1/2 cup Nutella
- 2 ripe bananas, sliced
- Optional: sprinkles or chopped nuts
Instructions
- Spread a generous layer of Nutella on each rice cake.
- Top with sliced bananas, arranging them evenly.
- If desired, sprinkle with sprinkles or chopped nuts for added texture.
- Serve immediately and enjoy!
Sausage and Cheese Platter with Crackers

This sausage and cheese platter is a delightful mix of flavors that kids will love munching on. With the savory taste of sliced sausages paired with creamy cheeses and crunchy crackers, it’s a simple yet satisfying snack that’s perfect for parties or after-school treats.
Not only is this platter easy to assemble, but it also encourages kids to explore different tastes and textures. You can customize it with their favorite cheeses and sausages, ensuring everyone finds something they enjoy. Give this recipe a try for a fun and dippable finger food!
Ingredients
- 1 cup sliced pepperoni
- 1 cup sliced salami
- 8 oz cheddar cheese, cubed
- 8 oz gouda cheese, cubed
- 1 cup assorted crackers
- 1/2 cup hummus or ranch dressing for dipping
Instructions
- Prepare the Platter: On a large serving board or platter, arrange the slices of pepperoni and salami in sections.
- Add the Cheese: Place the cubed cheddar and gouda cheese next to the meats for easy access.
- Include Crackers: Scatter the assorted crackers around the meats and cheeses to create a colorful display.
- Serve with Dip: Place a small bowl of hummus or ranch dressing in the center for dipping and enjoy!
Oven-Baked Chicken Tenders with Honey Mustard

Oven-baked chicken tenders are a delightful and healthier alternative to fried options. They are crispy on the outside while remaining tender and juicy on the inside. The hint of seasoning enhances the natural flavor of the chicken, making these tenders a favorite among kids and adults alike.
Pair them with a sweet and tangy honey mustard dip for a tasty treat that’s easy to prepare. This recipe makes it simple to whip up a batch for lunch, dinner, or snack time—perfect for when the little ones are feeling peckish!
Ingredients
- 1 lb chicken breast, cut into strips
- 1 cup breadcrumbs (panko for extra crunch)
- 1/2 cup all-purpose flour
- 2 large eggs
- 1 teaspoon garlic powder
- 1 teaspoon paprika
- Salt and pepper, to taste
- 1/4 cup honey
- 2 tablespoons Dijon mustard
Instructions
- Preheat the oven to 400°F (200°C) and line a baking sheet with parchment paper.
- Set up a dredging station: Place the flour in one bowl, whisk the eggs in another, and combine breadcrumbs with garlic powder, paprika, salt, and pepper in a third bowl.
- Dip each chicken strip into the flour, shake off excess, then dip in the eggs, and finally coat with the breadcrumb mixture. Press gently to ensure the coating sticks.
- Arrange the coated chicken tenders on the prepared baking sheet. Bake for 15-20 minutes, flipping halfway through, until golden brown and cooked through.
- While the chicken is baking, mix honey and Dijon mustard in a small bowl to create the dipping sauce.
- Serve the chicken tenders hot with the honey mustard dip on the side!
Baked Bean Dip with Tortilla Chips
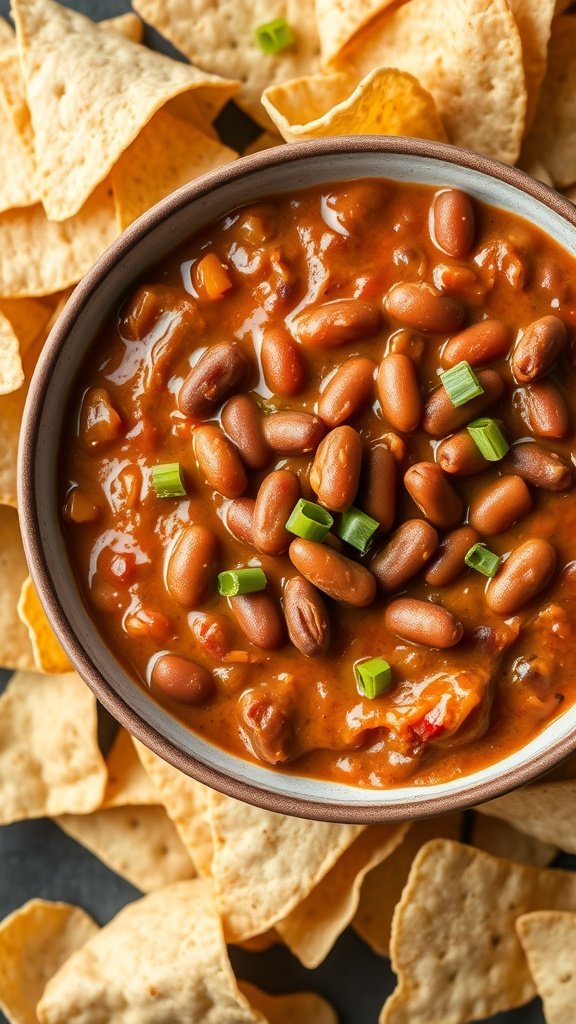
Baked Bean Dip is a delightful and hearty treat that kids will love. This dish is creamy, slightly sweet, and packed with flavor, making it a perfect snack for any occasion. Plus, it’s super simple to whip up, so you can spend more time enjoying it with your little ones.
Pair this dip with crunchy tortilla chips for a satisfying crunch that balances the smoothness of the dip. It’s a quick and easy recipe that brings a fun twist to snack time, encouraging kids to dig in and enjoy!

Ingredients
- 2 cans of baked beans
- 1 cup cream cheese, softened
- 1 cup shredded cheddar cheese
- 1/2 cup salsa
- 1 teaspoon garlic powder
- 1/2 teaspoon onion powder
- 1/4 cup chopped green onions (for garnish)
- Tortilla chips for serving
Instructions
- Preheat your oven to 350°F (175°C).
- In a large mixing bowl, combine the baked beans, softened cream cheese, shredded cheddar cheese, salsa, garlic powder, and onion powder. Mix well until everything is fully incorporated.
- Transfer the mixture to a baking dish and spread it evenly.
- Bake in the preheated oven for 25-30 minutes or until the dip is hot and the cheese is melted.
- Remove from the oven and sprinkle with chopped green onions before serving.
- Enjoy warm with tortilla chips!
Stuffed Mini Peppers with Cream Cheese
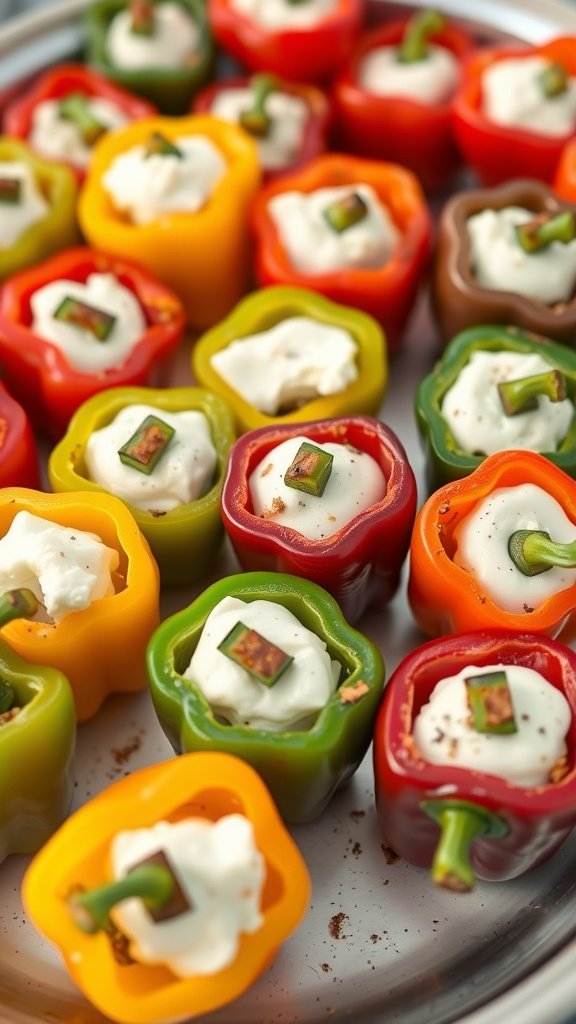
Stuffed mini peppers are a fun and colorful treat that kids absolutely enjoy. They’re filled with creamy cheese and come in a variety of flavors, making them a delicious choice for any occasion. The combination of crunchy peppers and rich cream cheese creates a delightful snack that’s both tasty and satisfying.
These little bites are super easy to whip up, making them a perfect choice for a quick after-school snack or a party platter. Plus, they’re a great way to sneak in some veggies while keeping things fun!
Ingredients
- 12 mini sweet peppers, halved and seeded
- 8 oz cream cheese, softened
- 1/2 cup shredded cheddar cheese
- 2 tablespoons sour cream
- 1 teaspoon garlic powder
- 1 teaspoon onion powder
- Salt and pepper to taste
Instructions
- Prepare the Peppers: Preheat your oven to 350°F (175°C). Slice the mini peppers in half and remove the seeds.
- Make the Filling: In a medium bowl, mix the softened cream cheese, shredded cheddar cheese, sour cream, garlic powder, onion powder, salt, and pepper until well combined.
- Stuff the Peppers: Spoon the cream cheese mixture into each pepper half, filling them generously.
- Bake: Place the stuffed peppers on a baking sheet and bake for about 15-20 minutes, or until the peppers are tender and the cheese is slightly golden.
- Serve: Allow them to cool slightly before serving. Enjoy your colorful and creamy stuffed mini peppers!
Frozen Yogurt Bark with Berries and Nuts
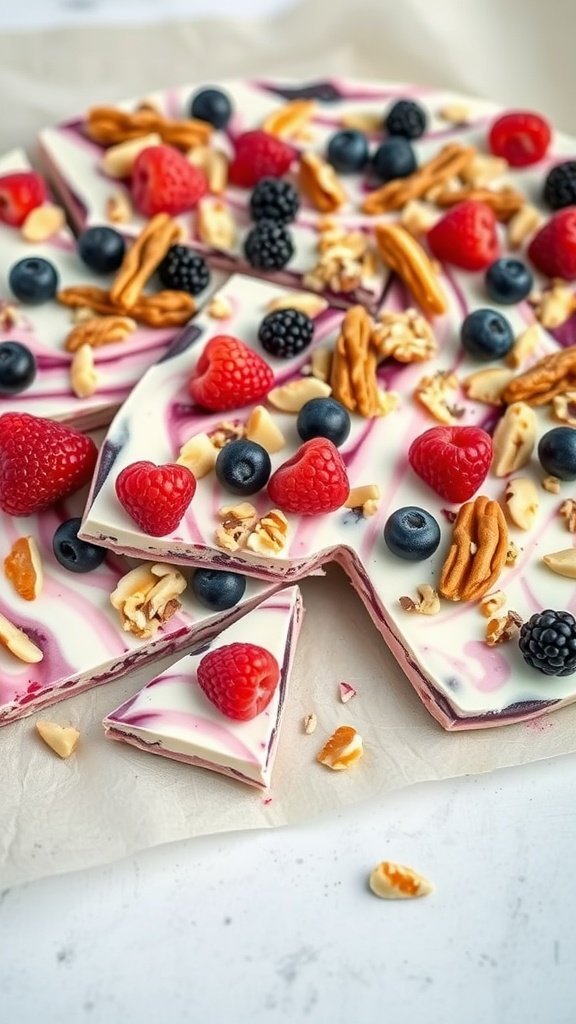
Frozen yogurt bark is a delightful treat that kids will love! It’s creamy, fruity, and crunchy, making it a fabulous snack for warm days or anytime you want something sweet. This recipe is super easy to make, and you can customize it with your favorite fruits and nuts, ensuring that it suits every taste.
The combination of tangy yogurt, fresh berries, and crunchy nuts creates a satisfying texture and flavor. Plus, it’s a healthy alternative to traditional sweets, packed with nutrients and free from excess sugar. Get ready to whip up this fun and tasty snack!
Ingredients
- 2 cups Greek yogurt (plain or flavored)
- 1 cup mixed berries (strawberries, blueberries, raspberries, blackberries)
- 1/4 cup honey or maple syrup (optional)
- 1/2 cup chopped nuts (almonds, walnuts, or pecans)
- 1/4 cup granola (optional)
Instructions
- Prepare the Yogurt: In a bowl, mix Greek yogurt with honey or maple syrup if you’re using it for extra sweetness.
- Spread the Yogurt: Line a baking sheet with parchment paper. Spread the yogurt mixture evenly on the parchment, about 1/2 inch thick.
- Add Toppings: Sprinkle the mixed berries, chopped nuts, and granola evenly over the yogurt layer.
- Freeze: Place the baking sheet in the freezer and let it freeze for at least 4 hours or until the yogurt is completely solid.
- Break into Pieces: Once frozen, remove the bark from the baking sheet and break it into pieces. Serve immediately or store in an airtight container in the freezer.
Cheesy Veggie Straws with Ranch Dip
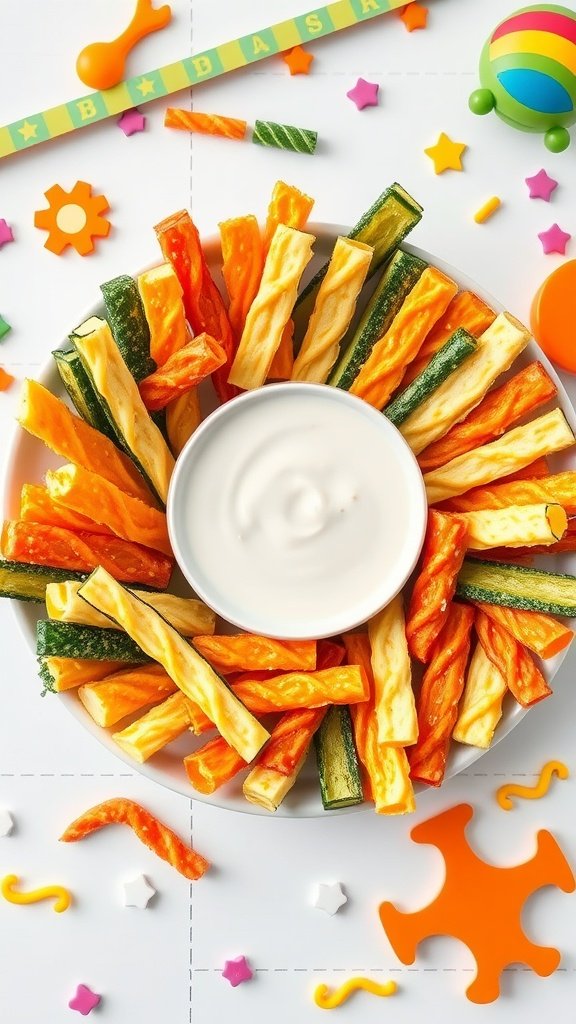
Cheesy Veggie Straws are a fun and tasty way to get kids excited about vegetables. These colorful straws are made from a mix of zucchini and carrots, giving them a delightful crunch and a cheesy flavor that kids will love. Pair them with ranch dip for an extra layer of flavor that makes snacking enjoyable and delicious.
This recipe is simple and quick, making it perfect for busy days or as a fun treat for gatherings. Plus, the vibrant colors make the dish visually appealing, encouraging kids to dive in. As a bonus, it adds a dose of nutrition to their snack time!
Ingredients
- 2 medium zucchinis, cut into sticks
- 2 medium carrots, cut into sticks
- 1 cup shredded cheese (cheddar or mozzarella)
- 1 cup all-purpose flour
- 1 teaspoon garlic powder
- 1 teaspoon onion powder
- 1/2 teaspoon salt
- 1/4 teaspoon black pepper
- 1 egg, beaten
- 1 cup ranch dressing (for dipping)
Instructions
- Preheat your oven to 400°F (200°C) and prepare a baking sheet with parchment paper.
- In a large bowl, combine the flour, cheese, garlic powder, onion powder, salt, and black pepper.
- Add the beaten egg and mix until a dough forms. If the dough is too sticky, you can add a little more flour.
- Take a piece of zucchini or carrot, and coat it with the dough, shaping it into a straw. Place on the prepared baking sheet.
- Repeat with the remaining veggies until the baking sheet is full.
- Bake for 15-20 minutes or until golden and crispy. Let cool slightly before serving with ranch dip.