If you’re looking to impress your guests at your next gathering without spending all day in the kitchen, you’ve come to the right place. This collection features 16 gourmet finger foods that are not only easy to prepare but also bring a touch of elegance to any occasion. From savory bites to sweet treats, these recipes are designed to delight your palate and make your event memorable.
Spicy Shrimp Tacos on Mini Tortillas

These spicy shrimp tacos on mini tortillas are a delightful bite-sized treat that packs a flavorful punch. With succulent shrimp marinated in zesty spices and served on soft tortillas, they’re an easy and tasty option for gatherings. The combination of fresh ingredients, like cilantro and lime, enhances the dish, making it both refreshing and satisfying.
Perfect for upscale gatherings or casual get-togethers, these tacos are simple to prepare and sure to impress your guests. Let’s dive into how to make these little delights!
Ingredients
- 1 pound shrimp, peeled and deveined
- 2 tablespoons olive oil
- 1 teaspoon chili powder
- 1/2 teaspoon cumin
- 1/2 teaspoon garlic powder
- Salt and pepper to taste
- 12 mini tortillas
- 1 cup shredded cabbage
- 1/2 cup diced tomatoes
- 1/4 cup chopped fresh cilantro
- 1 lime, cut into wedges
Instructions
- Marinate the Shrimp: In a bowl, combine shrimp, olive oil, chili powder, cumin, garlic powder, salt, and pepper. Mix well and let marinate for 15-20 minutes.
- Cook the Shrimp: Heat a skillet over medium heat. Add the marinated shrimp and cook for 2-3 minutes until they are pink and opaque.
- Warm the Tortillas: In another skillet, warm the mini tortillas for about 30 seconds on each side until soft.
- Assemble the Tacos: Place a few shrimp on each tortilla, then top with shredded cabbage, diced tomatoes, and chopped cilantro.
- Serve: Squeeze fresh lime juice over the tacos and serve immediately.
Truffle Mushroom Arancini

Truffle Mushroom Arancini are a delightful twist on the classic Italian rice ball. These golden, crispy bites are filled with creamy risotto infused with earthy truffle oil and a medley of mushrooms. The combination of flavors creates a luxurious treat that’s perfect for any upscale gathering.
Despite their gourmet appearance, arancini are surprisingly easy to make. The process involves preparing a flavorful risotto, allowing it to cool, forming it into balls, and frying until crispy. Serve them warm with a side of marinara sauce for dipping, and watch your guests savor every bite.
Ingredients
- 2 cups Arborio rice
- 4 cups vegetable broth
- 1 cup mushrooms, finely chopped
- 1 small onion, chopped
- 2 cloves garlic, minced
- 1/2 cup Parmesan cheese, grated
- 2 tablespoons truffle oil
- 2 cups breadcrumbs
- 2 eggs, beaten
- Salt and pepper to taste
- Oil for frying
Instructions
- Cook the Risotto: In a pot, sauté onions and garlic until translucent. Add mushrooms and cook until softened. Stir in Arborio rice and toast for 1-2 minutes. Gradually add vegetable broth, one ladle at a time, stirring frequently until rice is creamy and al dente.
- Add Flavor: Once the risotto is cooked, remove from heat and stir in Parmesan cheese and truffle oil. Season with salt and pepper. Let the mixture cool completely.
- Form the Arancini: Once cooled, take a small amount of risotto and form it into a ball. Repeat until all the mixture is used. Dip each ball in beaten eggs and coat with breadcrumbs.
- Fry the Balls: Heat oil in a deep pan over medium heat. Fry the arancini in batches until golden brown, about 3-4 minutes. Drain on paper towels.
- Serve: Enjoy the arancini warm with marinara sauce on the side for dipping.
Smoked Salmon Canapés with Cream Cheese
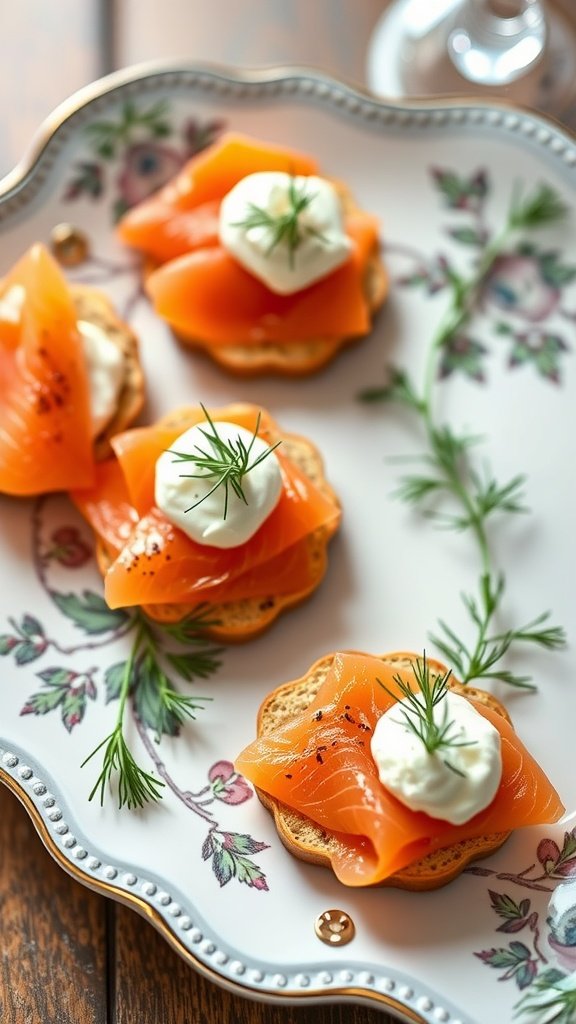
Smoked salmon canapés with cream cheese are a delightful blend of flavors and textures that make them a sophisticated choice for any gathering. The rich, smoky taste of the salmon pairs beautifully with the creamy tang of the cheese, delivering a bite that’s both savory and refreshing. Plus, they are surprisingly simple to prepare, making them ideal for both novice cooks and seasoned chefs.
These canapés are not just delicious; they’re visually appealing too. Served on crisp bread or crackers, they can be garnished with fresh herbs for an elegant touch. Whether you’re hosting an upscale event or just looking for a tasty snack, these little bites are sure to impress your guests.
Ingredients
- 8 oz smoked salmon, thinly sliced
- 8 oz cream cheese, softened
- 1 tablespoon fresh dill, chopped
- 1 tablespoon lemon juice
- 1 teaspoon capers, drained
- 1 package of small crispy bread rounds or crackers
- Fresh dill sprigs for garnish
- Freshly cracked black pepper, to taste
Instructions
- In a bowl, mix together the softened cream cheese, chopped dill, lemon juice, and capers until well combined.
- Spread a generous layer of the cream cheese mixture on each bread round or cracker.
- Top each canapé with a slice of smoked salmon, folding it creatively for a decorative effect.
- Sprinkle freshly cracked black pepper over the top for added flavor.
- Garnish with a small sprig of fresh dill before serving.
Stuffed Mini Peppers with Goat Cheese
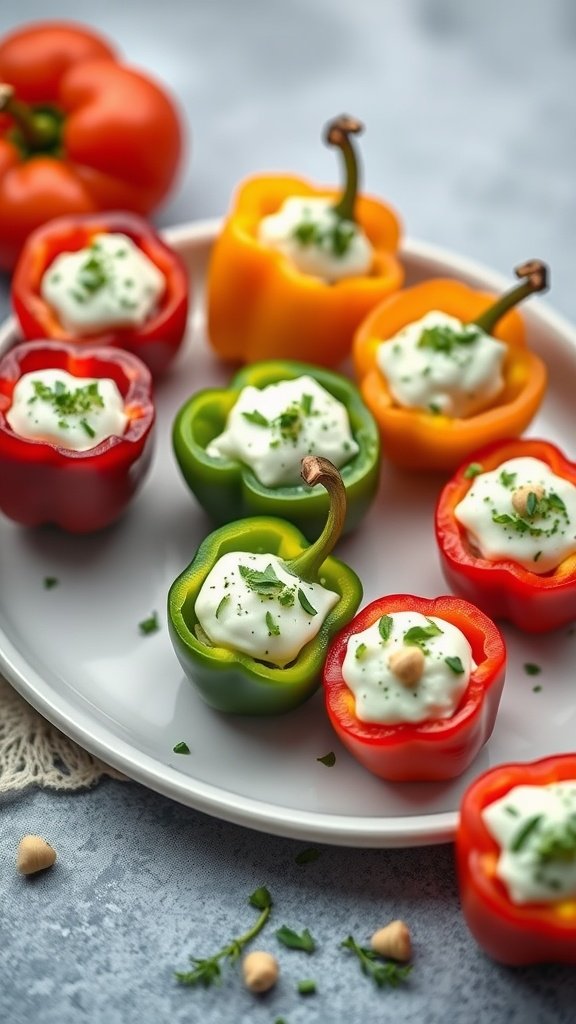
Stuffed mini peppers with goat cheese are a delightful addition to any gathering. These colorful little bites burst with flavor, combining the sweetness of the peppers with the creamy tang of goat cheese. They are not only tasty but also easy to prepare, making them a go-to choice for both casual and upscale occasions.
With just a few ingredients, you can whip up these delicious appetizers that are sure to impress your guests. They can be served cold or at room temperature, making them perfect for a variety of events. Whether you’re hosting a dinner party or a casual get-together, these stuffed mini peppers will add a touch of elegance to your table.
Ingredients
- 12 mini sweet peppers (assorted colors)
- 8 oz goat cheese, softened
- 1/4 cup cream cheese, softened
- 1 tablespoon fresh chives, chopped
- 1 tablespoon fresh parsley, chopped
- 1 teaspoon lemon juice
- Salt and pepper to taste
Instructions
- Prepare the Peppers: Preheat the oven to 375°F (190°C). Cut the tops off the mini peppers and remove the seeds. Arrange them on a baking sheet.
- Make the Filling: In a bowl, mix together the goat cheese, cream cheese, chives, parsley, lemon juice, salt, and pepper until well combined.
- Stuff the Peppers: Spoon the cheese mixture into each mini pepper, filling them generously.
- Bake: Place the baking sheet in the oven and bake for about 15-20 minutes, or until the peppers are tender and the filling is warmed through.
- Cool and Serve: Remove from the oven and let cool slightly before serving. Enjoy these tasty bites warm or at room temperature.
Mini Beef Wellington Bites

Mini Beef Wellington Bites bring a touch of luxury to any gathering. These little treats pack big flavors with tender beef, savory mushroom duxelles, and a crispy pastry exterior. Each bite is a delightful combination of rich, meaty goodness and flaky texture, making them an impressive yet easy appetizer.
Making Mini Beef Wellington Bites is a breeze, especially if you use store-bought puff pastry. They’re perfect for parties or upscale gatherings, as they look as good as they taste. Serve them warm with a side of tangy dipping sauce for a dish that your guests will love.
Ingredients
- 1 lb beef tenderloin, cut into small cubes
- 8 oz mushrooms, finely chopped
- 2 tbsp Dijon mustard
- 1 sheet of puff pastry, thawed
- 1 egg, beaten
- Salt and pepper, to taste
- 2 tbsp olive oil
- Fresh herbs, for garnish (optional)
Instructions
- Prepare the Beef: In a skillet over medium heat, add olive oil. Season the beef cubes with salt and pepper, and sear them until browned on all sides. Remove from heat and let cool.
- Make the Duxelles: In the same skillet, add the chopped mushrooms and sauté until all moisture is evaporated. Stir in the Dijon mustard and season with additional salt and pepper. Allow to cool.
- Assemble the Bites: Roll out the puff pastry on a lightly floured surface. Cut into squares large enough to hold the beef and mushroom mixture. Place a small spoonful of the duxelles on the pastry, add a cube of beef, and fold the pastry over to seal.
- Brush with Egg: Arrange the bites on a baking sheet lined with parchment paper. Brush the tops with beaten egg for a golden finish.
- Bake: Preheat your oven to 400°F (200°C). Bake for 15-20 minutes, or until the pastry is golden brown. Garnish with fresh herbs before serving.
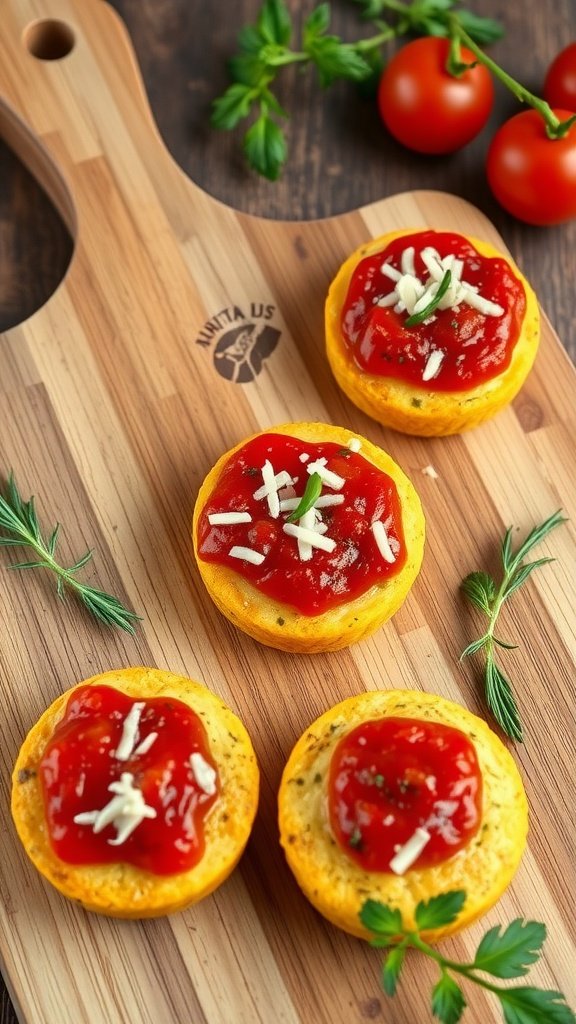
Mini Quiche Lorraines

Mini Quiche Lorraines are delightful little bites that pack a flavor punch while being incredibly easy to prepare. These savory tarts combine a rich, creamy filling with crispy, buttery pastry, making them a perfect finger food for upscale gatherings. They strike a balance between elegance and comfort, perfect for impressing your guests without spending hours in the kitchen.
The taste is a wonderful mix of eggs, cream, and cheese, often enhanced with crispy bacon and fresh herbs. They can be served warm or at room temperature, making them a versatile addition to any appetizer spread. Whether you’re hosting a cocktail party or a relaxed brunch, Mini Quiche Lorraines will surely be a hit.
Ingredients
- 1 pre-made pie crust
- 6 large eggs
- 1 cup heavy cream
- 1 cup shredded Gruyère cheese
- 1/2 cup cooked bacon, crumbled
- 1/4 cup chopped green onions
- 1/2 teaspoon salt
- 1/4 teaspoon black pepper
- Fresh parsley for garnish
Instructions
- Prepare the Crust: Preheat your oven to 375°F (190°C). Roll out the pie crust and cut it into small circles to fit into a mini muffin tin. Press the crust into the tin and set aside.
- Make the Filling: In a mixing bowl, whisk together the eggs and heavy cream until well combined. Stir in the cheese, crumbled bacon, green onions, salt, and pepper.
- Fill the Crusts: Pour the egg mixture into each crust, filling them about three-quarters full to allow for rising.
- Bake: Place the muffin tin in the oven and bake for 20-25 minutes, or until the quiches are set and lightly golden on top.
- Cool and Serve: Let the quiches cool for a few minutes before gently removing them from the tin. Garnish with fresh parsley and serve warm or at room temperature.
Savory Scallops Wrapped in Bacon
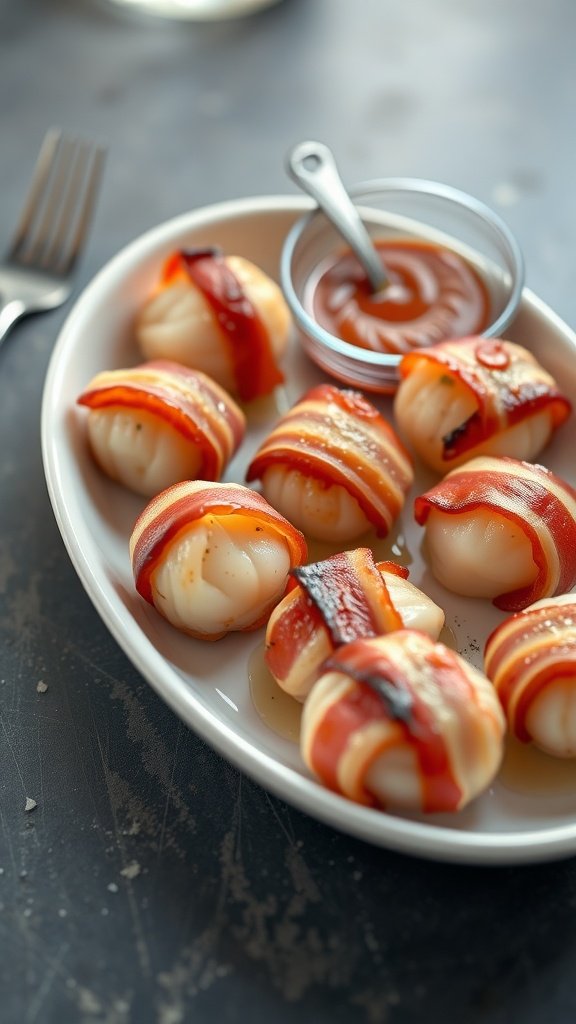
Savory scallops wrapped in bacon combine the delicate sweetness of the sea with the smoky richness of crisp bacon. This dish is not only flavorful but also easy to prepare, making it a standout choice for upscale gatherings or casual get-togethers. Each bite offers a delightful contrast between the tender scallop and the crispy bacon, creating a taste experience that’s sure to impress.
Whether you’re hosting a dinner party or simply looking to elevate your appetizer game, these bacon-wrapped scallops are a fantastic choice. They come together quickly and require just a few ingredients, allowing you to focus on enjoying your time with guests while delivering a dish that feels indulgent.
Ingredients
- 12 large sea scallops
- 6 slices of bacon, cut in half
- 1 tablespoon olive oil
- 1 teaspoon garlic powder
- 1/2 teaspoon black pepper
- 1/2 teaspoon salt
- Toothpicks (for securing)
Instructions
- Preheat your oven to 400°F (200°C).
- Rinse the scallops under cold water and pat them dry with paper towels. Season them with garlic powder, salt, and pepper.
- Wrap each scallop with half a slice of bacon and secure it with a toothpick.
- In a skillet, heat the olive oil over medium-high heat. Sear the wrapped scallops for about 2-3 minutes per side until the bacon is crispy.
- Transfer the scallops to a baking sheet and bake for an additional 5-7 minutes, or until the scallops are opaque and cooked through.
- Serve warm, and enjoy the delightful combination of flavors!
Lobster Salad on Endive Leaves
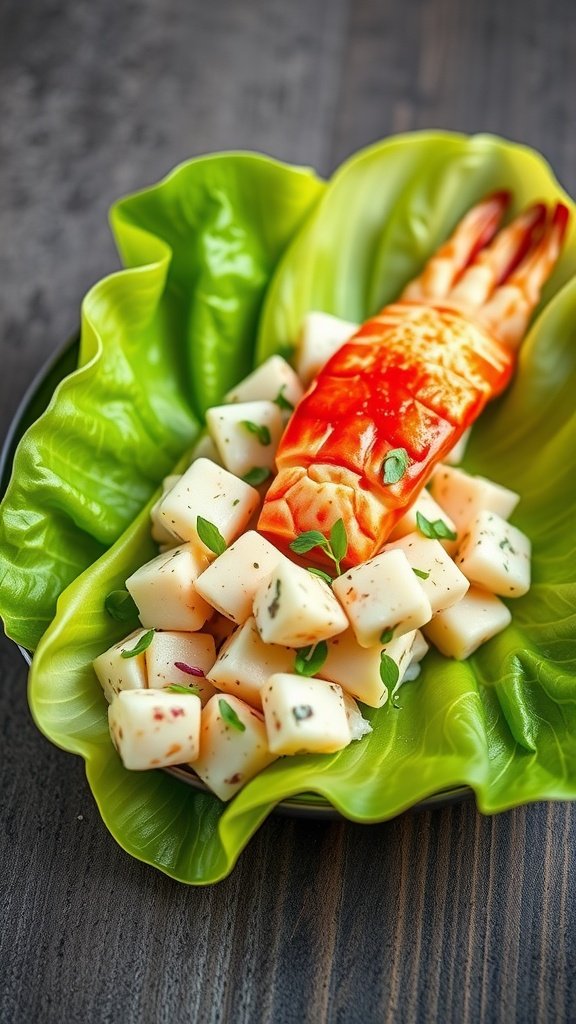
Lobster salad on endive leaves is a delightful and upscale appetizer that brings together the sweet, succulent flavor of lobster with the crisp, refreshing crunch of endive. This dish offers a beautiful presentation and a sophisticated taste that will impress your guests at any gathering.
Not only is it delicious, but it’s also quite simple to make. The combination of textures and the light, zesty dressing elevate this finger food, making it a standout choice for your next gathering.
Ingredients
- 1 pound cooked lobster meat, chopped
- 1/4 cup mayonnaise
- 1 tablespoon Dijon mustard
- 1 tablespoon fresh lemon juice
- 1/4 cup finely chopped celery
- 1 tablespoon chopped fresh chives
- Salt and pepper to taste
- 8-10 endive leaves
Instructions
- Prepare the Dressing: In a bowl, combine mayonnaise, Dijon mustard, lemon juice, salt, and pepper. Mix well to create a smooth dressing.
- Combine Ingredients: In a separate bowl, fold the chopped lobster meat, celery, and chives into the dressing until evenly coated.
- Assemble the Salad: Carefully fill each endive leaf with a generous spoonful of the lobster salad mixture.
- Serve: Arrange the filled endive leaves on a platter and enjoy your elegant finger food!
Herbed Polenta Bites with Marinara
Herbed polenta bites are a delightful addition to any upscale gathering, offering a unique twist on traditional finger foods. These bite-sized treats are made from creamy polenta, infused with fresh herbs, and topped with a savory marinara sauce, creating a perfect balance of flavors and textures. They’re simple to make, allowing you to spend more time with your guests and less time in the kitchen.
The taste is comforting yet elegant; the soft, cheesy polenta pairs beautifully with the tangy marinara, making these bites a crowd-pleaser. Whether served as an appetizer or a part of a larger spread, they are sure to impress your guests with their deliciousness and presentation.
Ingredients
- 1 cup polenta
- 4 cups vegetable broth
- 1/2 cup grated Parmesan cheese
- 1/4 cup fresh parsley, chopped
- 1 tablespoon fresh thyme, chopped
- Salt and pepper to taste
- 1 cup marinara sauce
- 1/2 cup shredded mozzarella cheese
Instructions
- Prepare the Polenta: In a large saucepan, bring the vegetable broth to a boil. Slowly whisk in the polenta, stirring constantly to avoid lumps. Reduce heat and cook for about 15 minutes until thickened.
- Mix in Add-Ins: Stir in the Parmesan cheese, chopped parsley, thyme, salt, and pepper. Mix well until combined.
- Set and Shape: Pour the polenta mixture into a lightly greased baking dish and spread it evenly. Allow it to cool and set for about 30 minutes, then cut into bite-sized squares or circles.
- Top with Marinara: Preheat the oven to 400°F (200°C). Place the polenta bites on a baking sheet, top each with a spoonful of marinara sauce, and sprinkle with shredded mozzarella cheese.
- Bake: Bake for 15-20 minutes or until the cheese is melted and bubbly. Serve warm, garnished with additional parsley if desired.
Prosciutto-Wrapped Asparagus Bundles
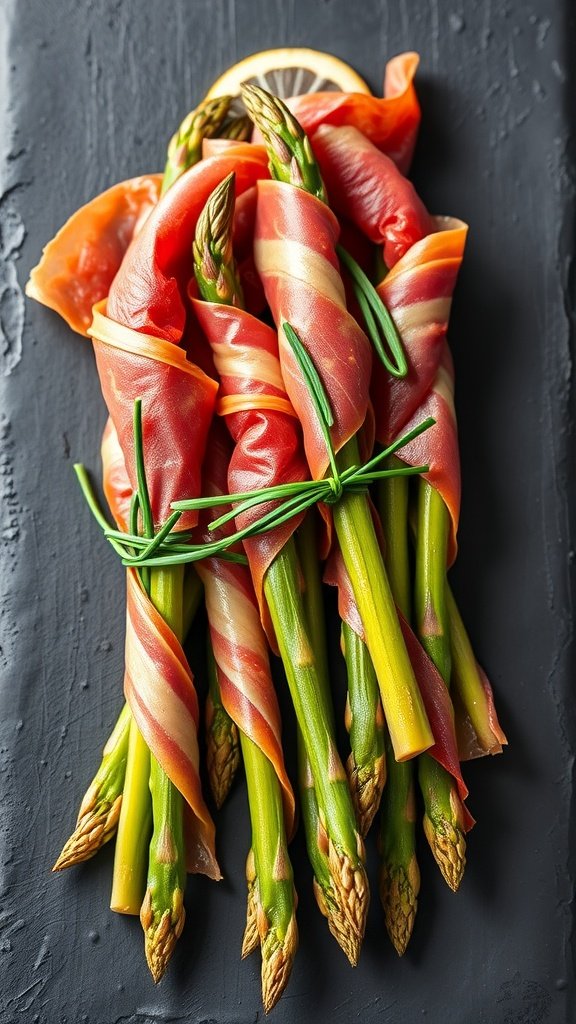
Prosciutto-wrapped asparagus bundles are a delightful and elegant appetizer that combines the earthy crunch of asparagus with the savory flavor of prosciutto. This finger food is not only delicious but also easy to prepare, making it a great choice for upscale gatherings.
The saltiness of the prosciutto enhances the natural sweetness of the asparagus, creating a balanced taste that pairs beautifully with a variety of dips or can be enjoyed on their own. Whether you’re hosting a cocktail party or a formal dinner, these bundles are sure to impress your guests.
Ingredients
- 1 pound fresh asparagus, trimmed
- 8 ounces prosciutto, sliced thin
- 1 tablespoon olive oil
- 1/2 teaspoon black pepper
- 1/4 teaspoon garlic powder
- 1/2 lemon, juiced
- Fresh chives for garnish
Instructions
- Preheat your oven to 400°F (200°C).
- In a bowl, toss the asparagus with olive oil, black pepper, garlic powder, and lemon juice until well coated.
- Take a slice of prosciutto and wrap it around each asparagus spear, starting from the bottom and spiraling up.
- Place the wrapped spears on a baking sheet lined with parchment paper.
- Bake for about 10-12 minutes, or until the prosciutto is crispy and the asparagus is tender.
- Remove from the oven and let cool slightly before serving. Garnish with fresh chives if desired.
Mini Chicken and Waffle Bites
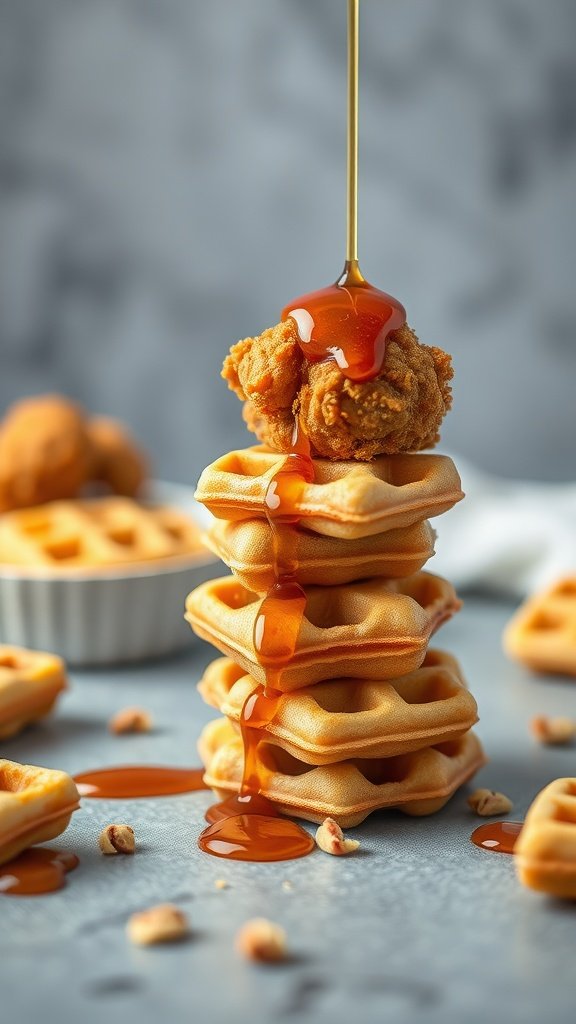
Mini Chicken and Waffle Bites are a delightful twist on a classic comfort food pairing. These bite-sized treats feature crispy fried chicken nestled between fluffy, golden waffles, drizzled with a touch of maple syrup for that perfect sweet-and-savory balance. They are not only delicious but also easy to prepare, making them an ideal finger food for upscale gatherings.
With their charming presentation and irresistible flavor, these bites are sure to impress your guests. The combination of textures—from the crunch of the chicken to the softness of the waffles—makes each bite a mini celebration. Whether you’re hosting a brunch or a cocktail party, this recipe is simple to whip up and will definitely steal the show.
Ingredients
- 4 mini waffles
- 4 pieces of fried chicken tenders (cut to fit the waffles)
- Maple syrup for drizzling
- Butter for greasing
- Pecan pieces (optional, for garnish)
Instructions
- Prepare the Waffles: If using store-bought mini waffles, warm them according to package instructions. If making homemade, mix your favorite waffle batter and cook in a mini waffle maker until golden.
- Fry the Chicken: Cook the chicken tenders in hot oil until golden and cooked through. Drain on paper towels to remove excess oil.
- Assemble the Bites: Place one mini waffle on a serving platter. Top with a piece of fried chicken and another waffle on top.
- Drizzle with Maple Syrup: Generously drizzle maple syrup over the stacked waffles and chicken. Add pecan pieces on top for an extra crunch.
- Serve Immediately: Enjoy these bites warm as a delightful appetizer at your gathering!
Crispy Vegetable Spring Rolls

Crispy vegetable spring rolls are a delightful treat that perfectly balance crunch and flavor. These rolls are filled with a colorful mix of fresh vegetables, making them a light yet satisfying option for any gathering. With a crispy exterior and a fresh, crunchy interior, they are sure to be a hit with guests.
Making these spring rolls is quite simple, even for beginners! They can be prepared ahead of time, allowing you to enjoy your event without stress. Serve them with a dipping sauce for that extra zing!

Ingredients
- 1 cup shredded carrots
- 1 cup sliced bell peppers (any color)
- 1 cup shredded cabbage
- 1/2 cup chopped green onions
- 1 tablespoon soy sauce
- 1 tablespoon sesame oil
- 1 package spring roll wrappers
- Vegetable oil for frying
Instructions
- Prepare the Filling: In a large bowl, combine carrots, bell peppers, cabbage, green onions, soy sauce, and sesame oil. Mix well to combine.
- Wrap the Rolls: Take a spring roll wrapper and place a spoonful of the vegetable mixture in the center. Fold the sides over the filling and roll tightly, sealing the edges with a little water.
- Fry the Spring Rolls: Heat vegetable oil in a frying pan over medium heat. Fry the spring rolls in batches until golden brown and crispy, about 3-4 minutes per side. Drain on paper towels.
- Serve: Arrange the crispy spring rolls on a platter and enjoy with your favorite dipping sauce, like sweet chili or soy sauce.
Savory Phyllo Cups with Spinach and Feta
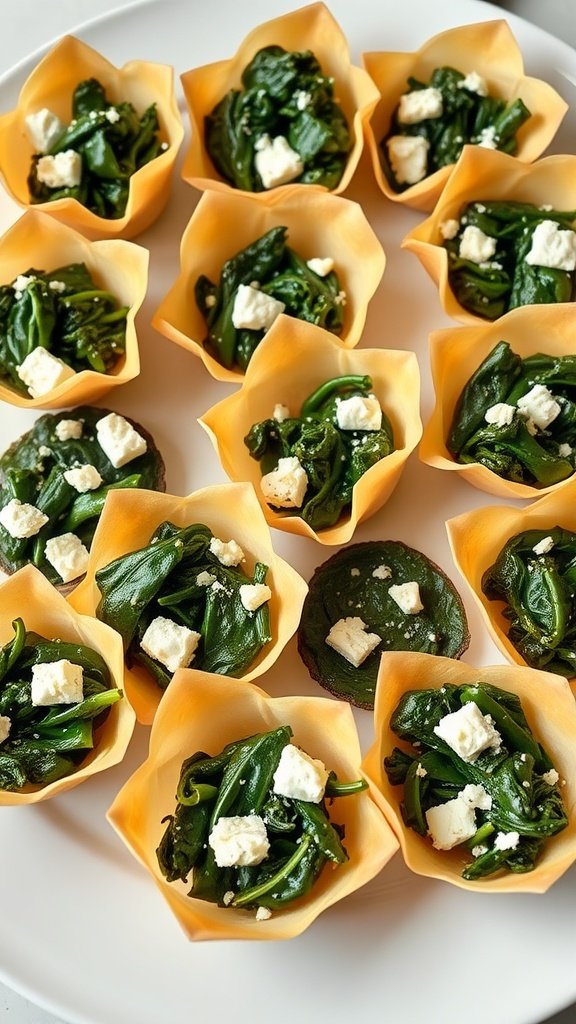
Savory phyllo cups filled with spinach and feta are a delightful addition to any upscale gathering. These bite-sized treats feature flaky, crispy shells that perfectly complement the rich, creamy filling of sautéed spinach and tangy feta cheese. They are not only tasty but also simple to prepare, making them a go-to choice for party hosts looking to impress their guests.
The combination of fresh spinach and feta creates a savory flavor profile that is both satisfying and light. Whether served as an appetizer or a part of a luxurious buffet, these phyllo cups are sure to be a hit. Here’s how to whip up this delicious recipe!
Ingredients
- 20 sheets of phyllo dough
- 1 cup fresh spinach, chopped
- 1 cup feta cheese, crumbled
- 1 tablespoon olive oil
- 2 cloves garlic, minced
- Salt and pepper to taste
- 1 egg, beaten (for egg wash)
Instructions
- Preheat the oven to 375°F (190°C).
- In a skillet, heat the olive oil over medium heat. Add minced garlic and sauté for about a minute until fragrant.
- Stir in the chopped spinach, cooking until wilted. Season with salt and pepper, then remove from heat and let cool slightly.
- Meanwhile, prepare the phyllo dough. Layer 4 sheets together, brushing each layer with a bit of melted butter or olive oil. Cut the stacked sheets into squares.
- Press each square into a greased muffin tin, forming cups.
- In a mixing bowl, combine the sautéed spinach with crumbled feta. Spoon the mixture into the phyllo cups.
- Brush the edges of the phyllo cups with the beaten egg for a golden finish.
- Bake for 15-20 minutes or until the phyllo is crispy and golden brown.
- Remove from the oven and allow to cool slightly before serving.
Chocolate-Dipped Strawberry Popcorn

Chocolate-Dipped Strawberry Popcorn combines the light crunch of popcorn with the rich sweetness of chocolate and the fresh burst of strawberries. This delightful treat is not only visually appealing but also brings together a mix of textures and flavors that will impress your guests. Plus, it’s super easy to whip up, making it a perfect choice for upscale gatherings.
This recipe elevates traditional popcorn to a gourmet snack with minimal effort. The chocolate adds a luxurious touch while the strawberries give a refreshing contrast. It’s an irresistible finger food that everyone will love!
Ingredients
- 4 cups popped popcorn
- 1 cup milk chocolate chips
- 1 cup white chocolate chips
- 1/2 cup crushed freeze-dried strawberries
- Fresh strawberries, for garnish
- Sprinkles (optional)
Instructions
- Prepare the Popcorn: Start by popping the popcorn using your preferred method. Make sure to remove any unpopped kernels.
- Melt the Chocolate: In two separate bowls, melt the milk chocolate and white chocolate chips in the microwave, heating in 30-second intervals until smooth.
- Coat the Popcorn: Drizzle the melted milk chocolate over the popcorn, tossing gently to coat. Repeat with the white chocolate for added flavor and color.
- Add Strawberry Flavor: Sprinkle the crushed freeze-dried strawberries over the chocolate-coated popcorn while it’s still warm. This will help them stick.
- Garnish: Transfer the popcorn to a serving bowl and garnish with fresh strawberries and optional sprinkles for a festive touch. Let it cool and set before serving.
Gourmet Cheese Board with Fruits and Nuts
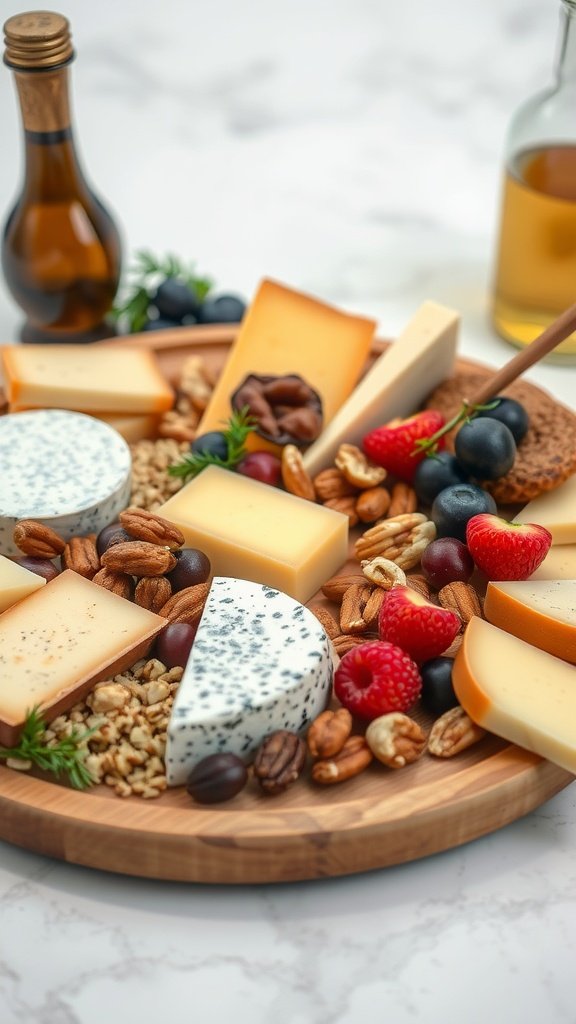
A gourmet cheese board is a delightful addition to any upscale gathering. It brings together a variety of flavors and textures that cater to different tastes. The combination of rich cheeses, fresh fruits, and crunchy nuts creates a balanced and satisfying experience. Plus, it’s easy to assemble, making it a stress-free option for entertaining.
The beauty of a cheese board lies in its versatility. You can mix and match different cheeses, from creamy brie to sharp cheddar, and pair them with seasonal fruits like berries or grapes. A sprinkle of nuts adds an extra crunch, while a drizzle of honey or a splash of balsamic vinegar enhances the overall taste. This recipe will guide you in crafting your own stunning cheese board that will impress your guests.
Ingredients
- 3 types of cheese (such as cheddar, brie, and blue cheese)
- 1 cup assorted fresh fruits (like strawberries, grapes, and blueberries)
- 1 cup mixed nuts (such as almonds, walnuts, and pecans)
- 1/2 cup honey or fig jam
- 1 baguette or assorted crackers
- Olive oil for drizzling
Instructions
- Prepare the Cheese: Cut the cheeses into varying shapes and sizes to create visual interest on the board.
- Arrange the Board: Start by placing the larger cheese pieces first, then fill in with fruits and nuts around them. Use small bowls for honey or jam to keep things neat.
- Add Breads and Crackers: Slice the baguette and arrange it near the cheeses. Scatter the crackers throughout the board for easy access.
- Finish with a Drizzle: Just before serving, drizzle olive oil over the board for an added touch of flavor.