Hosting a playdate? Keeping little hands and faces clean can be a challenge, but with these 11 mess-free finger food recipes, you’ll have tasty options that kids will love without the chaos. From simple snacks to tasty bites, these ideas are designed to keep the fun going while minimizing cleanup, making your gathering stress-free and enjoyable.
Peanut Butter Banana Roll-Ups
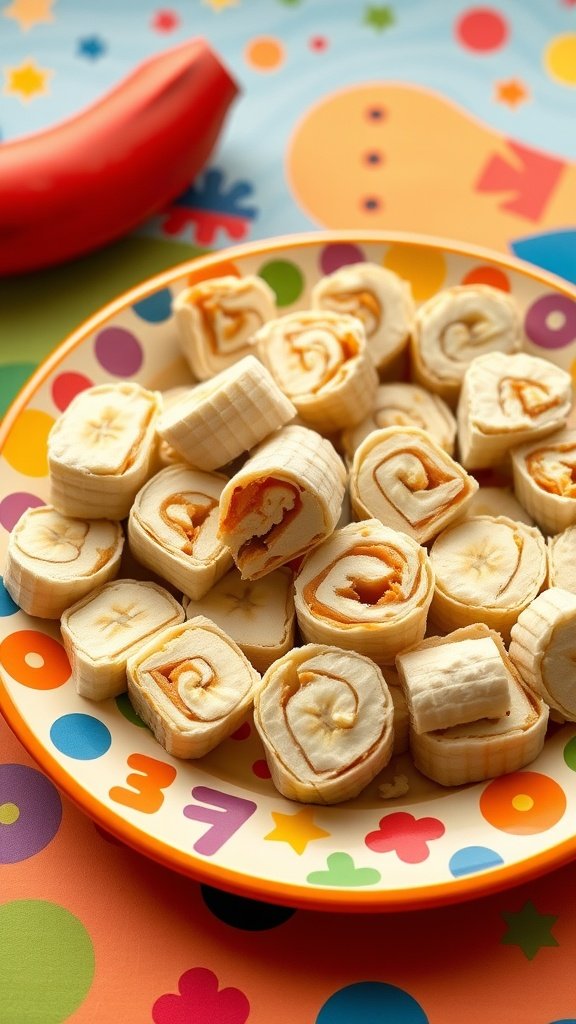
Peanut Butter Banana Roll-Ups are a delightful and simple snack that’s perfect for playdates. This recipe combines the sweetness of bananas with the creamy richness of peanut butter, creating a tasty treat that’s not only enjoyable to eat but also easy to prepare.
Kids will love the fun of rolling up their snacks, and you’ll appreciate how quickly they come together. These roll-ups are nutritious, satisfying, and mess-free, making them an ideal choice for little hands to dig into.
Ingredients
- 2 large tortillas
- 1/2 cup peanut butter
- 2 bananas
- 1/4 cup honey (optional)
- 1/4 cup mini chocolate chips (optional)
Instructions
- Spread peanut butter evenly over each tortilla.
- Place a banana at one edge of the tortilla and roll it up tightly.
- If desired, drizzle honey over the banana before rolling for added sweetness.
- For a fun twist, sprinkle mini chocolate chips inside before rolling.
- Slice the rolled tortillas into bite-sized pieces and serve immediately.
Apple Slices with Yogurt Dip
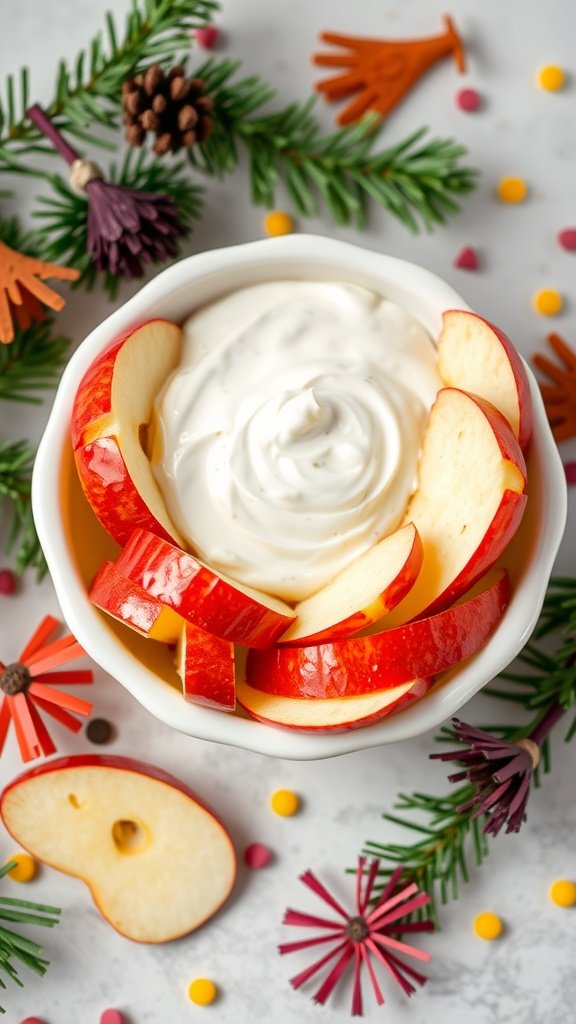
Apple slices with yogurt dip are a delightful and simple treat that kids will love. The crunchy sweetness of fresh apples pairs perfectly with a creamy, tangy yogurt dip, making it a tasty snack for playdates. This combination is not only light and refreshing but also offers a healthy option to satisfy those mid-afternoon cravings.
The yogurt dip can easily be customized with various flavors, such as honey or cinnamon, to suit different tastes. Plus, it’s a quick recipe that requires minimal preparation, ensuring your little ones can enjoy their snack without any mess. Perfect for little hands!
Ingredients
- 2 large apples, sliced
- 1 cup plain yogurt (Greek or regular)
- 2 tablespoons honey or maple syrup
- 1/2 teaspoon vanilla extract
- Cinnamon (optional, for sprinkling)
Instructions
- Prepare the Yogurt Dip: In a bowl, mix the yogurt, honey (or maple syrup), and vanilla extract until well combined.
- Slice the Apples: Core and slice the apples into wedges or rounds, keeping the skin on for added texture.
- Serve: Arrange the apple slices on a plate and serve with the yogurt dip in the center. Sprinkle with cinnamon if desired.
Fruit and Cheese Kabobs
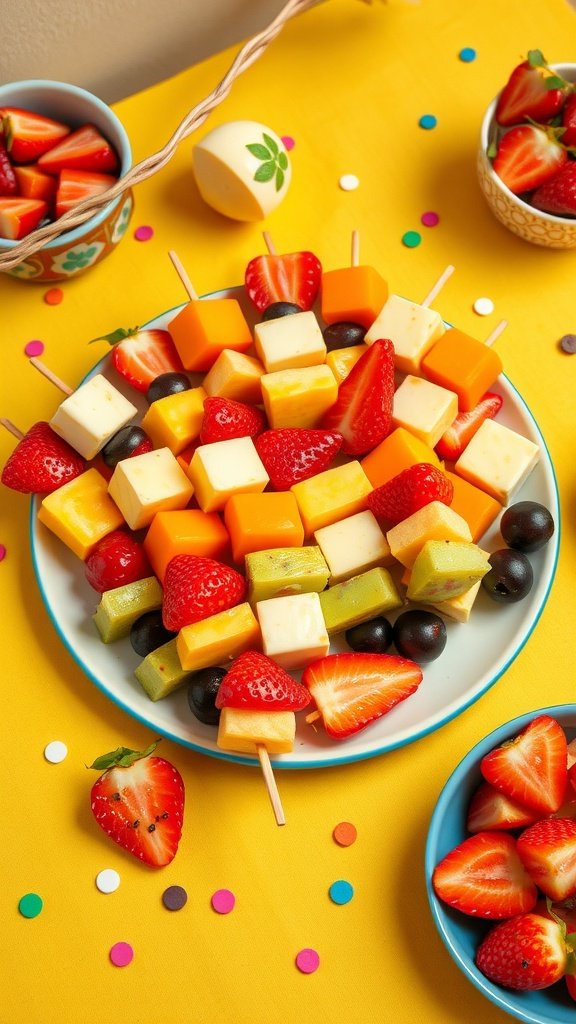
Fruit and cheese kabobs are a fun and colorful way to enjoy a snack that’s both tasty and nutritious. They combine the sweetness of fresh fruit with the creamy, savory flavors of cheese, making them a hit for playdates. Plus, they’re super easy to assemble, which means fewer messes and more time for play!
This recipe allows for endless creativity; you can mix and match your favorite fruits and cheeses. Whether you opt for strawberries, grapes, or melon paired with cheddar or mozzarella, these kabobs are sure to please little palates. They’re great for kids to eat with their hands, making them the perfect finger food!
Ingredients
- 1 cup strawberries, hulled
- 1 cup green grapes
- 1 cup cubed cheddar cheese
- 1 cup cubed mozzarella cheese
- 1 cup cantaloupe, cubed
- Wooden skewers or toothpicks
Instructions
- Prepare the Ingredients: Wash and prepare all the fruit. Cut the cheeses into bite-sized cubes.
- Assemble the Kabobs: Take a skewer and alternate threading the fruits and cheese cubes. You can follow any pattern you like!
- Serve: Once all the kabobs are assembled, place them on a platter and enjoy immediately or refrigerate until ready to serve.
Mini Veggie Pizzas on Cucumber Slices
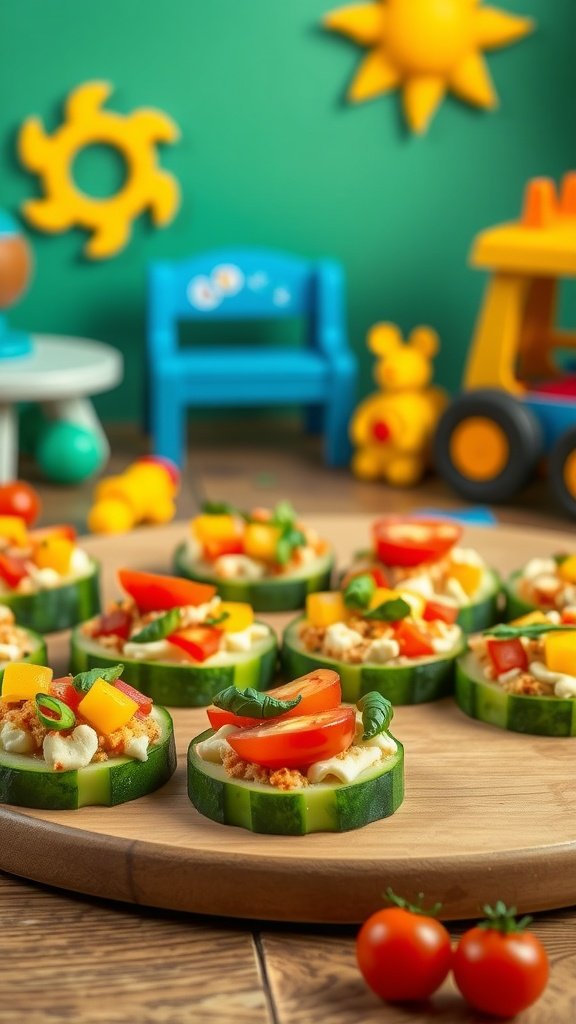
These mini veggie pizzas are a delightful twist on the classic dish, offering a fresh and crunchy base that kids will love. Using cucumber slices instead of traditional crust, they are not only fun to eat, but also packed with flavor. The combination of creamy cheese, colorful veggies, and herbs creates a satisfying bite that’s sure to please everyone at your playdate.
Simple to prepare, these finger foods can easily be customized based on your child’s favorite toppings. They’re perfect for little hands and make for a mess-free snack that encourages healthy eating. Try them at your next gathering, and watch as they quickly disappear!
Ingredients
- 1 large cucumber
- 1/2 cup cream cheese (or any spreadable cheese)
- 1/4 cup diced bell peppers (any color)
- 1/4 cup diced cherry tomatoes
- 1/4 cup shredded carrots
- Fresh basil or parsley for garnish
- Salt and pepper to taste
Instructions
- Slice the cucumber into thick rounds, about 1/2 inch each.
- Spread a layer of cream cheese on top of each cucumber slice.
- Top with diced bell peppers, cherry tomatoes, and shredded carrots.
- Season with a sprinkle of salt and pepper.
- Garnish with fresh basil or parsley leaves.
- Serve immediately and enjoy!
Cheesy Risotto Balls

Cheesy risotto balls are a delightful finger food that combines the creamy texture of risotto with the satisfying crunch of a golden outer layer. These little bites are not only tasty but also easy to make, making them a perfect addition to any playdate. With savory cheese and herbs, they deliver a burst of flavor in every bite, enticing both kids and adults alike.
Baking instead of frying makes these risotto balls a healthier option while still keeping them deliciously crispy. Serve them with a side of marinara or your favorite dipping sauce for an extra kick. They’ll disappear quickly, leaving everyone wanting more!
Ingredients
- 2 cups cooked risotto
- 1 cup shredded mozzarella cheese
- 1/4 cup grated Parmesan cheese
- 1/2 cup breadcrumbs
- 1 large egg
- 1 tablespoon chopped fresh parsley
- 1 teaspoon garlic powder
- Salt and pepper to taste
- Olive oil spray (for baking)
Instructions
- Preheat the oven to 400°F (200°C) and line a baking sheet with parchment paper.
- In a mixing bowl, combine the cooked risotto, mozzarella, Parmesan, breadcrumbs, egg, parsley, garlic powder, salt, and pepper. Mix well until combined.
- With your hands, form the mixture into small balls, about the size of a golf ball. Place them on the prepared baking sheet.
- Lightly spray the risotto balls with olive oil to help them crisp up during baking.
- Bake for 20-25 minutes or until golden brown and crispy on the outside. Serve warm with your favorite dipping sauce.
Savory Spinach and Cheese Bites

These savory spinach and cheese bites are a delightful finger food that’s perfect for playdates. With a fluffy texture and cheesy flavor, they’re sure to please both kids and adults alike. Plus, they’re easy to whip up, making them an ideal choice for those busy days when you want something tasty without spending hours in the kitchen.
The combination of fresh spinach and melty cheese offers a wonderful savory taste, while the bite-sized portions ensure they’re mess-free and easy to grab. Serve them warm, and watch your guests enjoy every last morsel!
Ingredients
- 2 cups fresh spinach, chopped
- 1 cup shredded cheese (cheddar or mozzarella)
- 4 large eggs
- 1/2 cup milk
- 1/2 cup flour
- 1 teaspoon baking powder
- Salt and pepper to taste
Instructions
- Preheat your oven to 375°F (190°C) and grease a muffin tin.
- In a large bowl, whisk together the eggs and milk until well combined.
- Add the flour, baking powder, salt, and pepper, mixing until smooth.
- Fold in the chopped spinach and shredded cheese until evenly distributed.
- Pour the mixture into the prepared muffin tin, filling each cup about three-quarters full.
- Bake for 15-20 minutes or until the bites are puffed and golden on top.
- Let them cool slightly before removing from the tin and serve warm. Enjoy!
Mini Meatball Sliders
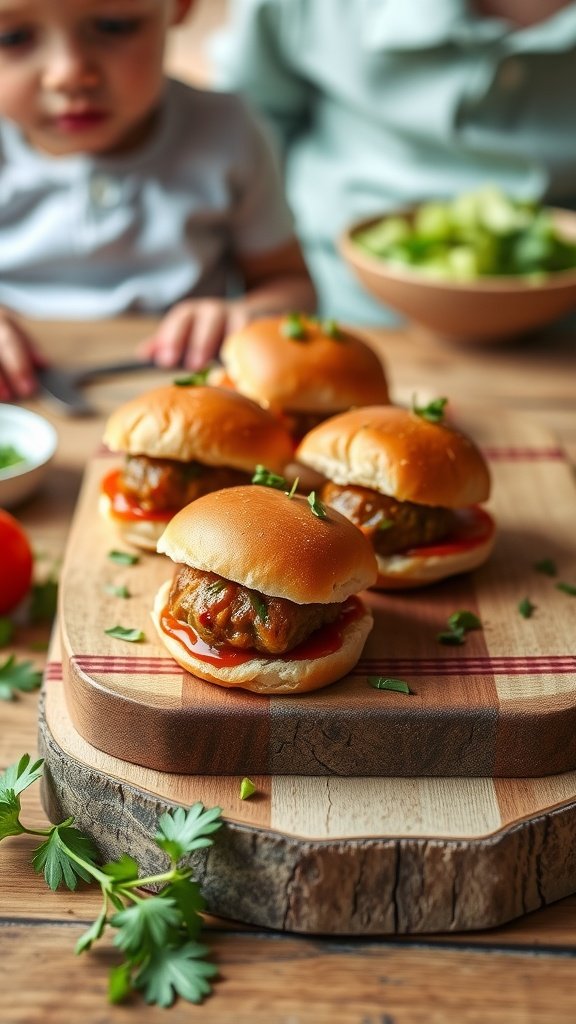
Mini meatball sliders are a tasty treat that everyone will love. They are simple to make and packed with flavor, making them a hit for playdates or family gatherings. With juicy meatballs nestled between soft slider buns, these bites are perfect for little hands to grab and enjoy!
Add your favorite sauces and toppings for a personal touch. Whether it’s a classic ketchup or a bit of cheese, these sliders can be customized to suit every palate. Plus, they’re mess-free and fun to eat, making them a fantastic addition to your playdate menu.
Ingredients
- 1 pound ground beef (or turkey)
- 1/4 cup breadcrumbs
- 1/4 cup grated Parmesan cheese
- 1 large egg
- 1 teaspoon garlic powder
- 1 teaspoon onion powder
- 1 teaspoon Italian seasoning
- Salt and pepper to taste
- 12 small slider buns
- Ketchup and mustard for serving
Instructions
- Preheat your oven to 400°F (200°C). Line a baking sheet with parchment paper.
- In a large bowl, combine ground beef, breadcrumbs, Parmesan, egg, garlic powder, onion powder, Italian seasoning, salt, and pepper. Mix until just combined.
- Shape the mixture into small meatballs, about 1 inch in diameter, and place them on the prepared baking sheet.
- Bake for 15-20 minutes, or until the meatballs are cooked through and browned.
- Assemble the sliders by placing a meatball in each slider bun. Add ketchup and mustard as desired, then serve and enjoy!
Homemade Hummus with Veggie Sticks
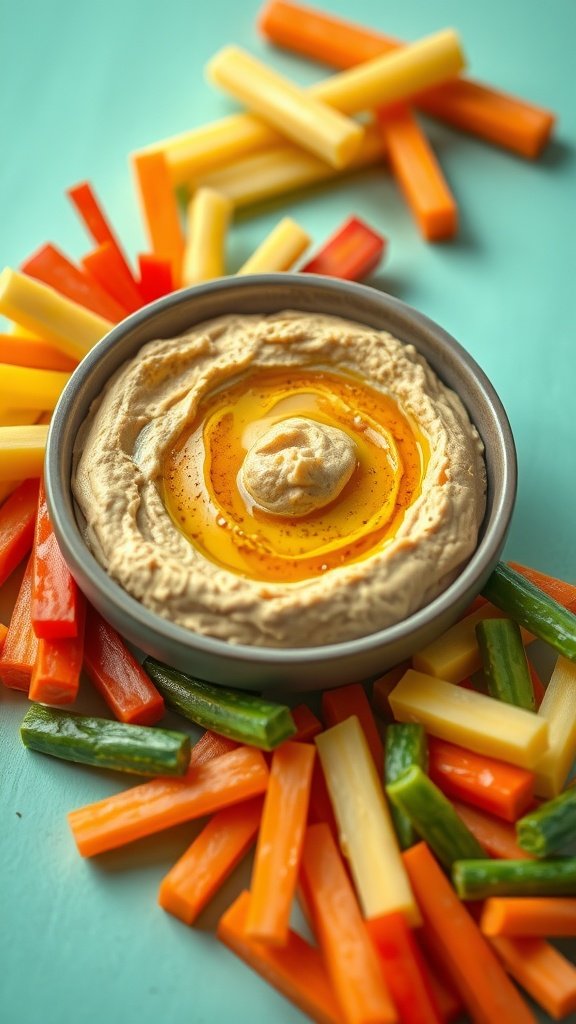
Homemade hummus is a delightful blend of creamy chickpeas, tahini, and a splash of lemon juice, making it both nutritious and flavorful. The taste is rich and savory, with a hint of zest from the lemon, making it an appealing snack for kids and adults alike. Plus, it’s super simple to whip up, and you can customize it with your favorite spices or add-ins!
Pair it with colorful veggie sticks like carrots, cucumbers, and bell peppers for a fun, mess-free finger food. This combination not only looks enticing but also makes for a healthy treat that kids will enjoy munching on during playdates.
Ingredients
- 1 can (15 oz) chickpeas, drained and rinsed
- 1/4 cup tahini
- 2 tablespoons olive oil
- 2 tablespoons lemon juice
- 1 garlic clove, minced
- 1/2 teaspoon cumin
- Salt to taste
- Water, as needed
- Vegetable sticks (carrots, celery, bell peppers, cucumbers)
Instructions
- Blend the Ingredients: In a food processor, combine the chickpeas, tahini, olive oil, lemon juice, garlic, cumin, and salt. Blend until smooth.
- Adjust Consistency: If the hummus is too thick, add water a tablespoon at a time until you reach your desired consistency.
- Taste and Adjust: Taste your hummus and adjust the seasoning to your liking. You can add more lemon juice or salt if desired.
- Serve: Transfer the hummus to a bowl, drizzle with a bit of olive oil, and serve it with an assortment of fresh veggie sticks.
Baked Sweet Potato Fries
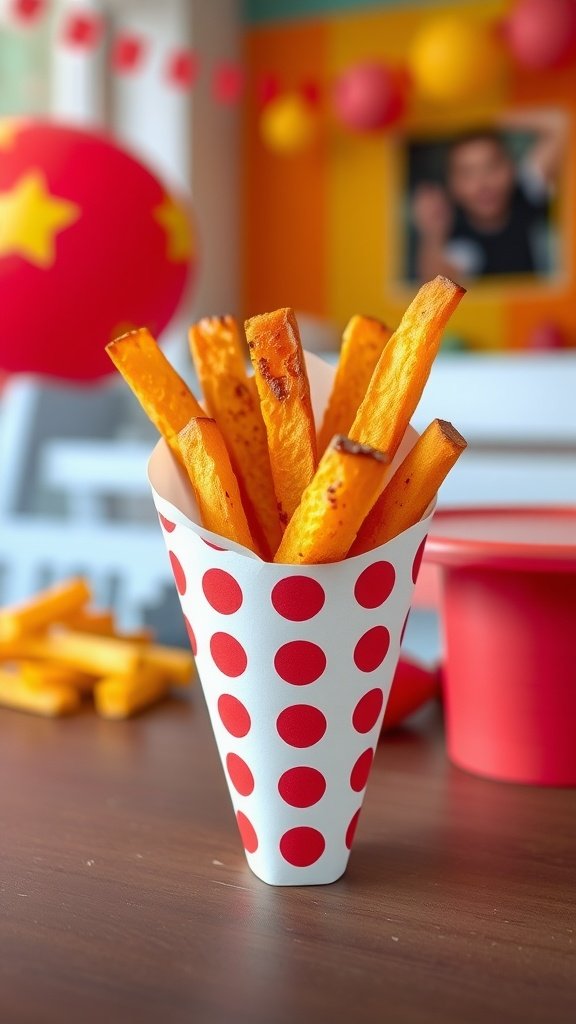
Baked sweet potato fries are a delightful twist on traditional potato fries, offering a naturally sweet flavor and a satisfying crunch. They’re easy to make and perfect for little hands during playdates, providing a healthier alternative that kids will love.
With just a few simple ingredients, you can whip up a batch in no time. These fries are not only tasty but also packed with nutrients, making them a great snack for both kids and adults. Pair them with a dip for an extra fun experience!
Ingredients
- 2 large sweet potatoes
- 2 tablespoons olive oil
- 1 teaspoon paprika
- 1/2 teaspoon garlic powder
- 1/2 teaspoon salt
- 1/4 teaspoon black pepper

Instructions
- Preheat the Oven: Preheat your oven to 425°F (220°C).
- Prepare the Sweet Potatoes: Peel the sweet potatoes and cut them into fry shapes, about 1/4 inch thick.
- Toss with Seasonings: In a large bowl, combine the sweet potato fries with olive oil, paprika, garlic powder, salt, and pepper. Toss until evenly coated.
- Spread on a Baking Sheet: Arrange the fries in a single layer on a baking sheet lined with parchment paper, making sure they aren’t overcrowded.
- Bake: Bake for 25-30 minutes, flipping halfway through, until they are golden and crispy.
- Serve: Let them cool slightly, then serve with your favorite dip!
Tortilla Pinwheels with Cream Cheese

Tortilla pinwheels are a fun and tasty finger food that’s perfect for playdates. These delightful bites combine soft tortillas with creamy cheese and fresh veggies, creating a satisfying snack that kids love. They’re easy to make and can be customized with your favorite fillings, making them versatile and enjoyable for everyone.
With a smooth cream cheese base, crunchy vegetables, and a hint of flavor, these pinwheels are not only delicious but also visually appealing. They make for a great addition to any gathering, allowing kids to enjoy their snacks without the mess. Plus, they can be prepared in advance, saving you time on the day of the playdate.
Ingredients
- 4 large tortillas
- 8 oz cream cheese, softened
- 1/2 cup diced bell peppers (red, green, or yellow)
- 1/2 cup shredded carrots
- 1/4 cup sliced olives (optional)
- 1/2 cup shredded cheese (cheddar or mozzarella)
- 1/4 teaspoon garlic powder (optional)
Instructions
- Spread a layer of softened cream cheese evenly over each tortilla.
- Sprinkle the diced bell peppers, shredded carrots, olives, and shredded cheese evenly on top of the cream cheese.
- For added flavor, sprinkle garlic powder over the fillings if desired.
- Starting from one end, tightly roll the tortilla up into a log.
- Slice the rolled tortillas into bite-sized pinwheels.
- Arrange the pinwheels on a platter and serve fresh, or refrigerate until ready to serve.
Chocolate Avocado Mousse Cups
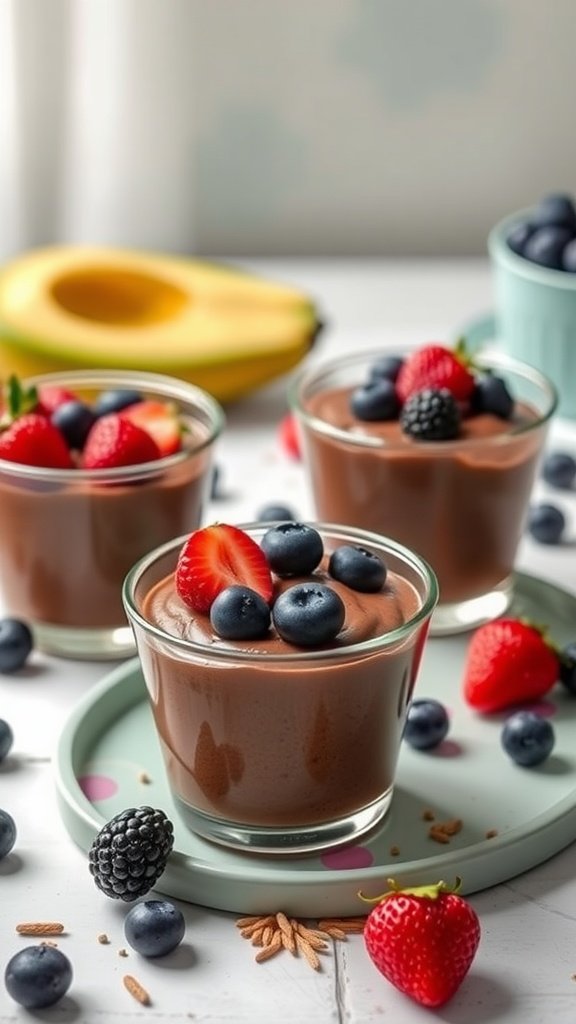
Chocolate avocado mousse cups are a delightful treat that combines creamy texture with rich chocolate flavor. This recipe is simple to prepare and perfect for playdates, offering a healthier twist on traditional desserts. Kids will love the chocolatey taste, while parents will appreciate the nutritious ingredients.
The main star here is the avocado, which provides a smooth consistency without the need for heavy creams or sugars. Topped with fresh fruits like strawberries and blueberries, these mousse cups are not just delicious, but visually appealing too. They are sure to be a hit!
Ingredients
- 2 ripe avocados
- 1/2 cup unsweetened cocoa powder
- 1/4 cup honey or maple syrup
- 1/4 cup almond milk (or any milk of choice)
- 1 teaspoon vanilla extract
- Fresh berries for topping
- Mint leaves (optional, for garnish)
Instructions
- Prepare the Avocados: Cut the avocados in half, remove the pit, and scoop the flesh into a blender.
- Add Ingredients: Add cocoa powder, honey (or maple syrup), almond milk, and vanilla extract to the blender.
- Blend Until Smooth: Blend all the ingredients until you have a creamy and smooth mixture. Scrape down the sides as needed.
- Chill: Spoon the mousse into small cups and refrigerate for at least 30 minutes to firm up.
- Serve: Top with fresh berries and mint leaves before serving for a burst of color and flavor.