If you’re tired of the same old lunchbox options and want to shake things up, look no further! Here are 10 tasty and healthy finger food recipes that are perfect for lunchboxes. These dishes are easy to prepare and packed with nutrients, making them great for both kids and adults on the go. Check them out and give your lunch a fun twist!
Savory Sweet Potato Bites

Savory sweet potato bites are a delicious and healthy option for lunchboxes. These bites combine the natural sweetness of sweet potatoes with savory spices, making them a tasty treat that both kids and adults will love. They are easy to prepare, baked until tender, and can be enjoyed warm or cold, making them perfect for on-the-go meals.
With their vibrant color and satisfying texture, these bites are not only visually appealing but also packed with nutrients. They are a great way to introduce more vegetables into your diet while keeping lunch fun and exciting. Try these sweet potato bites for a nutritious snack that will give you energy throughout the day.
Ingredients
- 2 large sweet potatoes
- 2 tablespoons olive oil
- 1 teaspoon paprika
- 1 teaspoon garlic powder
- 1/2 teaspoon salt
- 1/4 teaspoon black pepper
- Fresh herbs (like parsley or cilantro) for garnish
Instructions
- Preheat the oven to 400°F (200°C).
- Peel the sweet potatoes and slice them into thin rounds, about 1/4 inch thick.
- In a bowl, combine olive oil, paprika, garlic powder, salt, and black pepper. Toss the sweet potato slices in the mixture until evenly coated.
- Arrange the coated sweet potato slices on a baking sheet lined with parchment paper.
- Bake for 20-25 minutes, flipping halfway through, until the sweet potatoes are tender and starting to crisp.
- Remove from the oven and let cool slightly. Garnish with fresh herbs before serving.
Zucchini Cheese Fritters

These zucchini cheese fritters are a delightful treat for lunchboxes, bringing a crispy texture and cheesy flavor that kids will love. Packed with shredded zucchini and cheese, they make for a tasty finger food that’s easy to eat on the go. Plus, they’re simple to whip up, making them a perfect choice for busy days.
Not only are these fritters delicious, but they’re also a great way to sneak some veggies into your child’s meal. Serve them with a tasty dipping sauce for an extra punch of flavor. They can be enjoyed warm or cold, making them versatile for any lunchbox.
Ingredients
- 2 medium zucchinis, grated
- 1 cup shredded cheese (cheddar or mozzarella)
- 1/2 cup all-purpose flour
- 2 large eggs
- 1/4 teaspoon garlic powder
- 1/4 teaspoon onion powder
- Salt and pepper, to taste
- Olive oil, for frying
Instructions
- Prepare the Zucchini: Place the grated zucchini in a clean towel and squeeze out excess moisture.
- Mix Ingredients: In a large bowl, combine the zucchini, cheese, flour, eggs, garlic powder, onion powder, salt, and pepper. Mix until well combined.
- Heat Oil: In a large skillet, heat a few tablespoons of olive oil over medium heat.
- Cook Fritters: Scoop tablespoons of the mixture into the skillet, flattening them slightly. Cook for about 3-4 minutes on each side, or until golden brown.
- Drain: Remove fritters and place them on a paper towel to drain any excess oil before serving.
Turkey and Cheese Roll-Ups

Turkey and cheese roll-ups are a delightful and nutritious option for lunchboxes. They combine flavors that kids love while being quick and easy to prepare. The creamy cheese pairs perfectly with the savory turkey, all wrapped in fresh spinach leaves for a satisfying crunch.
This recipe is not only simple to make but also offers versatility. Swap in different ingredients like hummus or veggies to cater to your child’s preferences. These roll-ups are a hit for both kids and parents, making them a staple in the world of healthy finger foods.
Ingredients
- 4 slices of turkey breast
- 4 slices of cheese (your choice)
- 1 cup fresh spinach leaves
- Toothpicks or small skewers
Instructions
- Lay a slice of turkey flat on a clean surface.
- Place a slice of cheese on top of the turkey.
- Add a few spinach leaves on top of the cheese.
- Starting from one end, roll the turkey and cheese tightly into a cylinder.
- Secure the roll with a toothpick. Repeat with the remaining ingredients.
- Slice the roll-ups in half if desired, and serve!
Whole Wheat Pita Pockets with Hummus
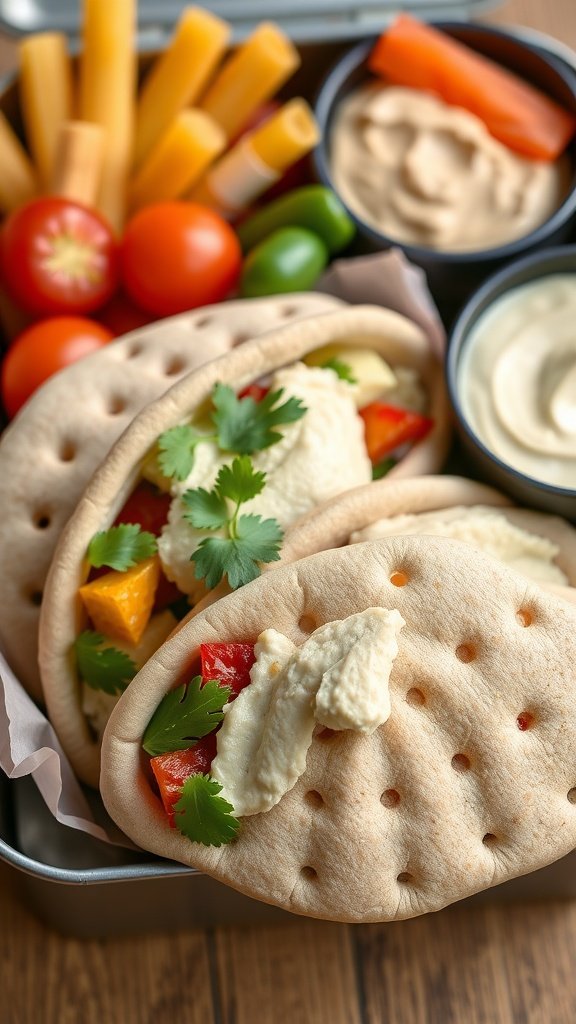
Whole Wheat Pita Pockets with Hummus are a delightful and nutritious option for lunchboxes. They are easy to prepare and customizable, making them a favorite among kids and adults alike. The whole wheat pitas provide a hearty base, while the creamy hummus adds a rich flavor that pairs beautifully with fresh veggies. You’ll love how quick it is to whip these up, ensuring a healthy meal that’s satisfying and full of taste.
These pita pockets can be filled with a variety of colorful vegetables, making them not only delicious but also visually appealing. Whether you’re packing them for a school lunch or a picnic, these pockets are sure to be a hit. Plus, they are part of our collection of 11 Healthy Finger Foods Recipes for Lunchboxes, ensuring your family enjoys health without compromising on flavor.
Ingredients
- 4 whole wheat pitas
- 1 cup hummus (store-bought or homemade)
- 1 cucumber, diced
- 1 bell pepper, diced
- 1 medium carrot, grated
- 1 cup cherry tomatoes, halved
- Fresh cilantro or parsley, for garnish
Instructions
- Prepare the Pitas: Carefully cut each whole wheat pita in half to create pockets.
- Spread Hummus: Generously spread hummus inside each pita pocket.
- Fill with Vegetables: Add diced cucumber, bell pepper, grated carrot, and halved cherry tomatoes into the pockets.
- Garnish: Top with fresh cilantro or parsley for added flavor and color.
- Serve: Enjoy immediately or pack them in lunchboxes for later!
Veggie-Loaded Mini Quiches

Veggie-loaded mini quiches are a delightful and nutritious addition to any lunchbox. Packed with colorful vegetables and a rich, creamy filling, these bite-sized treats are perfect for both kids and adults. They offer a wonderful combination of flavors and textures, making them a crowd-pleaser at any meal.
The best part? They are incredibly easy to make! You can whip these up in no time, and they are customizable to suit your taste. Whether you prefer spinach, bell peppers, or mushrooms, feel free to mix and match your favorite veggies for a personal touch.
Ingredients
- 6 large eggs
- 1 cup milk
- 1 cup shredded cheese (cheddar, mozzarella, or your choice)
- 1 cup chopped vegetables (bell peppers, spinach, onions, etc.)
- 1 teaspoon salt
- 1/2 teaspoon black pepper
- 1/2 teaspoon garlic powder
- 1 package of pre-made pastry dough or mini phyllo cups
Instructions
- Preheat the oven to 375°F (190°C) and grease a muffin tin if using.
- In a mixing bowl, whisk together the eggs, milk, salt, pepper, and garlic powder until well combined.
- Stir in the chopped vegetables and shredded cheese.
- If using pastry dough, roll it out and cut into circles to fit into the muffin tin. If using phyllo cups, place them directly into the tin.
- Fill each cup with the egg mixture, being careful not to overfill.
- Bake for 20-25 minutes, or until the quiches are set and lightly golden on top.
- Allow them to cool slightly before removing them from the muffin tin.
- Enjoy warm or let them cool completely before packing in lunchboxes!
Chickpea Salad Lettuce Wraps
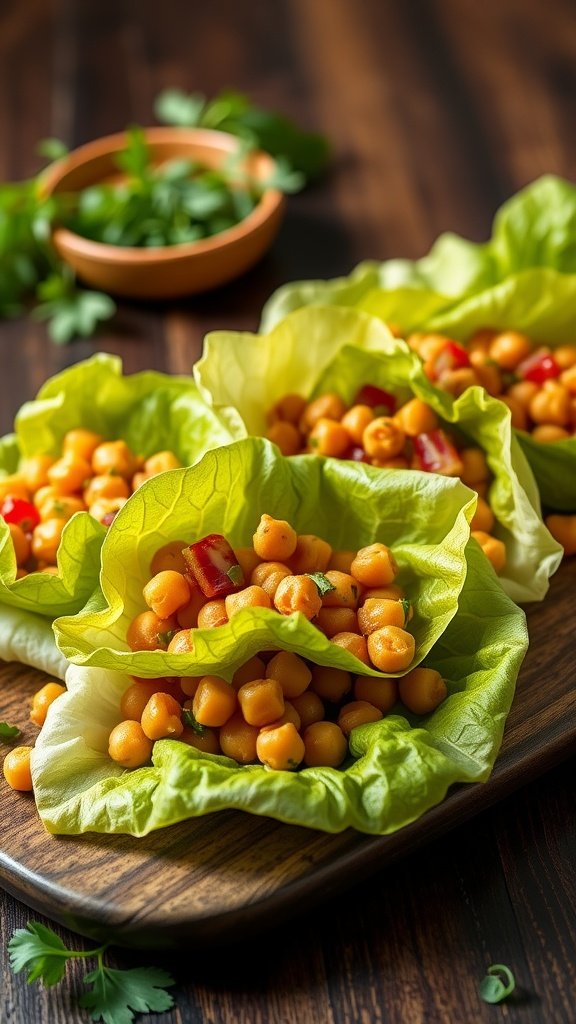
Chickpea salad lettuce wraps are a light and refreshing option for lunchboxes. They combine the earthy flavor of chickpeas with crunchy vegetables and fresh herbs, all wrapped up in crisp lettuce leaves. Perfect for those looking for a healthy finger food, these wraps are not only simple to make but also packed with protein and fiber, making them both satisfying and nutritious.
The mix of flavors and textures makes each bite delightful. You can easily customize the salad to suit your taste, adding your favorite spices or veggies. Plus, they are a fun way to enjoy a salad on the go!
Ingredients
- 1 can (15 oz) chickpeas, drained and rinsed
- 1/2 cup diced cucumber
- 1/2 cup diced bell pepper
- 1/4 cup finely chopped red onion
- 1/4 cup chopped fresh cilantro or parsley
- 2 tablespoons olive oil
- 1 tablespoon lemon juice
- Salt and pepper to taste
- Large lettuce leaves (like romaine or butter lettuce)
Instructions
- Prepare the Salad: In a large bowl, mash half of the chickpeas slightly with a fork. Add the diced cucumber, bell pepper, red onion, and herbs.
- Mix the Dressing: In a small bowl, whisk together the olive oil, lemon juice, salt, and pepper. Pour over the chickpea mixture and stir until everything is well combined.
- Assemble the Wraps: Lay out the lettuce leaves and spoon the chickpea salad into each leaf. Serve immediately or pack them for lunch.
Fruit and Nut Energy Bites

Fruit and nut energy bites are a delightful blend of flavors and textures, making them a perfect snack for lunchboxes. These little bites are both sweet and savory, offering a satisfying chew with every bite. Plus, they are super easy to make, requiring no baking!
These energy bites are packed with nutrients, thanks to the mix of nuts and dried fruits. They deliver a quick energy boost while being a wholesome choice for kids and adults alike. Enjoy them on the go or as a midday snack to keep cravings at bay!
Ingredients
- 1 cup rolled oats
- 1/2 cup almond butter (or any nut butter)
- 1/3 cup honey or maple syrup
- 1/2 cup mixed nuts (chopped)
- 1/2 cup dried fruits (raisins, cranberries, or apricots)
- 1/4 cup mini chocolate chips (optional)
- 1 teaspoon vanilla extract
- 1/2 teaspoon cinnamon
Instructions
- In a large bowl, mix together the rolled oats, almond butter, and honey until well combined.
- Add in the chopped nuts, dried fruits, chocolate chips (if using), vanilla extract, and cinnamon. Stir until everything is evenly mixed.
- Using your hands, form the mixture into small balls, about 1 inch in diameter.
- Place the energy bites on a baking sheet or plate lined with parchment paper and refrigerate for at least 30 minutes to set.
- Once firm, store in an airtight container in the fridge for up to a week.
Greek Yogurt Parfaits
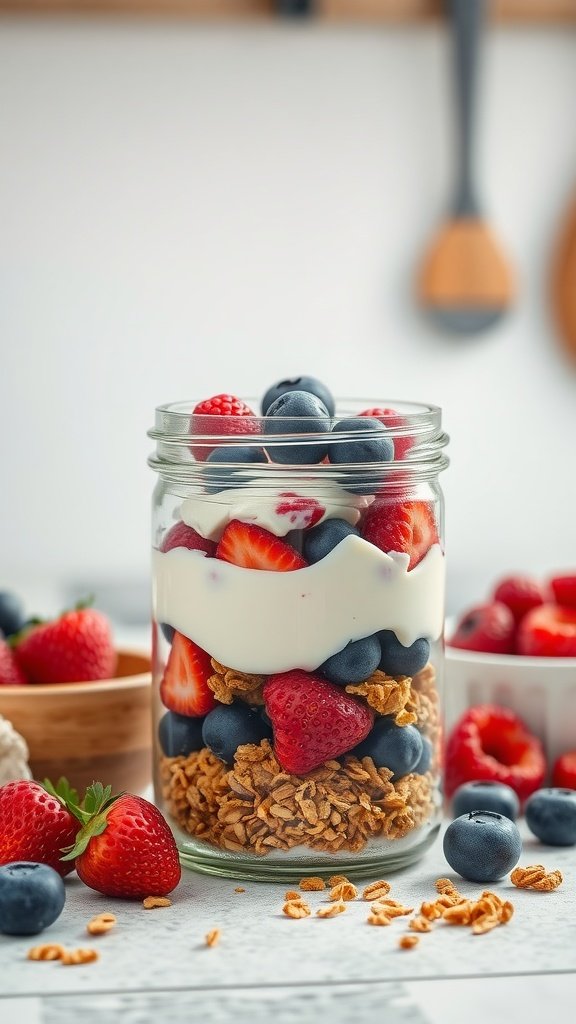
Greek yogurt parfaits are a delightful and healthy choice for lunchboxes. They combine layers of creamy Greek yogurt, crunchy granola, and fresh berries to create a tasty treat that’s both nutritious and satisfying. Not only are they delicious, but they’re also super easy to make, making them perfect for busy days.
The combination of tangy yogurt, sweet fruits, and crunchy textures makes each bite enjoyable. Plus, you can customize these parfaits with your favorite ingredients, ensuring a variety that won’t get boring. Here’s how to whip up your own Greek yogurt parfaits!
Ingredients
- 2 cups Greek yogurt
- 1 cup granola
- 1 cup mixed berries (strawberries, blueberries, raspberries)
- 1 tablespoon honey (optional)
- 1 teaspoon vanilla extract (optional)
Instructions
- Prepare the Yogurt: In a bowl, mix the Greek yogurt with honey and vanilla extract if using. This adds a touch of sweetness and flavor.
- Layer the Ingredients: In a jar or cup, add a layer of granola at the bottom, followed by a layer of the yogurt mixture. Then, add a layer of mixed berries.
- Repeat the Layers: Continue layering the granola, yogurt, and berries until you reach the top of the container. Finish with a few extra berries on top.
- Chill and Serve: Cover the parfaits and place them in the fridge until you’re ready to enjoy. They can be made a few hours ahead, making them perfect for lunchboxes.
Apple Slices with Almond Butter

Apple slices with almond butter offer a refreshing and nutritious snack that’s perfect for lunchboxes. The sweet crunchiness of fresh apples paired with the creamy, nutty flavor of almond butter makes for a delightful combination that kids and adults alike can enjoy. This snack is not only delicious but also simple to prepare, making it an easy choice for busy days.
This finger food is packed with vitamins and healthy fats, providing a great energy boost without the guilt. It’s a fantastic option among the 11 Healthy Finger Foods Recipes for Lunchboxes, ensuring your little ones are satisfied and nourished. Whether it’s a school lunch or a quick after-school snack, apple slices with almond butter are sure to please.
Ingredients
- 2 medium apples (any variety)
- 1/4 cup almond butter
- Optional: honey, cinnamon, or granola for topping
Instructions
- Wash and core the apples, then slice them into thin wedges.
- Arrange the apple slices on a plate or in a lunchbox.
- In a small bowl, place the almond butter, and if desired, drizzle with honey or sprinkle with cinnamon or granola.
- Serve immediately or store in an airtight container in the refrigerator for a quick grab-and-go option.
Caprese Skewers with Balsamic Drizzle
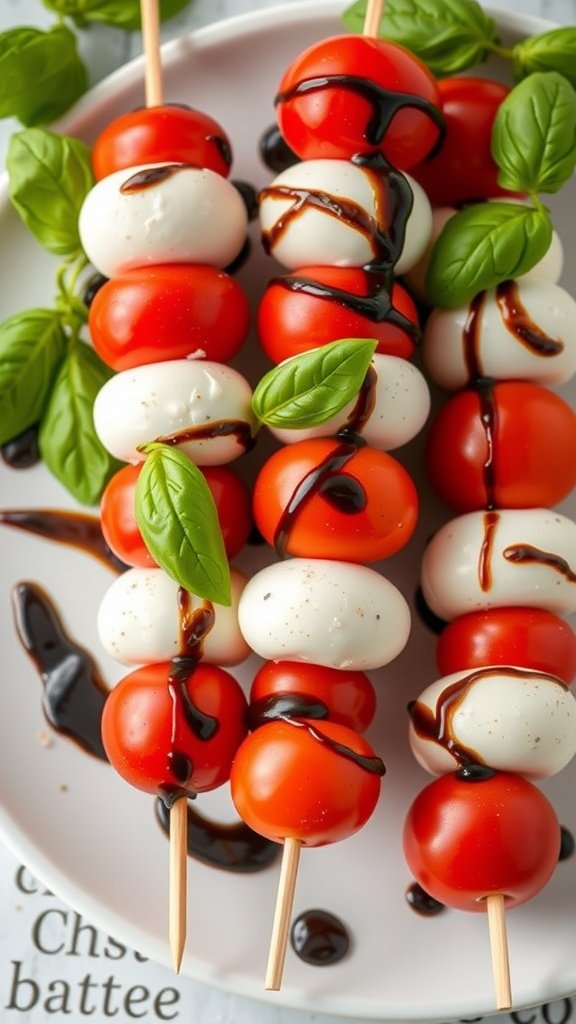
Caprese skewers are a delightful and healthy option that brings the classic Italian salad to a convenient finger food format. These skewers combine juicy cherry tomatoes, creamy mozzarella balls, and fresh basil, all drizzled with a tangy balsamic reduction. The combination of flavors is refreshing and perfect for lunchboxes or casual gatherings.
Making these skewers is incredibly simple and can be done in just a few minutes. They not only look appealing, but they also taste fantastic, with the sweetness of the tomatoes complementing the richness of the cheese, while the basil adds a fragrant touch. It’s a quick and fun recipe that kids and adults alike will enjoy!
Ingredients
- 1 pint cherry tomatoes
- 1 pound mozzarella balls (bocconcini)
- Fresh basil leaves
- 1/4 cup balsamic vinegar
- 1 tablespoon honey
- Salt and pepper to taste
- Skewers (6-inch or 8-inch)
Instructions
- Make the Balsamic Drizzle: In a small saucepan, combine balsamic vinegar and honey. Heat over medium heat until it thickens slightly, about 5-7 minutes. Remove from heat and let it cool.
- Assemble the Skewers: On each skewer, thread a cherry tomato, followed by a basil leaf, and then a mozzarella ball. Repeat this pattern until the skewer is filled, leaving a bit of space at each end.
- Season: Drizzle the skewers with the balsamic reduction. Sprinkle with salt and pepper to taste.
- Serve: Enjoy immediately or pack them in lunchboxes for a fresh, healthy snack!